Redux 核心教程第六部分:性能优化、数据规范化与响应式逻辑
本页面由 PageTurner AI 翻译(测试版)。未经项目官方认可。 发现错误? 报告问题 →
- 如何使用
createSelector创建记忆化选择器函数 - 优化组件渲染性能的模式
- 使用
createEntityAdapter存储和更新规范化数据 - 使用
createListenerMiddleware实现响应式逻辑
- 完成第五部分以理解数据获取流程
简介
在第五部分:异步逻辑与数据获取中,我们学习了如何编写异步 thunk 从服务器 API 获取数据,以及处理异步请求加载状态的模式。
在本节中,我们将探讨确保应用性能优化的最佳模式,以及自动处理 store 中数据常见更新的技术。同时还将学习如何编写响应派发动作的响应式逻辑。
到目前为止,我们的功能主要围绕 posts 特性展开。接下来我们将为应用添加几个新模块。完成这些添加后,我们将审视当前实现的具体细节,讨论现有方案的不足之处,并探索如何改进实现。
扩展用户功能
添加用户页面
当前我们从模拟 API 获取用户列表,在添加新帖子时可选择作者。但社交媒体应用需要能够查看特定用户页面并显示其所有帖子。让我们添加一个展示所有用户的页面,以及另一个显示特定用户所有帖子的页面。
我们将从添加新的 <UsersList> 组件开始。它遵循常见模式:通过 useSelector 从 store 读取数据,遍历数组显示用户列表并链接到各自页面:
import { Link } from 'react-router-dom'

import { useAppSelector } from '@/app/hooks'

import { selectAllUsers } from './usersSlice'

export const UsersList = () => {
  const users = useAppSelector(selectAllUsers)

  const renderedUsers = users.map(user => (
    <li key={user.id}>
      <Link to={`/users/${user.id}`}>{user.name}</Link>
    </li>
  ))

  return (
    <section>
      <h2>Users</h2>

      <ul>{renderedUsers}</ul>
    </section>
  )
}
接着添加 <UserPage> 组件,它类似于 <SinglePostPage>,从路由获取 userId 参数,然后渲染该用户的所有帖子列表。按照常规模式,我们首先在 postsSlice.ts 中添加 selectPostsByUser 选择器:
// omit rest of the file
export const selectPostById = (state: RootState, postId: string) =>
  state.posts.posts.find(post => post.id === postId)

export const selectPostsByUser = (state: RootState, userId: string) => {
  const allPosts = selectAllPosts(state)
  // ❌ This seems suspicious! See more details below
  return allPosts.filter(post => post.user === userId)
}

export const selectPostsStatus = (state: RootState) => state.posts.status
export const selectPostsError = (state: RootState) => state.posts.error
import { Link, useParams } from 'react-router-dom'

import { useAppSelector } from '@/app/hooks'
import { selectPostsByUser } from '@/features/posts/postsSlice'

import { selectUserById } from './usersSlice'

export const UserPage = () => {
  const { userId } = useParams()

  const user = useAppSelector(state => selectUserById(state, userId!))

  const postsForUser = useAppSelector(state =>
    selectPostsByUser(state, userId!)
  )

  if (!user) {
    return (
      <section>
        <h2>User not found!</h2>
      </section>
    )
  }

  const postTitles = postsForUser.map(post => (
    <li key={post.id}>
      <Link to={`/posts/${post.id}`}>{post.title}</Link>
    </li>
  ))

  return (
    <section>
      <h2>{user.name}</h2>

      <ul>{postTitles}</ul>
    </section>
  )
}
注意:我们在 selectPostsByUser 中使用了 allPosts.filter()。这实际上是有问题的模式! 稍后我们会解释原因。
usersSlice 中已有现成的 selectAllUsers 和 selectUserById 选择器,我们可以直接在组件中导入使用。
如前所述,我们可以从一个 useSelector 调用或 props 获取数据,并利用该数据决定在另一个 useSelector 调用中读取 store 的哪些内容。
按惯例,我们将在 <App> 中为这些组件添加路由:
          <Route path="/posts/:postId" element={<SinglePostPage />} />
          <Route path="/editPost/:postId" element={<EditPostForm />} />
          <Route path="/users" element={<UsersList />} />
          <Route path="/users/:userId" element={<UserPage />} />
同时在 <Navbar> 中添加指向 /users 的新标签页,以便点击跳转到 <UsersList>:
export const Navbar = () => {
  // omit other logic

  navContent = (
    <div className="navContent">
      <div className="navLinks">
        <Link to="/posts">Posts</Link>
        <Link to="/users">Users</Link>
      </div>
      <div className="userDetails">
        <UserIcon size={32} />
        {user.name}
        <button className="button small" onClick={onLogoutClicked}>
          Log Out
        </button>
      </div>
    </div>
  )

  // omit other rendering
}
现在我们可以实际浏览每个用户的页面,并查看其专属帖子列表。
向服务器发送登录请求
当前我们的 <LoginPage> 和 authSlice 仅派发客户端 Redux 动作来跟踪当前用户名。实际应用中,我们需要向服务器发送登录请求。与处理帖子和用户类似,我们将登录和注销处理转换为异步 thunk。
import { createSlice, createAsyncThunk } from '@reduxjs/toolkit'

import { client } from '@/api/client'

import type { RootState } from '@/app/store'

import { createAppAsyncThunk } from '@/app/withTypes'

interface AuthState {
  username: string | null
}

export const login = createAppAsyncThunk(
  'auth/login',
  async (username: string) => {
    await client.post('/fakeApi/login', { username })
    return username
  }
)

export const logout = createAppAsyncThunk('auth/logout', async () => {
  await client.post('/fakeApi/logout', {})
})

const initialState: AuthState = {
  // Note: a real app would probably have more complex auth state,
  // but for this example we'll keep things simple
  username: null
}

const authSlice = createSlice({
  name: 'auth',
  initialState,
  // Remove the reducer definitions
  reducers: {},
  extraReducers: builder => {
    // and handle the thunk actions instead
    builder
      .addCase(login.fulfilled, (state, action) => {
        state.username = action.payload
      })
      .addCase(logout.fulfilled, state => {
        state.username = null
      })
  }
})

// Removed the exported actions

export default authSlice.reducer
同时更新 <Navbar> 和 <LoginPage>,导入并派发新的 thunk 替代之前的动作创建器:
import { Link } from 'react-router-dom'

import { useAppDispatch, useAppSelector } from '@/app/hooks'

import { logout } from '@/features/auth/authSlice'
import { selectCurrentUser } from '@/features/users/usersSlice'

import { UserIcon } from './UserIcon'

export const Navbar = () => {
  const dispatch = useAppDispatch()
  const user = useAppSelector(selectCurrentUser)

  const isLoggedIn = !!user

  let navContent: React.ReactNode = null

  if (isLoggedIn) {
    const onLogoutClicked = () => {
      dispatch(logout())
    }
import React from 'react'
import { useNavigate } from 'react-router-dom'

import { useAppDispatch, useAppSelector } from '@/app/hooks'
import { selectAllUsers } from '@/features/users/usersSlice'

import { login } from './authSlice'

// omit types

export const LoginPage = () => {
  const dispatch = useAppDispatch()
  const users = useAppSelector(selectAllUsers)
  const navigate = useNavigate()

  const handleSubmit = async (e: React.FormEvent<LoginPageFormElements>) => {
    e.preventDefault()

    const username = e.currentTarget.elements.username.value
    await dispatch(login(username))
    navigate('/posts')
  }
由于 postsSlice 使用了 userLoggedOut action creator,我们可以将其更新为监听 logout.fulfilled:
import { createAsyncThunk, createSlice, PayloadAction } from '@reduxjs/toolkit'
import { client } from '@/api/client'

import type { RootState } from '@/app/store'

// Import this thunk instead
import { logout } from '@/features/auth/authSlice'

// omit types and setup

const postsSlice = createSlice({
  name,
  initialState,
  reducers: {
    /* omitted */
  },
  extraReducers: builder => {
    builder
      // switch to handle the thunk fulfilled action
      .addCase(logout.fulfilled, state => {
        // Clear out the list of posts whenever the user logs out
        return initialState
      })
    // omit other cases
  }
})
添加通知功能
没有通知功能的社交媒体应用是不完整的——我们需要实时获知有人发送消息、发表评论或对我们的帖子做出反应。
在实际应用中,客户端会与后端服务器保持持续通信,每当事件发生时服务器都会推送更新。由于这是示例应用,我们将通过添加按钮来模拟此过程:点击按钮会从模拟API获取通知条目。由于没有真实用户互动,模拟API每次请求都会生成随机通知(核心目标是演示Redux的应用逻辑)。
通知功能的Slice
作为新功能,我们首先创建通知slice和异步thunk来从API获取通知。为模拟真实场景,我们将使用状态中最新通知的时间戳,使模拟服务器能生成比该时间戳更新的通知。
import { createSlice } from '@reduxjs/toolkit'

import { client } from '@/api/client'

import type { RootState } from '@/app/store'
import { createAppAsyncThunk } from '@/app/withTypes'

export interface ServerNotification {
  id: string
  date: string
  message: string
  user: string
}

export const fetchNotifications = createAppAsyncThunk(
  'notifications/fetchNotifications',
  async (_unused, thunkApi) => {
    const allNotifications = selectAllNotifications(thunkApi.getState())
    const [latestNotification] = allNotifications
    const latestTimestamp = latestNotification ? latestNotification.date : ''
    const response = await client.get<ServerNotification[]>(
      `/fakeApi/notifications?since=${latestTimestamp}`
    )
    return response.data
  }
)

const initialState: ServerNotification[] = []

const notificationsSlice = createSlice({
  name: 'notifications',
  initialState,
  reducers: {},
  extraReducers(builder) {
    builder.addCase(fetchNotifications.fulfilled, (state, action) => {
      state.push(...action.payload)
      // Sort with newest first
      state.sort((a, b) => b.date.localeCompare(a.date))
    })
  }
})

export default notificationsSlice.reducer

export const selectAllNotifications = (state: RootState) => state.notifications
与其他slice相同,我们将notificationsReducer导入store.ts并添加到configureStore()中。
我们编写了名为fetchNotifications的异步thunk:它会从服务器获取新通知列表。在请求中,我们将包含状态中最新通知的创建时间戳,确保服务器只返回真正的新通知。
由于返回的是通知数组,我们可以将它们作为单独参数传递给state.push()来逐个添加。同时需要排序确保最新通知在数组最前面(注意:array.sort()始终会改变原数组——这仅在createSlice和Immer环境下安全)。
Thunk参数详解
观察fetchNotificationsthunk,会发现新增的特殊参数。现在我们来解析thunk的参数机制。
此前我们已了解:分发thunk时可传递参数,如dispatch(addPost(newPost))。对于createAsyncThunk:
- 仅支持单参数传递,该参数会成为payload创建回调的首个参数
- 未传递参数时,该参数值为
undefined
payload创建器的第二个参数是thunkAPI对象,包含以下核心属性和方法:
-
dispatch和getState:Redux store 实际的dispatch和getState方法。可在 thunk 内部使用它们来分发其他 action 或获取最新的 store 状态(例如,在分发另一个 action 后读取更新值)。 -
extra:创建store时传递给thunk中间件的"额外参数"。通常是API封装器(包含服务器通信逻辑),避免thunk直接处理URL和查询细节 -
requestId:当前thunk调用的唯一随机ID,用于跟踪单个请求状态 -
signal:AbortController.signal函数,可取消进行中的请求 -
rejectWithValue:工具函数,用于在thunk遇到错误时定制rejectedaction内容
(若手动编写thunk而非使用createAsyncThunk,thunk函数将分别接收(dispatch, getState)作为独立参数,而非整合为单一对象)
关于这些参数以及如何处理取消 thunk 和请求的更多细节,请参阅 createAsyncThunk API 参考文档。
这种情况下,我们需要访问 thunkApi 参数(它始终是第二个参数)。这意味着即使我们在派发 thunk 时不传递任何参数,且不需要在 payload 回调中使用第一个参数,也必须为其指定变量名。因此我们将其命名为 _unused(意为"未使用")。
我们知道通知列表位于 Redux 存储状态中,最新通知应位于数组首位。通过调用 thunkApi.getState() 可读取状态值,使用 selectAllNotifications 选择器可获取通知数组。由于通知数组按最新优先排序,我们可以使用数组解构获取最新通知:
添加通知列表组件
创建完 notificationsSlice 后,我们添加 <NotificationsList> 组件。它需要从存储中读取通知列表并进行格式化,包括显示每条通知的新旧程度和发送者。我们已有 <PostAuthor> 和 <TimeAgo> 组件可处理格式化,但 <PostAuthor> 默认包含"由 "前缀在此处不适用——我们将添加默认值为 true 的 showPrefix 属性,并在此处特别禁用前缀显示。
interface PostAuthorProps {
  userId: string
  showPrefix?: boolean
}

export const PostAuthor = ({ userId, showPrefix = true }: PostAuthorProps) => {
  const author = useAppSelector(state => selectUserById(state, userId))

  return (
    <span>
      {showPrefix ? 'by ' : null}
      {author?.name ?? 'Unknown author'}
    </span>
  )
}
import { useAppSelector } from '@/app/hooks'

import { TimeAgo } from '@/components/TimeAgo'

import { PostAuthor } from '@/features/posts/PostAuthor'

import { selectAllNotifications } from './notificationsSlice'

export const NotificationsList = () => {
  const notifications = useAppSelector(selectAllNotifications)

  const renderedNotifications = notifications.map(notification => {
    return (
      <div key={notification.id} className="notification">
        <div>
          <b>
            <PostAuthor userId={notification.user} showPrefix={false} />
          </b>{' '}
          {notification.message}
        </div>
        <TimeAgo timestamp={notification.date} />
      </div>
    )
  })

  return (
    <section className="notificationsList">
      <h2>Notifications</h2>
      {renderedNotifications}
    </section>
  )
}
同时更新 <Navbar> 添加"通知"标签页和获取通知的新按钮:
// omit several imports

import { logout } from '@/features/auth/authSlice'
import { fetchNotifications } from '@/features/notifications/notificationsSlice'
import { selectCurrentUser } from '@/features/users/usersSlice'

export const Navbar = () => {
  const dispatch = useAppDispatch()
  const user = useAppSelector(selectCurrentUser)

  const isLoggedIn = !!user

  let navContent: React.ReactNode = null

  if (isLoggedIn) {
    const onLogoutClicked = () => {
      dispatch(logout())
    }

    const fetchNewNotifications = () => {
      dispatch(fetchNotifications())
    }

    navContent = (
      <div className="navContent">
        <div className="navLinks">
          <Link to="/posts">Posts</Link>
          <Link to="/users">Users</Link>
          <Link to="/notifications">Notifications</Link>
          <button className="button small" onClick={fetchNewNotifications}>
            Refresh Notifications
          </button>
        </div>
        {/* omit user details */}
      </div>
    )
  }

  // omit other rendering
}
最后,我们需要在 App.tsx 中添加 "通知" 路由以便能够导航至此功能:
// omit imports
import { NotificationsList } from './features/notifications/NotificationsList'

function App() {
  return (
    // omit all the outer router setup
    <Routes>
      <Route path="/posts" element={<PostsMainPage />} />
      <Route path="/posts/:postId" element={<SinglePostPage />} />
      <Route path="/editPost/:postId" element={<EditPostForm />} />
      <Route path="/users" element={<UsersList />} />
      <Route path="/users/:userId" element={<UserPage />} />
      <Route path="/notifications" element={<NotificationsList />} />
    </Routes>
  )
}
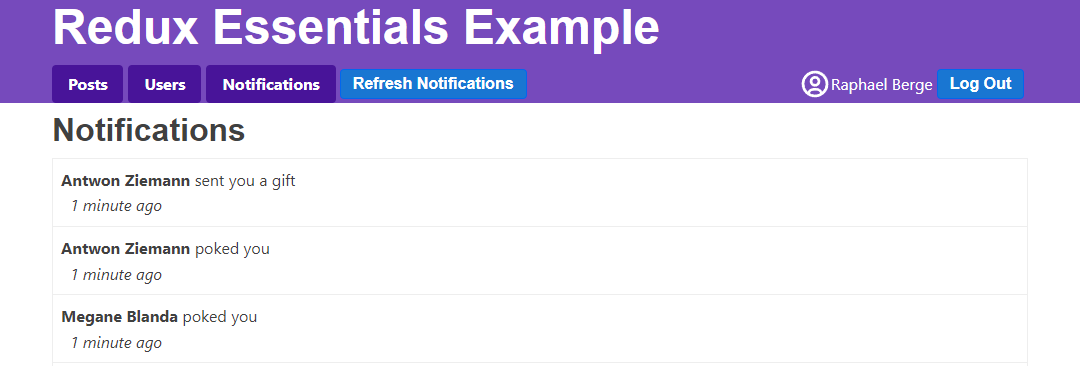
当前"通知"标签页效果如下:
显示新通知
每次点击"刷新通知"时,通知列表会增加几条新记录。实际应用中,这些通知可能在我们查看其他界面时从服务器推送而来。我们可以在查看 <PostsList> 或 <UserPage> 时点击"刷新通知"模拟此场景。
但目前无法获知新到通知数量,持续点击按钮会导致大量未读通知堆积。我们将添加逻辑跟踪通知的已读/未读状态:
- 在导航栏"通知"标签显示"未读"通知数量徽标
- 用不同颜色高亮新通知
跟踪通知状态
API 返回的 Notification 对象格式为 {id, date, message, user}。"新通知"和"未读"状态是客户端专属概念。据此重构 notificationsSlice:
首先创建扩展 ServerNotification 的 ClientNotification 类型,添加两个新字段。从服务器接收新通知时,始终添加带默认值的这些字段:
接着添加将通知标记为已读的 reducer,以及将现有通知标记为"非新"的逻辑:
最后添加统计存储中未读通知数量的选择器:
// omit imports

export interface ServerNotification {
  id: string
  date: string
  message: string
  user: string
}

export interface ClientNotification extends ServerNotification {
  read: boolean
  isNew: boolean
}

// omit thunk

const initialState: ClientNotification[] = []

const notificationsSlice = createSlice({
  name: 'notifications',
  initialState,
  reducers: {
    allNotificationsRead(state) {
      state.forEach(notification => {
        notification.read = true
      })
    }
  },
  extraReducers(builder) {
    builder.addCase(fetchNotifications.fulfilled, (state, action) => {
      // Add client-side metadata for tracking new notifications
      const notificationsWithMetadata: ClientNotification[] =
        action.payload.map(notification => ({
          ...notification,
          read: false,
          isNew: true
        }))

      state.forEach(notification => {
        // Any notifications we've read are no longer new
        notification.isNew = !notification.read
      })

      state.push(...notificationsWithMetadata)
      // Sort with newest first
      state.sort((a, b) => b.date.localeCompare(a.date))
    })
  }
})

export const { allNotificationsRead } = notificationsSlice.actions

export default notificationsSlice.reducer

export const selectUnreadNotificationsCount = (state: RootState) => {
  const allNotifications = selectAllNotifications(state)
  const unreadNotifications = allNotifications.filter(
    notification => !notification.read
  )
  return unreadNotifications.length
}
将通知标记为已读
我们需要在 <NotificationsList> 组件渲染时将通知标记为已读,无论是因为点击标签页查看通知,还是因为已打开通知列表时收到新通知。我们可以通过每次组件重新渲染时派发 allNotificationsRead 来实现。为避免更新时旧数据闪烁,我们将在 useLayoutEffect 钩子中派发该动作。同时,我们还需要在通知列表条目中添加额外类名以实现高亮效果:
import { useLayoutEffect } from 'react'
import classnames from 'classnames'
import { useAppSelector, useAppDispatch } from '@/app/hooks'

import { TimeAgo } from '@/components/TimeAgo'

import { PostAuthor } from '@/features/posts/PostAuthor'

import {
  allNotificationsRead,
  selectAllNotifications
} from './notificationsSlice'

export const NotificationsList = () => {
  const dispatch = useAppDispatch()
  const notifications = useAppSelector(selectAllNotifications)

  useLayoutEffect(() => {
    dispatch(allNotificationsRead())
  })

  const renderedNotifications = notifications.map(notification => {
    const notificationClassname = classnames('notification', {
      new: notification.isNew
    })

    return (
      <div key={notification.id} className={notificationClassname}>
        <div>
          <b>
            <PostAuthor userId={notification.user} showPrefix={false} />
          </b>{' '}
          {notification.message}
        </div>
        <TimeAgo timestamp={notification.date} />
      </div>
    )
  })

  return (
    <section className="notificationsList">
      <h2>Notifications</h2>
      {renderedNotifications}
    </section>
  )
}
这种方法可行,但存在一个意外行为:每当出现新通知(无论是刚切换标签页还是从 API 获取新通知),实际会派发 两次 "notifications/allNotificationsRead" 动作。原因何在?
假设在查看 <PostsList> 时获取了通知,随后点击"通知"标签页:<NotificationsList> 组件挂载后,useLayoutEffect 回调会在首次渲染后执行并派发 allNotificationsRead。notificationsSlice 通过更新 store 中的通知条目来处理该动作,创建包含不可变更新条目的新 state.notifications 数组,导致组件因 useSelector 返回新数组而强制重新渲染。
当组件第二次渲染时,useLayoutEffect 钩子再次运行并派发 allNotificationsRead。reducer 也会再次执行,但本次没有数据变化,切片状态和根状态保持不变,因此组件不会重新渲染。
我们可通过拆分逻辑避免第二次派发(如组件挂载时仅派发一次,仅在通知数组长度变化时再次派发),但当前实现并无实际损害,可暂不处理。
这表明派发动作后完全可能不发生任何状态变化。请牢记:是否更新状态始终由 reducer 决定,"无需任何操作"是 reducer 的合法处理结果。
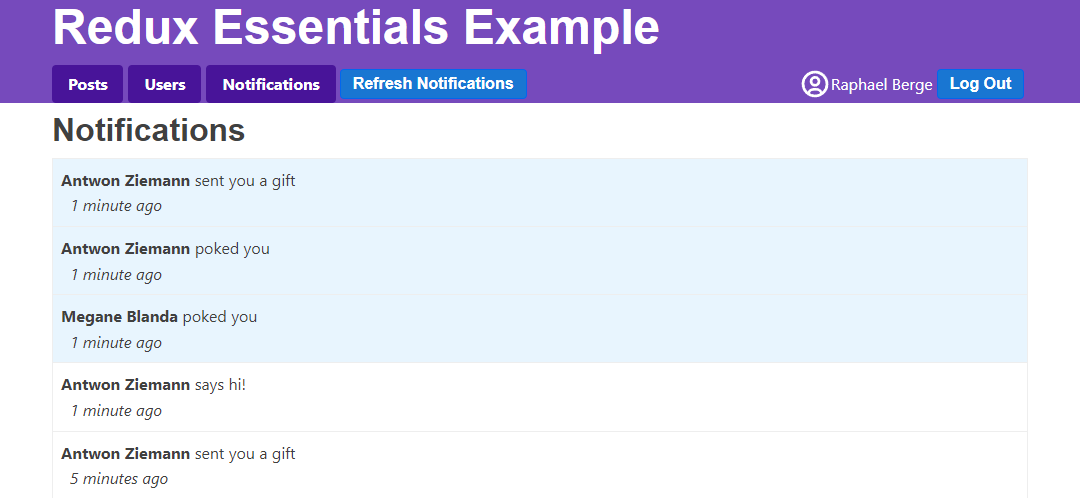
实现"新通知/已读"功能后的通知标签页效果如下:
显示未读通知
最后需要实现的功能是在导航栏"通知"标签上添加徽章,用于在其他标签页时显示未读通知数量:
// omit other imports

import {
  fetchNotifications,
  selectUnreadNotificationsCount
} from '@/features/notifications/notificationsSlice'

export const Navbar = () => {
  const dispatch = useAppDispatch()
  const username = useAppSelector(selectCurrentUsername)
  const user = useAppSelector(selectCurrentUser)

  const numUnreadNotifications = useAppSelector(selectUnreadNotificationsCount)


  const isLoggedIn = !!user

  let navContent: React.ReactNode = null

  if (isLoggedIn) {
    const onLogoutClicked = () => {
      dispatch(logout())
    }

    const fetchNewNotifications = () => {
      dispatch(fetchNotifications())
    }

    let unreadNotificationsBadge: React.ReactNode | undefined

    if (numUnreadNotifications > 0) {
      unreadNotificationsBadge = (
        <span className="badge">{numUnreadNotifications}</span>
      )
    }

    navContent = (
      <div className="navContent">
        <div className="navLinks">
          <Link to="/posts">Posts</Link>
          <Link to="/users">Users</Link>
          <Link to="/notifications">
            Notifications {unreadNotificationsBadge}
          </Link>
          <button className="button small" onClick={fetchNewNotifications}>
            Refresh Notifications
          </button>
        </div>
        {/* omit button */}
      </div>
    )
  }

  // omit other rendering
}
提升渲染性能
当前应用功能完整,但组件重渲染的时机和方式存在缺陷。下面我们将分析这些问题并探讨性能优化方案。
调查渲染行为
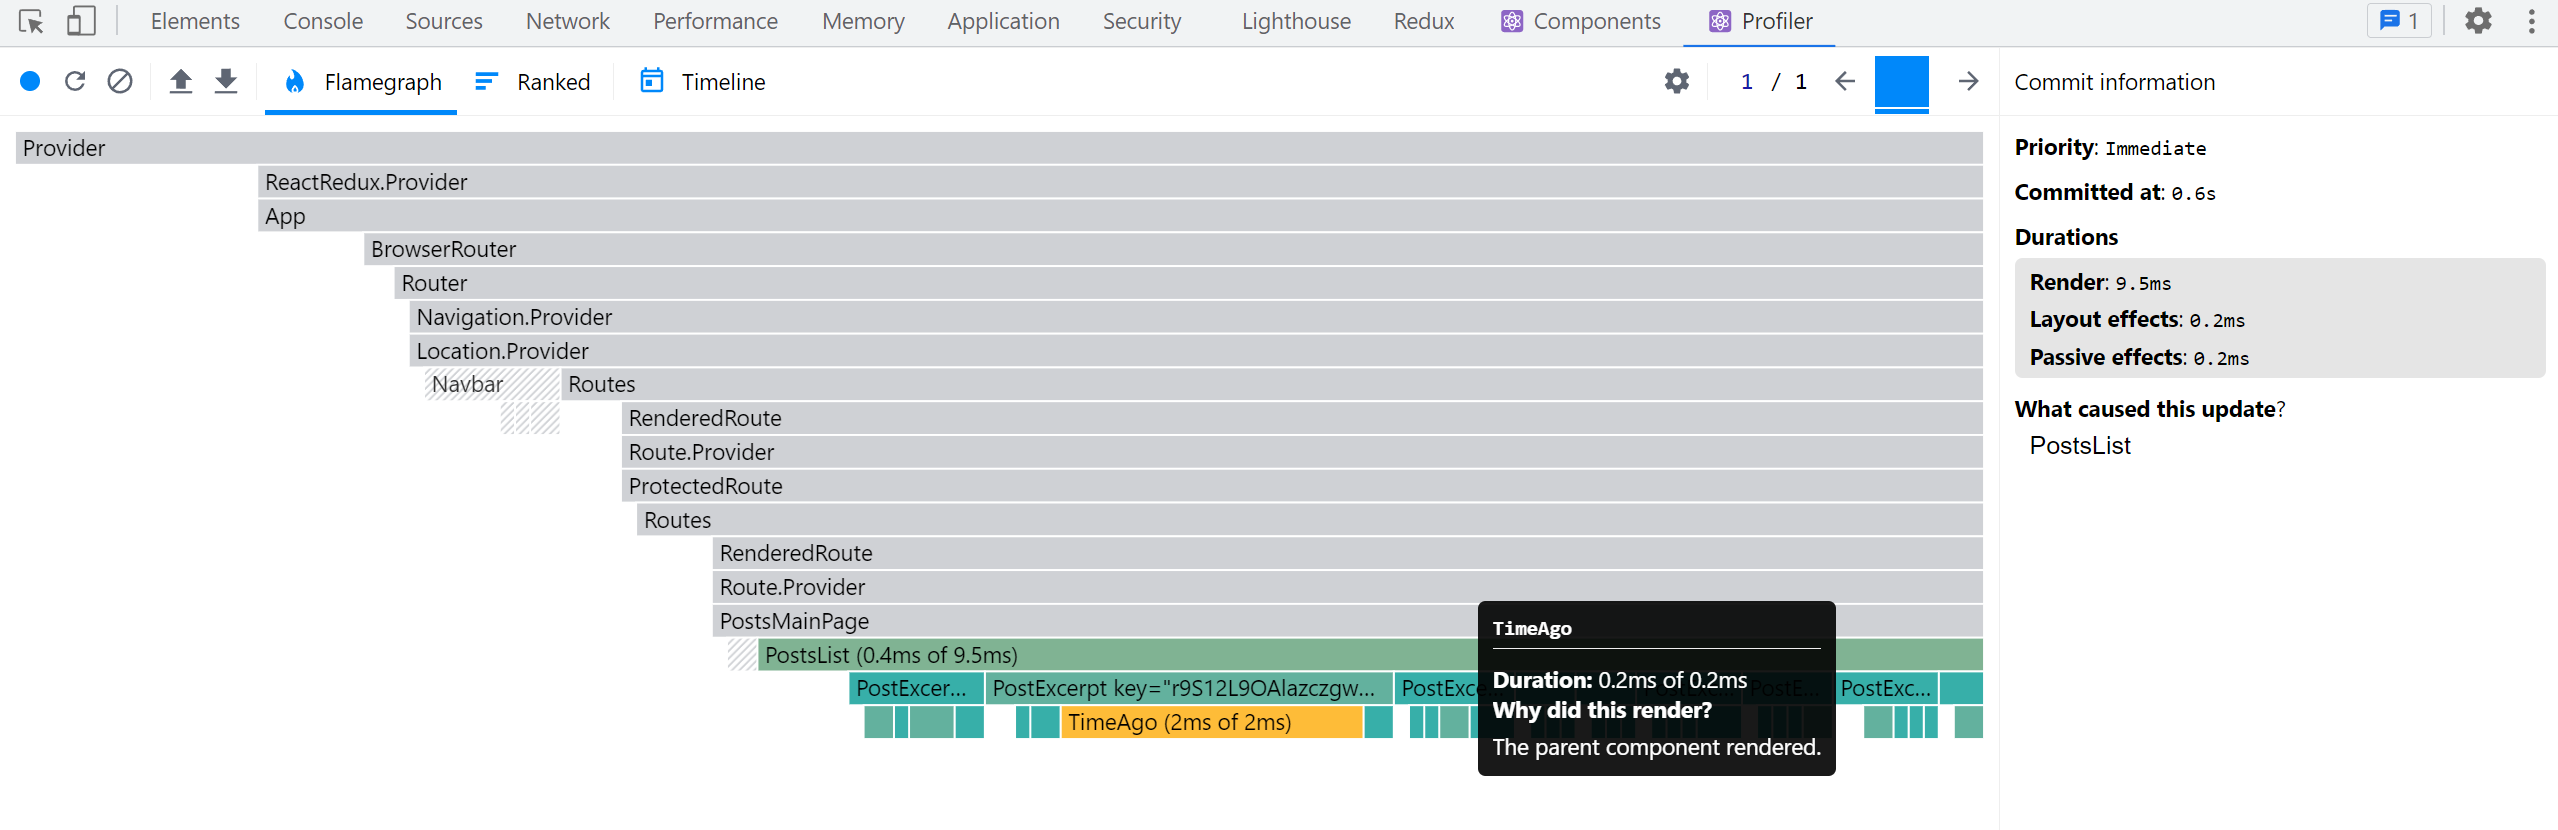
使用 React DevTools Profiler 可查看状态更新时的组件重渲染图表:进入某个用户的 <UserPage>,打开浏览器开发者工具 → React "Profiler" 标签 → 点击左上角圆形录制按钮 → 在应用中点击"刷新通知"按钮 → 停止录制。你将看到类似图表:
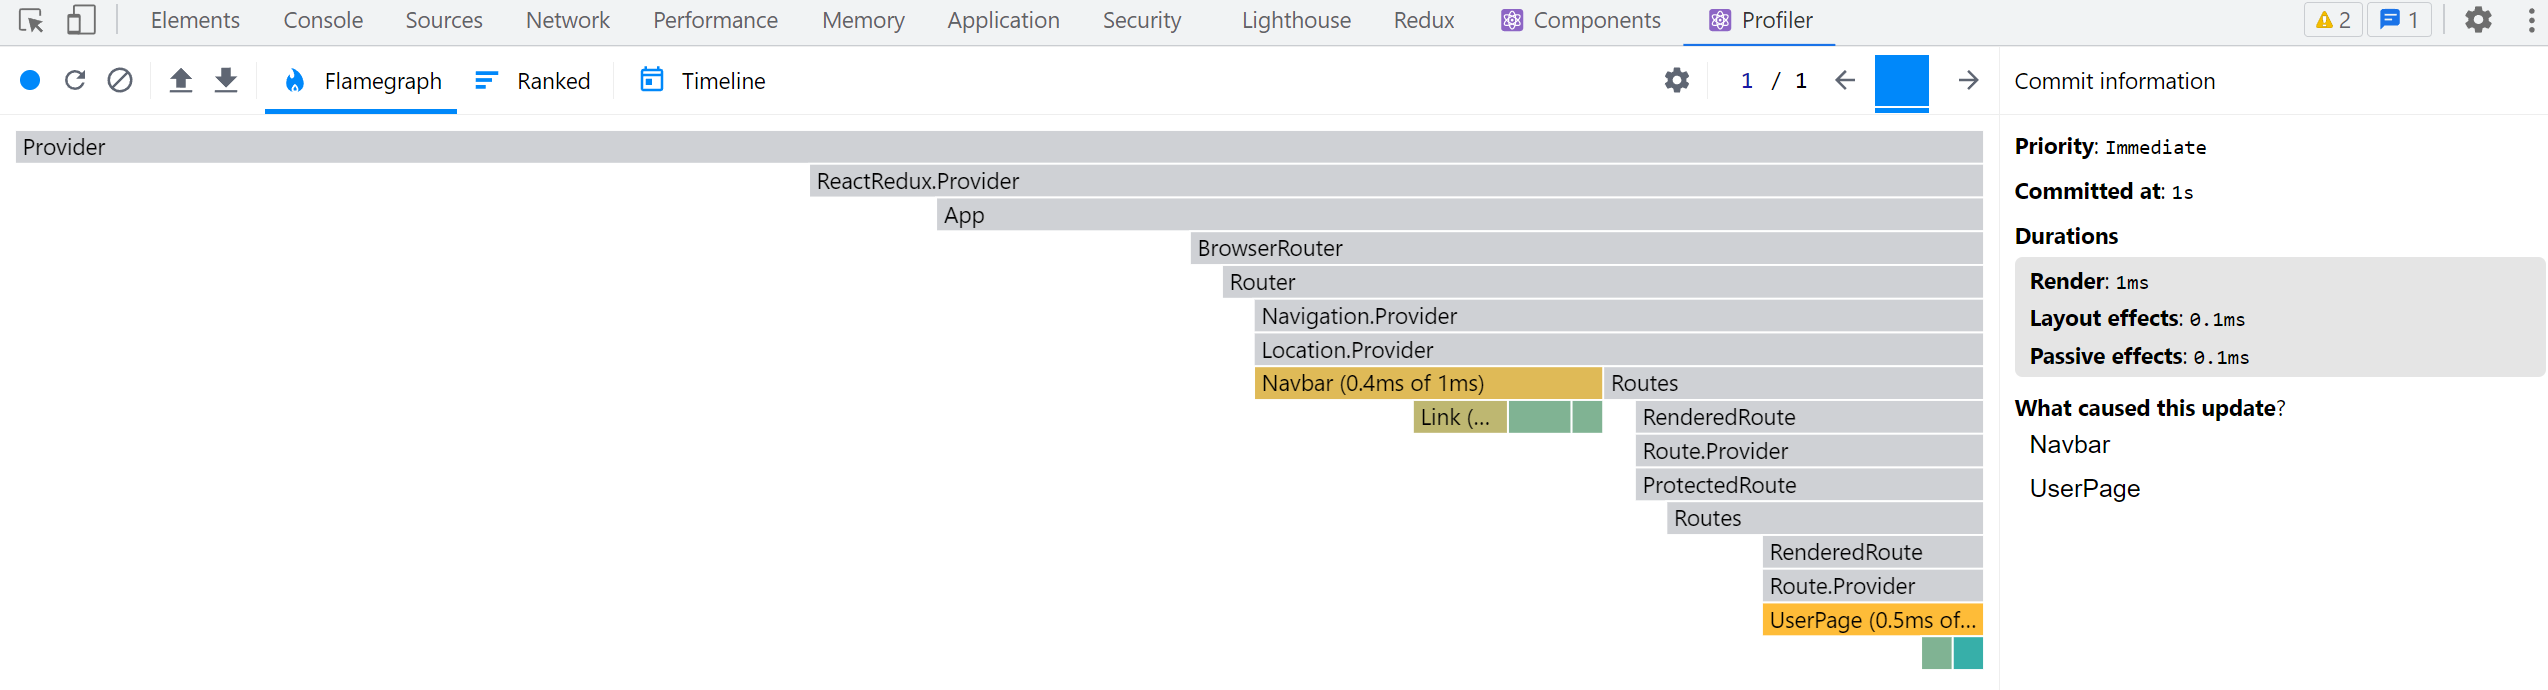
<Navbar> 的重渲染符合预期(需要更新标签页的"未读通知"徽章),但为何 <UserPage> 也会重渲染?
通过 Redux DevTools 检查最近派发的动作可发现:仅通知状态发生更新。由于 <UserPage> 未读取任何通知数据,本不应重渲染。问题可能出在组件本身或其使用的选择器上。
<UserPage> 组件通过 selectPostsByUser 选择器从 store 中读取帖子列表。仔细查看 selectPostsByUser 的实现,存在一个特定问题:
export const selectPostsByUser = (state: RootState, userId: string) => {
  const allPosts = selectAllPosts(state)
  // ❌ WRONG - this _always_ creates a new array reference!
  return allPosts.filter(post => post.user === userId)
}
我们知道,每当有 action 被 dispatch 时,useSelector 都会重新执行,如果返回了新的引用值,就会强制组件重新渲染。
我们在选择器函数内部调用了 filter(),目的是仅返回属于当前用户的帖子列表。
但问题在于:这会导致 useSelector 始终返回新的数组引用,因此即使帖子数据没有变化,组件也会在每次 action 后重新渲染!
这是 Redux 应用中的常见错误。因此,React-Redux 在开发模式下会检查意外返回新引用的选择器。打开浏览器开发者工具的控制台,你会看到类似警告:
Selector unknown returned a different result when called with the same parameters.
This can lead to unnecessary rerenders.
Selectors that return a new reference (such as an object or an array) should be memoized:
    at UserPage (http://localhost:5173/src/features/users/UserPage.tsx)
多数情况下,错误信息会显示选择器的变量名。但本例中由于我们在 useAppSelector 内部使用了匿名函数,错误信息未指定具体名称。不过通过 <UserPage> 的提示可以定位问题。
在当前示例应用中,这并非严重的性能问题:<UserPage> 组件较小,且应用中 dispatch 的 action 不多。但在实际应用中,这可能造成重大性能影响,具体取决于应用结构。不必要的组件重渲染是常见性能问题,应当修复。
记忆化选择器函数
我们需要一种机制:仅当 state.posts 或 userId 变化时才重新计算过滤数组。如果未变化,则返回上次的过滤数组引用。
这种机制称为记忆化(Memoization):保存输入参数和计算结果,当输入相同时直接返回缓存结果。
目前我们编写的选择器都是普通函数,主要作用是避免重复编写 store 数据读取逻辑。如果能实现选择器记忆化,将显著提升性能。
Reselect 是专为 Redux 设计的记忆化选择器库。其 createSelector 函数可生成仅当输入变化时才重新计算的选择器。Redux Toolkit 已导出 createSelector 函数,可直接使用。
现在用 createSelector 重写记忆化的 selectPostsByUser:
import { createSlice, createAsyncThunk, createSelector } from '@reduxjs/toolkit'

// omit slice logic

export const selectAllPosts = (state: RootState) => state.posts.posts

export const selectPostById = (state: RootState, postId: string) =>
  state.posts.posts.find(post => post.id === postId)

export const selectPostsByUser = createSelector(
  // Pass in one or more "input selectors"
  [
    // we can pass in an existing selector function that
    // reads something from the root `state` and returns it
    selectAllPosts,
    // and another function that extracts one of the arguments
    // and passes that onward
    (state: RootState, userId: string) => userId
  ],
  // the output function gets those values as its arguments,
  // and will run when either input value changes
  (posts, userId) => posts.filter(post => post.user === userId)
)
createSelector 首先需要若干"输入选择器"(可放在数组中或作为独立参数),然后传入用于计算结果的"输出函数"。
当我们调用 selectPostsByUser(state, userId) 时,createSelector 会将所有参数传递给每个输入选择器。输入选择器的返回值将作为输出选择器的参数(类似 selectCurrentUser 中先执行 const currentUsername = selectCurrentUsername(state) 的模式)。
本例中,输出函数需要所有帖子的数组和用户 ID 两个参数。我们可以复用现有的 selectAllPosts 获取帖子数组。由于用户 ID 是 selectPostsByUser 的第二个参数,可编写小型选择器直接返回 userId。
输出函数接收 posts 和 userId 参数,返回该用户的帖子过滤数组。
如果我们多次调用 selectPostsByUser,它只会在 posts 或 userId 发生变化时重新执行输出选择器:
const state1 = getState()
// Output selector runs, because it's the first call
selectPostsByUser(state1, 'user1')
// Output selector does _not_ run, because the arguments haven't changed
selectPostsByUser(state1, 'user1')
// Output selector runs, because `userId` changed
selectPostsByUser(state1, 'user2')

dispatch(fetchUsers())
const state2 = getState()
// Output selector does not run, because `posts` and `userId` are the same
selectPostsByUser(state2, 'user2')

// Add some more posts
dispatch(addNewPost())
const state3 = getState()
// Output selector runs, because `posts` has changed
selectPostsByUser(state3, 'user2')
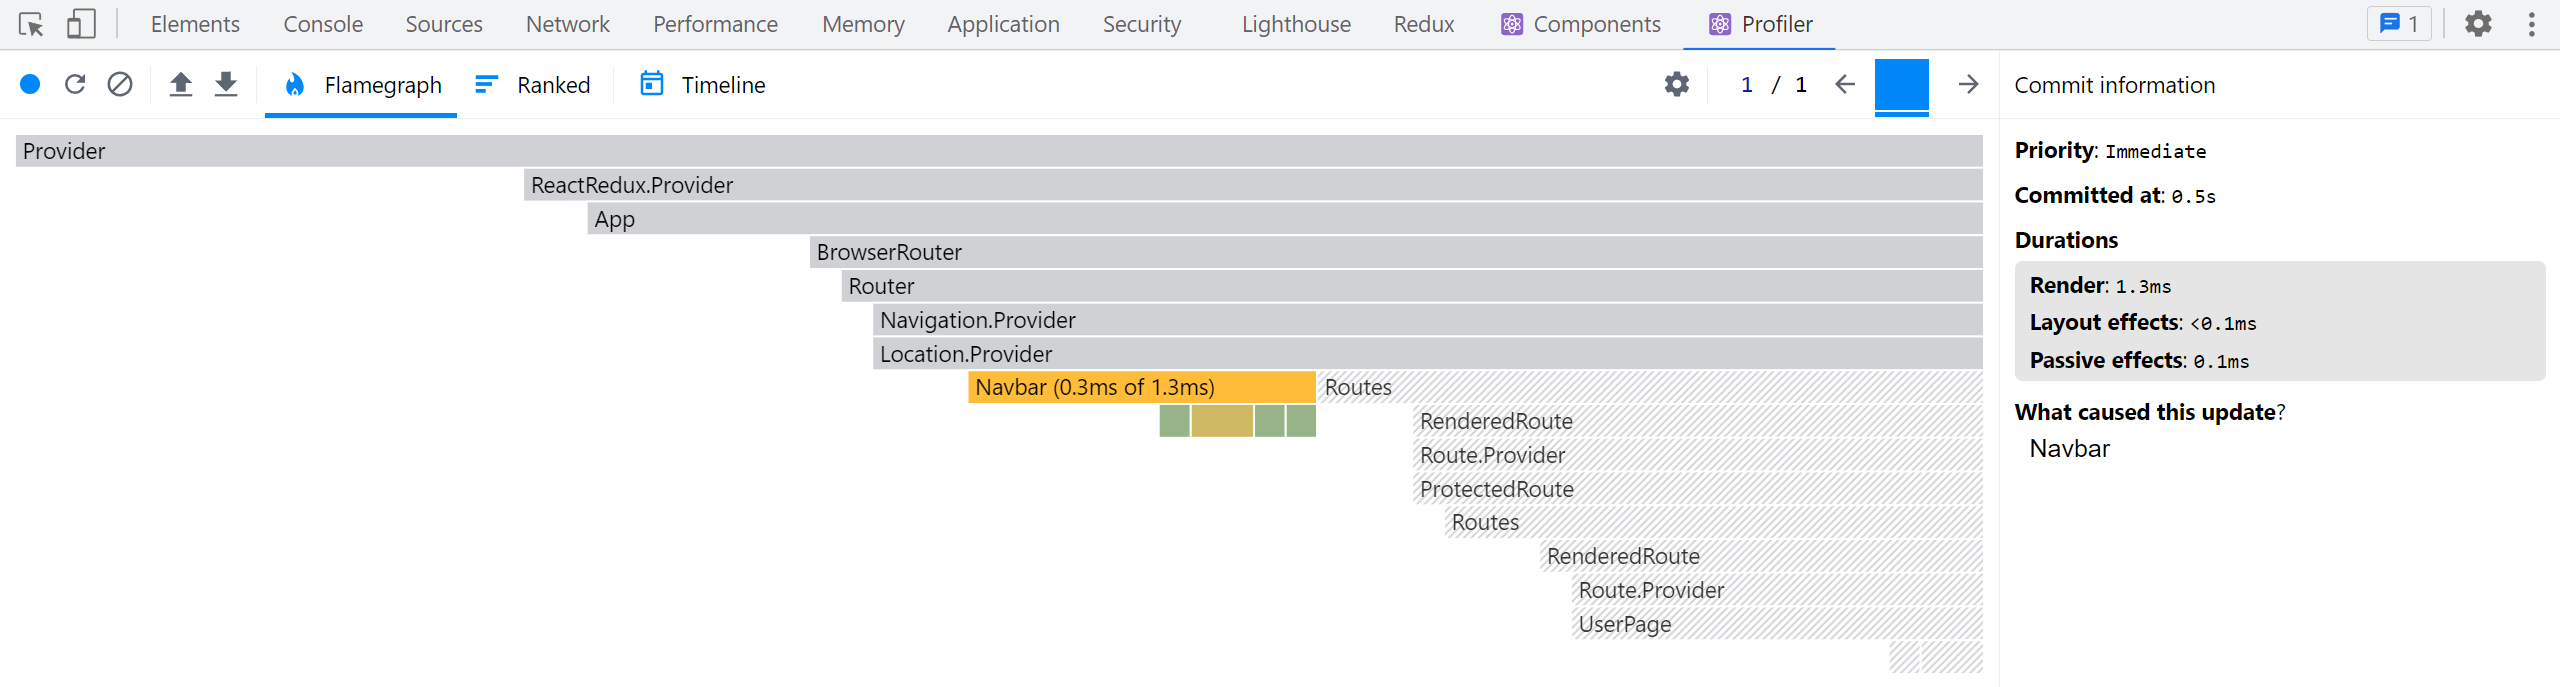
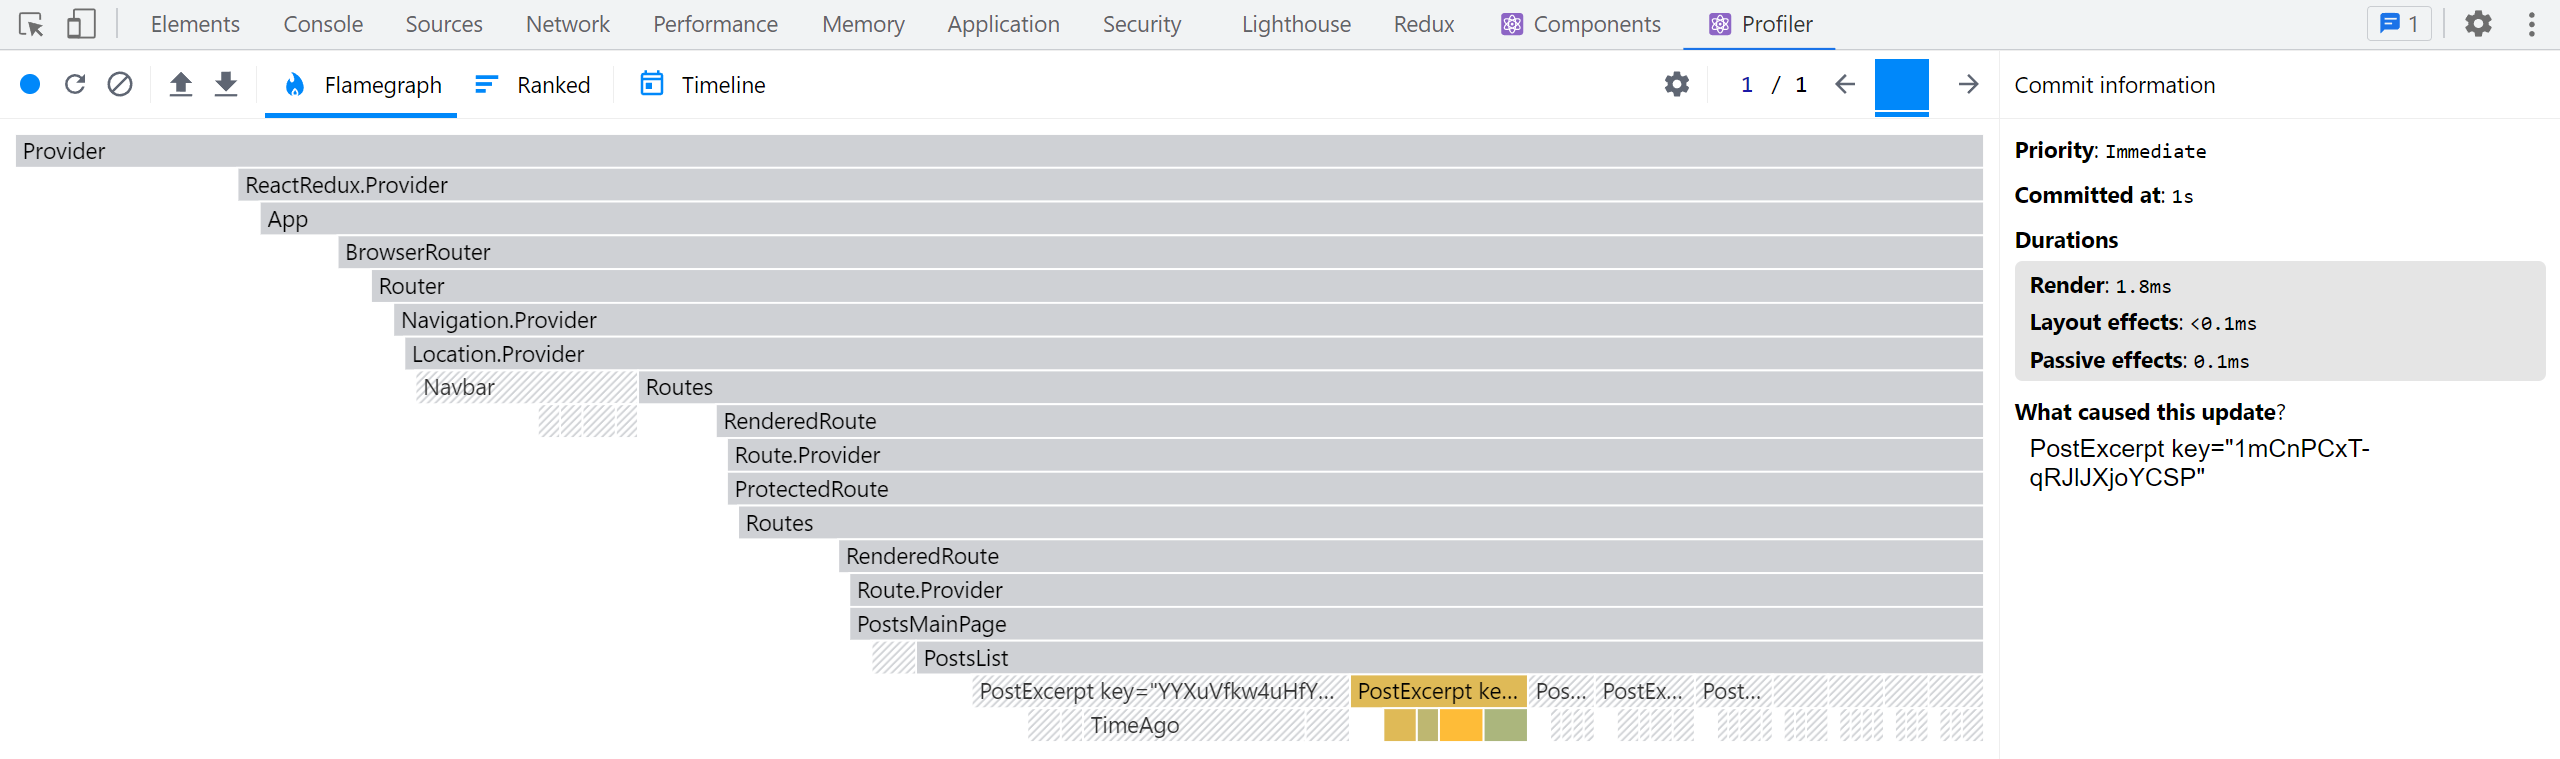
现在我们已经对 selectPostsByUser 进行了记忆化处理,可以尝试在获取通知时重复使用 React Profiler 测试打开的 <UserPage>。这次我们应该看到 <UserPage> 不会重新渲染:
平衡选择器的使用
记忆化选择器是提升 React+Redux 应用性能的宝贵工具,因为它们可以帮助我们避免不必要的重新渲染,并在输入数据未变化时避免执行可能复杂或昂贵的计算。
注意:并非应用中所有选择器都需要记忆化! 我们编写的其余选择器仍然是普通函数,它们工作良好。只有当选择器创建并返回新的对象或数组引用,或者计算逻辑"昂贵"时,才需要记忆化。
例如,让我们回顾一下 selectUnreadNotificationsCount:
export const selectUnreadNotificationsCount = (state: RootState) => {
  const allNotifications = selectAllNotifications(state)
  const unreadNotifications = allNotifications.filter(
    notification => !notification.read
  )
  return unreadNotifications.length
}
这个选择器_是_一个内部执行 .filter() 调用的普通函数。但请注意,它并没有_返回_新的数组引用,而是返回一个数字。这样更安全——即使我们更新通知数组,实际返回值也不会频繁变化。
现在,每次运行此选择器时重新过滤通知数组_有点浪费_。将其转换为记忆化选择器是合理的,这可能会节省一些 CPU 周期。但相比选择器每次返回新引用的情况,这种优化并非那么_必要_。
关于为何使用选择器函数以及如何使用 Reselect 编写记忆化选择器的更多详情,请参阅:
研究帖子列表
如果我们回到 <PostsList> 并尝试在捕获 React Profiler 跟踪时点击某个帖子的反应按钮,我们会发现不仅 <PostsList> 和更新的 <PostExcerpt> 实例会渲染,_所有_的 <PostExcerpt> 组件都会渲染:
为什么会这样?其他帖子都没有变化,为什么它们需要重新渲染?
React 的默认行为是:当父组件渲染时,React 会递归渲染其内部所有子组件!。一个帖子对象的不可变更新也创建了新的 posts 数组。我们的 <PostsList> 必须重新渲染,因为 posts 数组是一个新引用,所以在它渲染后,React 会继续向下递归并重新渲染所有 <PostExcerpt> 组件。
这对于我们的小型示例应用来说不是严重问题,但在更大的实际应用中,我们可能会有很长的列表或非常大的组件树,所有这些额外组件的重新渲染可能会拖慢速度。
优化列表渲染的选项
有几种不同的方法可以优化 <PostsList> 中的这种行为。
首先,我们可以将 <PostExcerpt> 组件包装在 React.memo() 中,这将确保其内部的组件仅在 props 实际发生变化时才重新渲染。这种方法效果相当好——尝试一下看看会发生什么:
let PostExcerpt = ({ post }: PostExcerptProps) => {
  // omit logic
}

PostExcerpt = React.memo(PostExcerpt)
另一种方案是重写 <PostsList>,使其仅从 store 中选择帖子 ID 列表而非整个 posts 数组,并重写 <PostExcerpt> 使其接收 postId 属性并通过 useSelector 读取所需帖子对象。若 <PostsList> 获取的 ID 列表未变则无需重渲染,仅发生变化的 <PostExcerpt> 组件需要更新。
遗憾的是,这存在难点:我们必须确保所有帖子按日期排序并正确渲染。可更新 postsSlice 使数组始终保持排序状态(避免在组件内排序),并使用记忆化选择器提取帖子 ID 列表。另一种方案是自定义 useSelector 的结果比较函数,例如 useSelector(selectPostIds, shallowEqual),当 ID 数组的 内容 未改变时跳过重渲染。
最终方案是让 reducer 维护独立的帖子 ID 数组,仅在增删帖子时修改该数组,并同步重写 <PostsList> 和 <PostExcerpt>。这样 <PostsList> 仅在 ID 数组变化时才重渲染。
幸运的是,Redux Toolkit 提供的 createEntityAdapter 函数正为此场景设计。
规范化数据
你已注意到我们大量逻辑都通过 ID 字段查找条目。由于数据存储在数组中,必须使用 array.find() 遍历整个数组才能定位目标 ID 的条目。
实际耗时虽短,但当数组包含数百/数千条目时,全量遍历查找单一条目将造成性能浪费。我们需要能根据 ID 直接定位条目的方法,无需检查其他条目——此过程称为**"规范化"**。
规范化状态结构
"规范化状态" 意味着:
-
每种数据在状态中仅存一份副本,消除重复
-
规范化数据保存在查找表中:条目 ID 为键,条目本身为值(通常是普通 JS 对象)
-
可能包含特定类型所有 ID 的数组
JavaScript 对象可用作查找表(类似其他语言的 "maps" 或 "dictionaries")。以下是一组 user 对象的规范化状态示例:
{
  users: {
    ids: ["user1", "user2", "user3"],
    entities: {
      "user1": {id: "user1", firstName, lastName},
      "user2": {id: "user2", firstName, lastName},
      "user3": {id: "user3", firstName, lastName},
    }
  }
}
这使根据 ID 查找特定 user 对象变得高效,无需遍历数组中其他用户对象:
const userId = 'user2'
const userObject = state.users.entities[userId]
使用 createEntityAdapter 管理规范化状态
Redux Toolkit 的 createEntityAdapter API 提供标准化方案:将条目集合转化为 { ids: [], entities: {} } 形态存入切片。除预定义状态结构外,它还生成能处理该数据的 reducer 函数和选择器。
这带来多重优势:
-
无需自行编写规范化管理代码
-
createEntityAdapter预置的 reducer 函数可处理常见场景,例如"添加所有项"、"更新单个项"或"删除多个项" -
createEntityAdapter可根据项目内容选择性保持 ID 数组的排序状态,且仅在添加/删除项目或排序顺序变化时才更新该数组
createEntityAdapter 接受包含 sortComparer 函数的配置对象,该函数通过比较两个项目来维护项目 ID 数组的排序(其工作方式与 Array.sort() 相同)
它返回包含用于在实体状态对象中添加/更新/删除项的预生成 reducer 函数集的对象。这些 reducer 函数既可作为特定 action 类型的 case reducer,也可在 createSlice 中作为其他 reducer 内的"可变"工具函数使用
适配器对象还包含 getSelectors 函数。传入从 Redux 根状态返回特定切片的 selector 后,它将生成 selectAll 和 selectById 等 selector
最后,适配器对象的 getInitialState 函数生成空对象 {ids: [], entities: {}}。可向 getInitialState 传入额外字段进行合并
规范化 Posts 切片
基于此,我们将更新 postsSlice 以使用 createEntityAdapter,这需要多处修改
PostsState 结构将变更:不再使用数组形式的 posts: Post[],而是采用 {ids: string[], entities: Record<string, Post>} 结构。Redux Toolkit 已提供描述此 {ids, entities} 结构的 EntityState 类型,我们将导入并作为 PostsState 基础类型,同时保留 status 和 error 字段
我们需要导入 createEntityAdapter,创建应用正确 Post 类型的实例,并配置正确的帖子排序逻辑
import {
  createEntityAdapter,
  EntityState
  // omit other imports
} from '@reduxjs/toolkit'

// omit thunks

interface PostsState extends EntityState<Post, string> {
  status: 'idle' | 'pending' | 'succeeded' | 'rejected'
  error: string | null
}

const postsAdapter = createEntityAdapter<Post>({
  // Sort in descending date order
  sortComparer: (a, b) => b.date.localeCompare(a.date)
})

const initialState: PostsState = postsAdapter.getInitialState({
  status: 'idle',
  error: null
})


// omit thunks

const postsSlice = createSlice({
  name: 'posts',
  initialState,
  reducers: {
    postUpdated(state, action: PayloadAction<PostUpdate>) {
      const { id, title, content } = action.payload

      const existingPost = state.entities[id]

      if (existingPost) {
        existingPost.title = title
        existingPost.content = content
      }
    },
    reactionAdded(
      state,
      action: PayloadAction<{ postId: string; reaction: ReactionName }>
    ) {
      const { postId, reaction } = action.payload
      const existingPost = state.entities[postId]
      if (existingPost) {
        existingPost.reactions[reaction]++
      }
    }
  },
  extraReducers(builder) {
    builder
      // omit other cases
      .addCase(fetchPosts.fulfilled, (state, action) => {
        state.status = 'succeeded'
        // Save the fetched posts into state
        postsAdapter.setAll(state, action.payload)
      })
      .addCase(addNewPost.fulfilled, postsAdapter.addOne)
  }
})

export const { postAdded, postUpdated, reactionAdded } = postsSlice.actions

export default postsSlice.reducer

// Export the customized selectors for this adapter using `getSelectors`
export const {
  selectAll: selectAllPosts,
  selectById: selectPostById,
  selectIds: selectPostIds
  // Pass in a selector that returns the posts slice of state
} = postsAdapter.getSelectors((state: RootState) => state.posts)

export const selectPostsByUser = createSelector(
  [selectAllPosts, (state: RootState, userId: string) => userId],
  (posts, userId) => posts.filter(post => post.user === userId)
)
此处涉及多项变更,让我们逐步解析
首先导入 createEntityAdapter 并调用以创建 postsAdapter 对象。我们需要按最新帖子优先的顺序排列 ID 数组,因此传入基于 post.date 字段将较新项目前置的 sortComparer 函数
getInitialState() 返回空的规范化状态对象 {ids: [], entities: {}}。postsSlice 仍需保留加载状态相关的 status 和 error 字段,因此将其传入 getInitialState()
当帖子以查询表形式存储在 state.entities 后,我们可将 reactionAdded 和 postUpdated reducer 改为直接通过 state.entities[postId] 按 ID 查找对应帖子,无需遍历原 posts 数组
处理 fetchPosts.fulfilled action 时,使用 postsAdapter.setAll 函数通过传入草稿 state 和 action.payload 中的帖子数组,将所有传入帖子添加到状态。这是在 createSlice reducer 中使用适配器方法作为"可变"辅助函数的示例
处理 addNewPost.fulfilled action 时,我们需要将新帖子对象添加到状态。适配器函数可直接作为 reducer 使用,因此将 postsAdapter.addOne 作为处理该 action 的 reducer 函数。此时我们将适配器方法_作为_该 action 的实际 reducer
最后,我们可以用 postsAdapter.getSelectors 生成的 selector 函数替换手写的 selectAllPosts 和 selectPostById。由于 selector 调用时会传入整个 Redux 状态对象,它们需要知道在哪里查找 posts 数据,因此我们传入一个返回 state.posts 的小型 selector。生成的 selector 函数总是命名为 selectAll 和 selectById,因此我们可以使用解构语法在导出时重命名它们以匹配旧的 selector 名称。我们也会以同样方式导出 selectPostIds,因为我们需要在 <PostsList> 组件中读取排序后的帖子 ID 列表。
我们甚至可以通过修改 postUpdated 来使用 postsAdapter.updateOne 方法进一步精简代码。该方法接收形如 {id, changes} 的对象参数,其中 changes 是包含要覆盖字段的对象:
const postsSlice = createSlice({
  name: 'posts',
  initialState,
  reducers: {
    postUpdated(state, action: PayloadAction<PostUpdate>) {
      const { id, title, content } = action.payload
      postsAdapter.updateOne(state, { id, changes: { title, content } })
    },
    reactionAdded(
      state,
      action: PayloadAction<{ postId: string; reaction: ReactionName }>
    ) {
      const { postId, reaction } = action.payload
      const existingPost = state.entities[postId]
      if (existingPost) {
        existingPost.reactions[reaction]++
      }
    }
  }
  // omit `extraReducers`
})
请注意,我们无法在 reactionAdded reducer 中使用 postsAdapter.updateOne,因为它的逻辑更复杂。我们不仅要替换帖子对象中的字段,还需要递增嵌套在某个字段内的计数器。这种情况下,像之前那样查找对象并进行"直接修改"的更新是可行的。
优化帖子列表
既然我们的 posts 切片已使用 createEntityAdapter,现在可以更新 <PostsList> 以优化其渲染行为。
我们将更新 <PostsList> 使其仅读取排序后的帖子 ID 数组,并将 postId 传递给每个 <PostExcerpt>:
// omit other imports

import {
  fetchPosts,
  selectPostById,
  selectPostIds,
  selectPostsStatus,
  selectPostsError
} from './postsSlice'

interface PostExcerptProps {
  postId: string
}

function PostExcerpt({ postId }: PostExcerptProps) {
  const post = useAppSelector(state => selectPostById(state, postId))
  // omit rendering logic
}

export const PostsList = () => {
  const dispatch = useAppDispatch()
  const orderedPostIds = useAppSelector(selectPostIds)

  // omit other selections and effects

  if (postStatus === 'pending') {
    content = <Spinner text="Loading..." />
  } else if (postStatus === 'succeeded') {
    content = orderedPostIds.map(postId => (
      <PostExcerpt key={postId} postId={postId} />
    ))
  } else if (postStatus === 'rejected') {
    content = <div>{postsError}</div>
  }

  // omit other rendering
}
现在,如果我们在捕获 React 组件性能分析时点击某帖子的反应按钮,应该会看到仅该组件重新渲染:
规范化用户切片
我们也可以将其他切片转换为使用 createEntityAdapter。
usersSlice 相当精简,因此只需做少量修改:
import {
  createSlice,
  createEntityAdapter
} from '@reduxjs/toolkit'

import { client } from '@/api/client'
import { createAppAsyncThunk } from '@/app/withTypes'

const usersAdapter = createEntityAdapter<User>()

const initialState = usersAdapter.getInitialState()

export const fetchUsers = createAppAsyncThunk('users/fetchUsers', async () => {
  const response = await client.get('/fakeApi/users')
  return response.users
})

const usersSlice = createSlice({
  name: 'users',
  initialState,
  reducers: {},
  extraReducers(builder) {
    builder.addCase(fetchUsers.fulfilled, usersAdapter.setAll)
  }
})

export default usersSlice.reducer

export const { selectAll: selectAllUsers, selectById: selectUserById } =
  usersAdapter.getSelectors((state: RootState) => state.users)

export const selectCurrentUser = (state: RootState) => {
  const currentUsername = selectCurrentUsername(state)
  if (!currentUsername) {
    return
  }
  return selectUserById(state, currentUsername)
}
我们在此处理的唯一操作总是用从服务器获取的数组替换整个用户列表。我们可以改用 usersAdapter.setAll 来实现。
我们之前已经导出了手写的 selectAllUsers 和 selectUserById selector。现在可以用 usersAdapter.getSelectors() 生成的版本替换它们。
现在我们在 selectUserById 上存在轻微的类型不匹配问题——根据类型定义,currentUsername 可能为 null,但生成的 selectUserById 选择器无法接受该值。简单的解决方法是检查其是否存在,若不存在则提前返回。
规范化通知切片
最后同样重要的是,我们也将更新 notificationsSlice:
import { createEntityAdapter, createSlice } from '@reduxjs/toolkit'

import { client } from '@/api/client'

// omit types and fetchNotifications thunk

const notificationsAdapter = createEntityAdapter<ClientNotification>({
  // Sort with newest first
  sortComparer: (a, b) => b.date.localeCompare(a.date)
})

const initialState = notificationsAdapter.getInitialState()

const notificationsSlice = createSlice({
  name: 'notifications',
  initialState,
  reducers: {
    allNotificationsRead(state) {
      Object.values(state.entities).forEach(notification => {
        notification.read = true
      })
    }
  },
  extraReducers(builder) {
    builder.addCase(fetchNotifications.fulfilled, (state, action) => {
      // Add client-side metadata for tracking new notifications
      const notificationsWithMetadata: ClientNotification[] =
        action.payload.map(notification => ({
          ...notification,
          read: false,
          isNew: true
        }))

      Object.values(state.entities).forEach(notification => {
        // Any notifications we've read are no longer new
        notification.isNew = !notification.read
      })

      notificationsAdapter.upsertMany(state, notificationsWithMetadata)
    })
  }
})

export const { allNotificationsRead } = notificationsSlice.actions

export default notificationsSlice.reducer

export const { selectAll: selectAllNotifications } =
  notificationsAdapter.getSelectors((state: RootState) => state.notifications)

export const selectUnreadNotificationsCount = (state: RootState) => {
  const allNotifications = selectAllNotifications(state)
  const unreadNotifications = allNotifications.filter(
    notification => !notification.read
  )
  return unreadNotifications.length
}
我们再次导入 createEntityAdapter,调用它,然后使用 notificationsAdapter.getInitialState() 来设置切片。
具有讽刺意味的是,我们确实有几处需要遍历所有通知对象并进行更新。由于这些通知不再保存在数组中,我们必须使用 Object.values(state.entities) 获取通知数组并遍历它。另一方面,我们可以用 notificationsAdapter.upsertMany 替换之前的获取更新逻辑。
编写响应式逻辑
到目前为止,我们所有的应用行为都是相对命令式的。用户执行操作(添加帖子、获取通知)后,我们会在点击处理函数或组件的 useEffect 钩子中分发 action 作为响应。这包括像 fetchPosts 和 login 这样的数据获取 thunk。
然而,有时我们需要编写更多逻辑来响应应用中发生的事件,例如特定 action 被分发。
我们已经为数据获取(如帖子加载)展示了加载指示器。当用户添加新帖子时,最好能提供某种视觉确认效果,比如弹出提示消息。
我们已经看到多个 reducer 可以响应同一个派发的 action。这对于"更新更多状态片段"的逻辑非常有效,但如果我们需要编写包含异步或其他副作用的逻辑该怎么办?我们不能把这些逻辑放在 reducer 中——reducer 必须是"纯函数"且不能有任何副作用。
如果不能把这些带副作用的逻辑放在 reducer 中,那应该放在哪里?
答案是放在 Redux 中间件中,因为中间件就是为支持副作用而设计的。
使用 createListenerMiddleware 实现响应式逻辑
我们已经使用 thunk 中间件处理需要"立即执行"的异步逻辑。但 thunk 只是普通函数。我们需要另一种中间件来实现"当特定 action 被派发时,执行这段额外逻辑"的功能。
Redux Toolkit 提供了 createListenerMiddleware API,允许我们编写响应特定 action 派发的逻辑。通过添加"监听器"条目,我们可以定义要监听哪些 action,并设置匹配时执行的 effect 回调函数。
从概念上讲,你可以将 createListenerMiddleware 类比为 React 的 useEffect 钩子,区别在于监听器定义在 Redux 逻辑中而非 React 组件内,并且它们响应派发的 action 和 Redux 状态更新而触发,而非 React 的渲染生命周期。
配置监听器中间件
我们不需要专门设置 thunk 中间件,因为 Redux Toolkit 的 configureStore 会自动将其添加到 store 配置中。但对于监听器中间件,我们需要进行一些初始化工作来创建并添加到 store。
我们将创建新的 app/listenerMiddleware.ts 文件并在其中创建监听器中间件实例。类似于 createAsyncThunk,我们会传递正确的 dispatch 和 state 类型以确保安全访问状态字段和派发 action。
import { createListenerMiddleware, addListener } from '@reduxjs/toolkit'
import type { RootState, AppDispatch } from './store'

export const listenerMiddleware = createListenerMiddleware()

export const startAppListening = listenerMiddleware.startListening.withTypes<
  RootState,
  AppDispatch
>()
export type AppStartListening = typeof startAppListening

export const addAppListener = addListener.withTypes<RootState, AppDispatch>()
export type AppAddListener = typeof addAppListener
与 createSlice 类似,createListenerMiddleware 返回包含多个字段的对象:
-
listenerMiddleware.middleware: 需要添加到 store 的实际 Redux 中间件实例 -
listenerMiddleware.startListening: 直接向中间件添加新的监听器条目 -
listenerMiddleware.addListener: 一个 action 创建器,可在任何能访问dispatch的代码位置派发以添加监听器,即使未导入listenerMiddleware对象
与异步 thunk 和钩子类似,我们可以使用 .withTypes() 方法创建预定义类型的 startAppListening 和 addAppListener 函数。
接着我们需要将其添加到 store:
import { configureStore } from '@reduxjs/toolkit'

import authReducer from '@/features/auth/authSlice'
import postsReducer from '@/features/posts/postsSlice'
import usersReducer from '@/features/users/usersSlice'
import notificationsReducer from '@/features/notifications/notificationsSlice'

import { listenerMiddleware } from './listenerMiddleware'

export const store = configureStore({
  reducer: {
    auth: authReducer,
    posts: postsReducer,
    users: usersReducer,
    notifications: notificationsReducer
  },
  middleware: getDefaultMiddleware =>
    getDefaultMiddleware().prepend(listenerMiddleware.middleware)
})
configureStore 默认已添加 redux-thunk 中间件,并在开发环境中添加了额外的安全检查中间件。我们需要保留这些中间件,同时添加监听器中间件。
中间件的配置顺序很重要,因为它们形成处理管道:m1 -> m2 -> m3 -> store.dispatch()。本例中,监听器中间件应位于管道起始位置,以便优先拦截和处理某些 action。
getDefaultMiddleware() 返回一个包含已配置中间件的数组。由于它本身是数组类型,因此已具备返回新项位于数组末尾副本的 .concat() 方法。但 configureStore 还额外提供了等效的 .prepend() 方法,可创建新项位于数组开头的副本。
因此,我们将调用 getDefaultMiddleware().prepend(listenerMiddleware.middleware) 将其添加到列表前端。
显示新帖子的通知
现在监听器中间件已配置完成,我们可以添加新的监听器条目,在每次成功添加新帖子时显示通知消息。
我们将使用 react-tiny-toast 库管理通知的显示样式。该项目仓库已包含该库,因此无需额外安装。
我们只需在 <App> 中导入并渲染其 <ToastContainer> 组件:
import React from 'react'
import {
  BrowserRouter as Router,
  Route,
  Routes,
  Navigate
} from 'react-router-dom'
import { ToastContainer } from 'react-tiny-toast'

// omit other imports and ProtectedRoute definition

function App() {
  return (
    <Router>
      <Navbar />
      <div className="App">
        <Routes>{/* omit routes content */}</Routes>
        <ToastContainer />
      </div>
    </Router>
  )
}
现在我们可以添加监听器:监听 addNewPost.fulfilled 动作,显示"帖子已添加"通知,并在延迟后自动移除。
代码库中定义监听器有多个实现方式。通常最佳实践是在与目标逻辑最相关的切片文件中定义监听器。本例中我们要在添加帖子时显示通知,因此将其添加到 postsSlice 文件:
import {
  createEntityAdapter,
  createSelector,
  createSlice,
  EntityState,
  PayloadAction
} from '@reduxjs/toolkit'
import { client } from '@/api/client'

import type { RootState } from '@/app/store'
import { AppStartListening } from '@/app/listenerMiddleware'
import { createAppAsyncThunk } from '@/app/withTypes'

// omit types, initial state, slice definition, and selectors

export const selectPostsStatus = (state: RootState) => state.posts.status
export const selectPostsError = (state: RootState) => state.posts.error

export const addPostsListeners = (startAppListening: AppStartListening) => {
  startAppListening({
    actionCreator: addNewPost.fulfilled,
    effect: async (action, listenerApi) => {
      const { toast } = await import('react-tiny-toast')

      const toastId = toast.show('New post added!', {
        variant: 'success',
        position: 'bottom-right',
        pause: true
      })

      await listenerApi.delay(5000)
      toast.remove(toastId)
    }
  })
}
添加监听器需要调用 app/listenerMiddleware.ts 中定义的 startAppListening 函数。但为保持导入链一致性,建议_不要_直接在切片文件中导入 startAppListening。更好的做法是导出一个接收 startAppListening 参数的函数,这样 app/listenerMiddleware.ts 可导入此函数,类似 app/store.ts 从各切片文件导入 reducer 的方式。
添加监听器条目时,调用 startAppListening 并传入包含 effect 回调函数的对象,并通过以下选项之一指定回调触发时机:
-
actionCreator: ActionCreator:任何 RTK action 创建函数,如reactionAdded或addNewPost.fulfilled。当该特定 action 被派发时触发 effect -
matcher: (action: UnknownAction) => boolean:任何 RTK 匹配器函数,如isAnyOf(reactionAdded, addNewPost.fulfilled)。当匹配器返回true时触发 effect -
predicate: (action: UnknownAction, currState: RootState, prevState: RootState) => boolean:更通用的匹配函数,可访问currState和prevState。可用于对 action 或状态值进行任意检查,包括检测状态片段变更(例如currState.counter.value !== prevState.counter.value)
本例中,我们明确要在 addNewPost thunk 成功时显示通知,因此通过 actionCreator: addNewPost.fulfilled 指定 effect 触发条件
effect 回调函数本身类似异步 thunk:第一个参数是匹配的 action,第二个参数是 listenerApi 对象
listenerApi 包含标准 dispatch 和 getState 方法,还提供多个实现复杂异步逻辑和工作流的函数。包括:condition()(暂停直到其他 action 派发或状态变更)、unsubscribe()/subscribe()(控制监听器激活状态)、fork()(启动子任务)等方法
这种情况下,我们需要动态导入实际的 react-tiny-toast 库,显示成功通知,等待几秒钟,然后移除通知。
最后,我们需要在某个地方实际导入并调用 addPostsListeners。这里我们将把它导入到 app/listenerMiddleware.ts 中:
import { createListenerMiddleware, addListener } from '@reduxjs/toolkit'
import type { RootState, AppDispatch } from './store'

import { addPostsListeners } from '@/features/posts/postsSlice'

export const listenerMiddleware = createListenerMiddleware()

export const startAppListening = listenerMiddleware.startListening.withTypes<
  RootState,
  AppDispatch
>()
export type AppStartListening = typeof startAppListening

export const addAppListener = addListener.withTypes<RootState, AppDispatch>()
export type AppAddListener = typeof addAppListener

// Call this and pass in `startAppListening` to let the
// posts slice set up its listeners
addPostsListeners(startAppListening)
现在当我们添加新文章时,应该能在页面右下角看到小型绿色通知弹出,并在 5 秒后消失。这是因为 Redux store 中的监听器中间件在 action 被分发后检查并执行了效果回调,尽管我们并未在 React 组件本身添加额外逻辑。
学习要点
在本节中,我们构建了大量新功能。现在让我们看看应用在所有这些更改后的效果。
本节主要内容包括:
- 记忆化 selector 函数可用于优化性能
- Redux Toolkit 重新导出了 Reselect 的
createSelector函数,用于生成记忆化 selectors - 记忆化 selectors 仅在输入 selectors 返回新值时重新计算结果
- 记忆化可跳过昂贵计算,并确保返回相同的结果引用
- Redux Toolkit 重新导出了 Reselect 的
- 多种模式可优化 React 组件在 Redux 中的渲染
- 避免在
useSelector内部创建新对象/数组引用——这些会导致不必要的重新渲染 - 可将记忆化 selector 函数传递给
useSelector来优化渲染 useSelector可接受替代比较函数(如shallowEqual)而非引用相等- 用
React.memo()包裹组件可仅在 props 变化时重新渲染 - 列表渲染优化:父组件仅读取条目 ID 数组,将 ID 传递给子列表项,子项再按 ID 获取条目
- 避免在
- 归一化状态结构是推荐的数据存储方式
- "归一化"意味着无数据重复,并通过条目 ID 在查找表中存储条目
- 归一化状态通常形如
{ids: [], entities: {}}
- Redux Toolkit 的
createEntityAdapterAPI 帮助管理切片中的归一化数据- 通过传递
sortComparer选项可保持条目 ID 的排序 - 适配器对象包含:
adapter.getInitialState:可接受加载状态等额外状态字段- 常见场景的预置 reducer,如
setAll、addMany、upsertOne和removeMany adapter.getSelectors:生成如selectAll和selectById的 selectors
- 通过传递
- Redux Toolkit 的
createListenerMiddlewareAPI 用于响应分发 action 执行反应式逻辑- 监听器中间件应添加到 store 配置中,并附加正确的 store 类型
- 监听器通常在切片文件中定义,但也可采用其他结构
- 监听器可匹配单个 action、多个 action 或使用自定义比较
- 监听器效果回调可包含任何同步或异步逻辑
listenerApi对象提供多种管理异步工作流的方法
下一步是什么?
Redux Toolkit 还包含强大的数据获取与缓存 API "RTK Query"。RTK Query 是可选插件,能完全消除手动编写数据获取逻辑的需求。在第 7 部分:RTK Query 基础中,您将了解 RTK Query 的功能、解决的问题,以及如何在应用中获取和使用缓存数据。