Redux 要点,第 5 部分:异步逻辑与数据获取
本页面由 PageTurner AI 翻译(测试版)。未经项目官方认可。 发现错误? 报告问题 →
- 如何使用 Redux "thunk" 中间件处理异步逻辑
- 处理异步请求状态的模式
- 如何使用 Redux Toolkit 的
createAsyncThunkAPI 管理异步调用
- 熟悉使用 HTTP 请求从服务器 REST API 获取和更新数据
简介
在第 4 部分:使用 Redux 数据中,我们学习了如何在 React 组件内使用 Redux store 中的多个数据片段,在 action 对象被分发前定制其内容,以及在 reducer 中处理更复杂的更新逻辑。
迄今为止,我们处理的所有数据都直接位于 React 客户端应用内部。然而,大多数实际应用需要通过 HTTP API 调用来获取和保存服务器数据。
在本节中,我们将改造社交媒体应用:从 API 获取帖子和用户数据,并通过保存到 API 来添加新帖子。
Redux Toolkit 包含 RTK Query 数据获取和缓存 API。RTK Query 是专为 Redux 应用构建的数据获取和缓存解决方案,可完全消除编写 thunk 或 reducer 等额外 Redux 逻辑来管理数据获取的需求。我们特别推荐将 RTK Query 作为数据获取的默认方案。
RTK Query 基于本页展示的相同模式构建,因此本节将帮助你理解 Redux 数据获取的底层机制。
我们将从第 7 部分:RTK Query 基础开始介绍如何使用 RTK Query。
REST API 与客户端示例
为使示例项目独立且贴近实际,初始项目已包含用于数据的模拟内存 REST API(使用 Mock Service Worker 模拟 API 工具配置)。该 API 以 /fakeApi 作为端点基础 URL,支持对 /fakeApi/posts、/fakeApi/users 和 fakeApi/notifications 使用标准的 GET/POST/PUT/DELETE HTTP 方法,定义位于 src/api/server.ts。
项目还包含一个小型 HTTP API 客户端对象,提供类似 axios 等流行 HTTP 库的 client.get() 和 client.post() 方法,定义位于 src/api/client.ts。
本节我们将使用 client 对象向内存模拟 REST API 发起 HTTP 调用。
此外,模拟服务器设置为每次页面加载时复用相同的随机种子,从而生成相同的假用户和假帖子列表。如需重置,请删除浏览器本地存储中的 'randomTimestampSeed' 值并重新加载页面,或通过编辑 src/api/server.ts 将 useSeededRNG 设为 false 来关闭此功能。
请注意,代码示例主要关注每个部分的核心概念和变更。完整的应用更改请查看 CodeSandbox 项目及项目仓库的 tutorial-steps-ts 分支。
使用中间件启用异步逻辑
Redux store 本身并不感知异步逻辑。它仅知道如何同步分发 action、通过调用根 reducer 函数更新状态,以及通知 UI 变更。所有异步操作必须在 store 外部处理。
但是,如果你想通过分发 action、检查当前 store 状态或执行副作用等方式让异步逻辑与 store 交互,该怎么办?这正是 Redux 中间件的用武之地。它们扩展了 store 的功能,让你能够:
-
在任何 action 被分发时执行额外逻辑(例如记录 action 和状态)
-
暂停、修改、延迟、替换或中止已分发的 action
-
编写可访问
dispatch和getState的额外代码 -
通过拦截函数和 promise 等非普通 action 对象的值,并分发真正的 action 对象,从而让
dispatch能接受这些值 -
编写包含异步逻辑或其他副作用的代码
使用中间件最常见的原因是让各类异步逻辑能与 store 交互。这样你就可以编写既能分发 action 又能检查 store 状态的代码,同时保持这些逻辑与 UI 分离。
有关中间件如何让你自定义 Redux store 的更多详情,请参阅:
中间件与 Redux 数据流
此前我们了解过 Redux 同步数据流的运作方式。
中间件通过在 dispatch 起始阶段添加额外步骤来更新 Redux 数据流。这样,中间件可以先执行 HTTP 请求等逻辑,再分发 action。异步数据流因此变为:
Thunk 与异步逻辑
Redux 有多种异步中间件,每种都支持不同的语法编写逻辑。最常用的异步中间件是 redux-thunk,它允许直接编写包含异步逻辑的普通函数。Redux Toolkit 的 configureStore 函数默认自动配置 thunk 中间件,且推荐将 thunk 作为 Redux 异步逻辑的标准方案。
Thunk 函数
将 thunk 中间件添加到 Redux store 后,你可以直接将_thunk 函数_传递给 store.dispatch。thunk 函数始终以 (dispatch, getState) 作为参数,你可以在函数内部按需使用它们。
thunk 函数可包含_任意_同步或异步逻辑。
thunk 通常使用 action 创建函数分发普通 action,例如 dispatch(increment()):
const store = configureStore({ reducer: counterReducer })

const exampleThunkFunction = (
  dispatch: AppDispatch,
  getState: () => RootState
) => {
  const stateBefore = getState()
  console.log(`Counter before: ${stateBefore.counter}`)
  dispatch(increment())
  const stateAfter = getState()
  console.log(`Counter after: ${stateAfter.counter}`)
}

store.dispatch(exampleThunkFunction)
为保持与分发普通 action 对象的一致性,我们通常将其编写为_thunk action 创建函数_——这些函数返回 thunk 函数本身。thunk action 创建函数可接收参数,这些参数可在 thunk 内部使用。
const logAndAdd = (amount: number) => {
  return (dispatch: AppDispatch, getState: () => RootState) => {
    const stateBefore = getState()
    console.log(`Counter before: ${stateBefore.counter}`)
    dispatch(incrementByAmount(amount))
    const stateAfter = getState()
    console.log(`Counter after: ${stateAfter.counter}`)
  }
}

store.dispatch(logAndAdd(5))
Thunk 通常写在"slice"文件中,因为 thunk 数据获取在概念上通常与特定 slice 的更新逻辑相关。在后续内容中,我们将介绍几种不同的 thunk 定义方式。
编写异步 Thunk
Thunk 内部可以包含异步逻辑,如 setTimeout、Promise 和 async/await,这使其成为调用服务器 API 的理想场所。
Redux 的数据获取逻辑通常遵循可预测的模式:
-
请求发起前分发"start"动作,表示请求进行中。可用于跟踪加载状态以跳过重复请求或在 UI 中显示加载指示器。
-
使用
fetch或封装库发起异步请求,并返回结果 promise -
当请求 promise 解析时,异步逻辑分发包含结果数据的"success"动作或包含错误详情的"failure"动作。两种情况下的 reducer 逻辑都会清除加载状态,并处理成功情况的结果数据或存储错误值供后续显示。
这些步骤并非必须,但属于通用实践(若只关注成功结果,可在请求完成时分发单个"success"动作,跳过"start"和"failure"动作)。
Redux Toolkit 提供 createAsyncThunk API 来实现创建和分发描述异步请求的动作。
createAsyncThunk 的基本用法如下:
import { createAsyncThunk } from '@reduxjs/toolkit'

export const fetchItemById = createAsyncThunk(
  'items/fetchItemById',
  async (itemId: string) => {
    const item = await someHttpRequest(itemId)
    return item
  }
)
有关 createAsyncThunk 如何简化异步请求动作分发代码的详细信息,请参阅详情部分。稍后我们将看到其实际应用。
Detailed Explanation: Dispatching Request Status Actions in Thunks
If we were to write out the code for a typical async thunk by hand, it might look like this:
const getRepoDetailsStarted = () => ({
  type: 'repoDetails/fetchStarted'
})
const getRepoDetailsSuccess = (repoDetails: RepoDetails) => ({
  type: 'repoDetails/fetchSucceeded',
  payload: repoDetails
})
const getRepoDetailsFailed = (error: any) => ({
  type: 'repoDetails/fetchFailed',
  error
})

const fetchIssuesCount = (org: string, repo: string) => {
  return async (dispatch: AppDispatch) => {
    dispatch(getRepoDetailsStarted())
    try {
      const repoDetails = await getRepoDetails(org, repo)
      dispatch(getRepoDetailsSuccess(repoDetails))
    } catch (err) {
      dispatch(getRepoDetailsFailed(err.toString()))
    }
  }
}
However, writing code using this approach is tedious. Each separate type of request needs repeated similar implementation:
- Unique action types need to be defined for the three different cases
- Each of those action types usually has a corresponding action creator function
- A thunk has to be written that dispatches the correct actions in the right sequence
createAsyncThunk abstracts this pattern by generating the action types and action creators, and generating a thunk that dispatches those actions automatically. You provide a callback function that makes the async call and returns a Promise with the result.
It's also easy to make mistakes with error handling when writing thunk logic yourself. In this case, the try block will actually catch errors from both a failed request, and any errors while dispatching. Handling this correctly would require restructuring the logic to separate those. createAsyncThunk already handles errors correctly for you internally.
为 Redux Thunk 添加类型
为手写 Thunk 添加类型
如果你手动编写 thunk,可以显式地为 thunk 参数添加类型注解:(dispatch: AppDispatch, getState: () => RootState)。由于这种情况很常见,你也可以定义一个可复用的 AppThunk 类型并改用该类型:
import { Action, ThunkAction, configureStore } from '@reduxjs/toolkit'

// omit actual store setup

// Infer the type of `store`
export type AppStore = typeof store
// Infer the `AppDispatch` type from the store itself
export type AppDispatch = typeof store.dispatch
// Same for the `RootState` type
export type RootState = ReturnType<typeof store.getState>
// Export a reusable type for handwritten thunks
export type AppThunk = ThunkAction<void, RootState, unknown, Action>
随后可在编写的 thunk 函数中使用:
// Use `AppThunk` as the return type, since we return a thunk function
const logAndAdd = (amount: number): AppThunk => {
  return (dispatch, getState) => {
    const stateBefore = getState()
    console.log(`Counter before: ${stateBefore.counter}`)
    dispatch(incrementByAmount(amount))
    const stateAfter = getState()
    console.log(`Counter after: ${stateAfter.counter}`)
  }
}
为 createAsyncThunk 添加类型
针对 createAsyncThunk:若有效负载函数接受参数,请为该参数提供类型声明(如 async (userId: string))。默认无需提供返回类型——TS 会自动推断返回类型。
若需在 createAsyncThunk 中访问 dispatch 或 getState,RTK 提供创建"预定义类型"版本的方法:该版本内置了正确的 dispatch 和 getState 类型,通过调用 createAsyncThunk.withTypes()(类似预定义 useSelector 和 useDispatch 的方式)。我们将在 src/app/withTypes 文件中创建并导出:
import { createAsyncThunk } from '@reduxjs/toolkit'

import type { RootState, AppDispatch } from './store'

export const createAppAsyncThunk = createAsyncThunk.withTypes<{
  state: RootState
  dispatch: AppDispatch
}>()
有关 TypeScript 定义 thunk 的更多细节,请参阅:
加载文章
目前 postsSlice 使用硬编码的示例数据作为初始状态。我们将改为从空数组开始,然后从服务器获取文章列表。
为此需要修改 postsSlice 的状态结构,以便跟踪 API 请求的当前状态。
请求的加载状态
发起 API 调用时,可将其进度视为可能处于四种状态的状态机:
-
请求尚未开始
-
请求进行中
-
请求成功,我们现在已获得所需数据
-
请求失败,可能包含错误信息
我们_本可以_使用布尔值(如 isLoading: true)来跟踪这些信息,但更好的做法是将这些状态视为一个联合值进行跟踪。推荐的模式是定义如下状态结构(使用 TypeScript 字符串联合类型表示):
{
  // Multiple possible status string union values
  status: 'idle' | 'pending' | 'succeeded' | 'failed',
  error: string | null
}
这些字段将与实际存储的数据并存。这些特定的字符串状态名称并非必须——你可以随意使用其他名称,例如用 'loading' 代替 'pending',或用 'completed' 代替 'succeeded'。
我们可以利用这些信息来决定在请求过程中 UI 应显示什么内容,同时也可以在 reducer 中添加逻辑以防止重复加载数据等情况。
让我们更新 postsSlice,使用此模式来跟踪"获取帖子"请求的加载状态。我们将把状态从单纯的帖子数组改为类似 {posts, status, error} 的结构。同时,我们将从初始状态中移除旧的示例帖子条目,并为加载状态和错误字段添加几个新的选择器:
import { createSlice, nanoid } from '@reduxjs/toolkit'

// omit reactions and other types

interface PostsState {
  posts: Post[]
  status: 'idle' | 'pending' | 'succeeded' | 'failed'
  error: string | null
}

const initialState: PostsState = {
  posts: [],
  status: 'idle',
  error: null
}

const postsSlice = createSlice({
  name: 'posts',
  initialState,
  reducers: {
    postAdded: {
      reducer(state, action: PayloadAction<Post>) {
        state.posts.push(action.payload)
      },
      prepare(title: string, content: string, userId: string) {
        // omit prepare logic
      }
    },
    postUpdated(state, action: PayloadAction<PostUpdate>) {
      const { id, title, content } = action.payload
      const existingPost = state.posts.find(post => post.id === id)
      if (existingPost) {
        existingPost.title = title
        existingPost.content = content
      }
    },
    reactionAdded(
      state,
      action: PayloadAction<{ postId: string; reaction: ReactionName }>
    ) {
      const { postId, reaction } = action.payload
      const existingPost = state.posts.find(post => post.id === postId)
      if (existingPost) {
        existingPost.reactions[reaction]++
      }
    }
  },
  extraReducers: builder => {
    builder.addCase(userLoggedOut, state => {
      // Clear out the list of posts whenever the user logs out
      return initialState
    })
  }
})

export const { postAdded, postUpdated, reactionAdded } = postsSlice.actions

export default postsSlice.reducer


export const selectAllPosts = (state: RootState) => state.posts.posts

export const selectPostById = (state: RootState, postId: string) =>
  state.posts.posts.find(post => post.id === postId)

export const selectPostsStatus = (state: RootState) => state.posts.status
export const selectPostsError = (state: RootState) => state.posts.error
作为更改的一部分,我们还需要将所有将 state 作为数组使用的地方改为 state.posts,因为数组现在嵌套了一层。
是的,这_确实_意味着我们现在会有一个类似 state.posts.posts 的嵌套对象路径,这有点重复且显得笨拙 :) 如果为了避免这种情况,我们_可以_将嵌套数组的名称改为 items 或 data 等,但目前我们暂时保持原样。
使用 createAsyncThunk 获取数据
Redux Toolkit 的 createAsyncThunk API 会生成 thunk,这些 thunk 会自动为你分发"开始/成功/失败"等动作。
让我们先添加一个 thunk,它将发起 HTTP 请求以获取帖子列表。我们将从 src/api 文件夹导入 client 工具,并用它向 '/fakeApi/posts' 发起请求。
import { createSlice, nanoid, PayloadAction } from '@reduxjs/toolkit'
import { client } from '@/api/client'

import type { RootState } from '@/app/store'
import { createAppAsyncThunk } from '@/app/withTypes'

// omit other imports and types

export const fetchPosts = createAppAsyncThunk('posts/fetchPosts', async () => {
  const response = await client.get<Post[]>('/fakeApi/posts')
  return response.data
})

const initialState: PostsState = {
  posts: [],
  status: 'idle',
  error: null
}
createAsyncThunk 接受两个参数:
-
一个字符串,用作生成的动作类型的前缀
-
一个"payload 创建器"回调函数,它应返回一个包含某些数据的 Promise,或一个包含错误的 rejected Promise
payload 创建器通常会发起某种 HTTP 请求,它可以直接返回该 HTTP 请求的 Promise,也可以从 API 响应中提取数据并返回。我们通常使用 JS 的 async/await 语法编写此函数,这让我们能够编写使用 Promise 的函数,同时使用标准的 try/catch 逻辑而非 somePromise.then() 链。
在本例中,我们传入 'posts/fetchPosts' 作为动作类型前缀。
在本例中,fetchPosts 的 payload 创建回调不需要任何参数,它只需等待 API 调用返回响应。响应对象类似于 {data: []},而我们希望分发的 Redux 动作的 payload _仅_为帖子数组。因此,我们提取 response.data 并从回调中返回它。
如果我们尝试调用 dispatch(fetchPosts()),fetchPosts thunk 将首先分发一个类型为 'posts/fetchPosts/pending' 的动作:
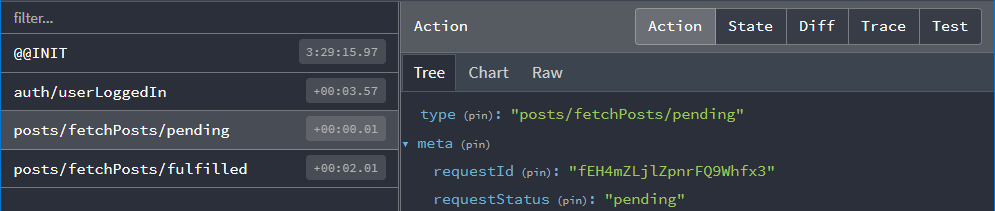
我们可以在 reducer 中监听此动作,并将请求状态标记为 'pending'。
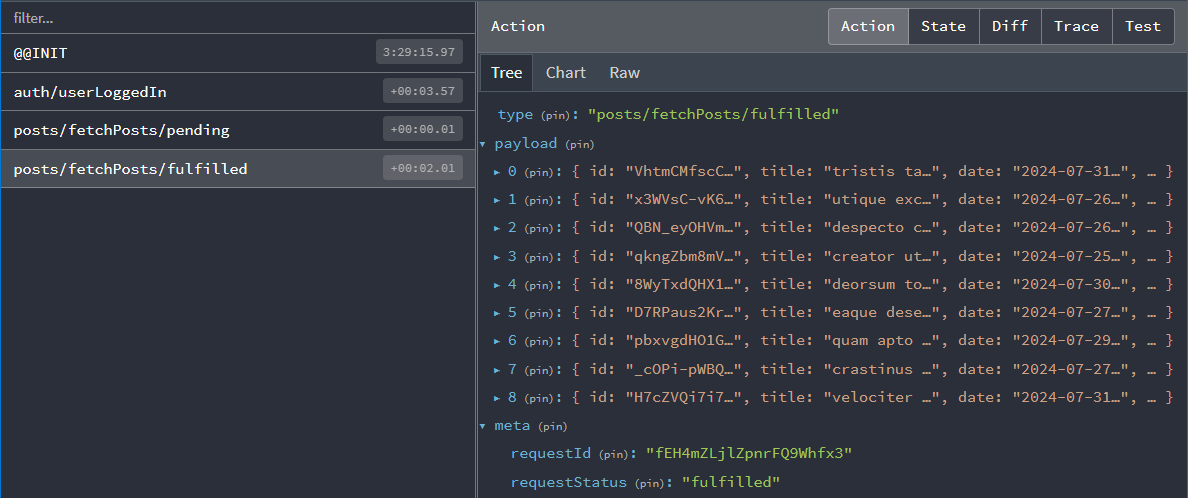
当 Promise 解析后,fetchPosts thunk 会获取我们从回调中返回的 response.data 数组,并分发一个 'posts/fetchPosts/fulfilled' 动作,其中包含帖子数组作为 action.payload:
还原器与加载操作
接下来,我们需要在还原器中处理这两个操作。这需要更深入地了解我们一直使用的 createSlice API。
我们已经看到,createSlice 会为我们在 reducers 字段中定义的每个还原器函数生成一个 action 创建器,并且生成的操作类型包含切片的名称,例如:
console.log(
  postUpdated({ id: '123', title: 'First Post', content: 'Some text here' })
)
/*
{
  type: 'posts/postUpdated',
  payload: {
    id: '123',
    title: 'First Post',
    content: 'Some text here'
  }
}
*/
我们也已经看到,可以使用 createSlice 中的 extraReducers 字段来响应在切片外部定义的操作。
这种情况下,我们需要监听由 fetchPosts thunk 分发的 "pending" 和 "fulfilled" action 类型。这些 action 创建器已附加到实际的 fetchPosts 函数上,我们可以将它们传递给 extraReducers 来监听这些 action:
export const fetchPosts = createAsyncThunk('posts/fetchPosts', async () => {
  const response = await client.get<Post[]>('/fakeApi/posts')
  return response.data
})

const postsSlice = createSlice({
  name: 'posts',
  initialState,
  reducers: {
    // omit existing reducers here
  },

  extraReducers: builder => {
    builder
      .addCase(userLoggedOut, state => {
        // Clear out the list of posts whenever the user logs out
        return initialState
      })
      .addCase(fetchPosts.pending, (state, action) => {
        state.status = 'pending'
      })
      .addCase(fetchPosts.fulfilled, (state, action) => {
        state.status = 'succeeded'
        // Add any fetched posts to the array
        state.posts.push(...action.payload)
      })
      .addCase(fetchPosts.rejected, (state, action) => {
        state.status = 'failed'
        state.error = action.error.message ?? 'Unknown Error'
      })
  }
})
我们将根据返回的 Promise 处理 thunk 可能派发的所有三种操作类型:
-
当请求开始时,将
status设为'pending' -
如果请求成功,我们将
status标记为'succeeded',并将获取的帖子添加到state.posts -
如果请求失败,我们将
status标记为'failed',并将任何错误信息保存到状态中以便显示
从组件派发 Thunks
现在我们已经编写了 fetchPosts thunk 并更新了切片以处理这些操作,让我们更新 <PostsList> 组件来实际启动数据获取。
我们将把 fetchPosts thunk 导入组件。像所有其他 action 创建器一样,我们必须派发它,因此我们还需要添加 useAppDispatch 钩子。由于我们希望在 <PostsList> 挂载时获取数据,我们需要导入 React 的 useEffect 钩子并派发该操作。
关键是要确保只尝试获取一次帖子列表。如果每次 <PostsList> 组件渲染时都获取(或因视图切换而重新创建组件),可能导致多次重复获取。我们可以利用 posts.status 值来决定是否真正开始获取:在组件中选择该状态,仅当状态为 'idle'(表示尚未开始)时才发起请求。
import React, { useEffect } from 'react'
import { Link } from 'react-router-dom'

import { useAppSelector, useAppDispatch } from '@/app/hooks'
import { TimeAgo } from '@/components/TimeAgo'

import { PostAuthor } from './PostAuthor'
import { ReactionButtons } from './ReactionButtons'
import { fetchPosts, selectAllPosts, selectPostsStatus } from './postsSlice'

export const PostsList = () => {
  const dispatch = useAppDispatch()
  const posts = useAppSelector(selectAllPosts)
  const postStatus = useAppSelector(selectPostsStatus)

  useEffect(() => {
    if (postStatus === 'idle') {
      dispatch(fetchPosts())
    }
  }, [postStatus, dispatch])

  // omit rendering logic
}
这样,我们现在应该能在登录应用后看到刷新的帖子列表!
避免重复获取
好消息是我们已成功从模拟服务器 API 获取了这些帖子对象。
不幸的是,我们遇到了一个问题。现在我们的帖子列表显示每个帖子都有重复项:

实际上,如果我们查看 Redux DevTools,我们可以看到派发了 两组 'pending' 和 'fulfilled' 操作:
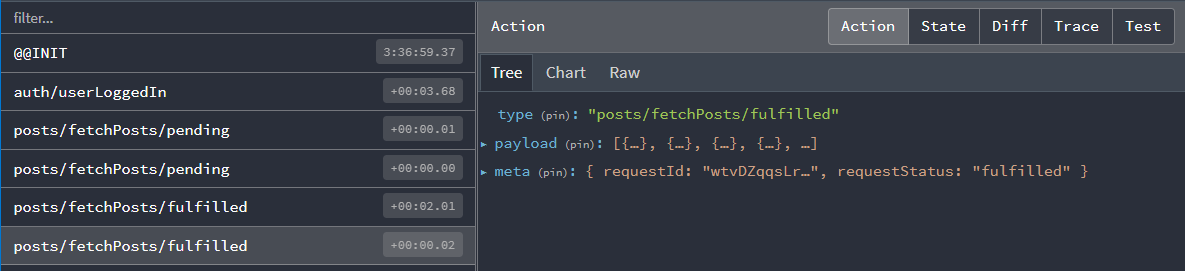
为什么会这样?我们不是刚刚添加了对 postStatus === 'idle' 的检查吗?这难道还不足以确保我们只派发 thunk 一次吗?
嗯,是...但也不是 :)
这里 useEffect 中的逻辑本身是正确的。问题在于,我们当前处于应用的开发构建版本中,在开发环境下,当处于 <StrictMode> 组件内时,React 会在挂载时运行所有 useEffect 钩子两次,以便更明显地暴露某些类型的错误。
在这种情况下,发生的事情是:
-
<PostsList>组件挂载 -
useEffect钩子第一次运行。此时postStatus的值为'idle',因此它派发了fetchPoststhunk -
fetchPosts立即派发了fetchPosts.pendingaction,因此 Redux store 确实立即将状态更新为'pending'... -
但 React 在没有重新渲染组件的情况下再次运行
useEffect,因此 effect 仍然认为postStatus是'idle',于是第二次派发fetchPosts -
两个 thunk 都完成了数据获取并分发了
fetchPosts.fulfilledaction;因此,fulfilledreducer 会运行两次,导致重复的帖子集合被添加到 state 中
那么,我们该如何解决这个问题呢?
一种选择是从应用中移除 <StrictMode> 标签。但是,React 团队推荐使用它,而且它确实有助于捕获其他问题。
我们可以使用 useRef 钩子编写一些复杂的逻辑来跟踪该组件是否是第一次渲染,并以此确保只派发一次 fetchPosts。但是,这有点繁琐。
最后一种选择是使用 Redux 状态中的实际 state.posts.status 值来检查是否已有请求在进行中,如果是,则让 thunk 本身退出。幸运的是,createAsyncThunk 提供了一种实现方式。
检查异步 Thunk 的条件
createAsyncThunk 接受一个可选的 condition 回调函数,我们可以用它来执行该检查。如果提供了此回调,它会在 thunk 调用开始时运行,并且如果 condition 返回 false.,则会取消整个 thunk。
在本例中,我们希望避免在 state.posts.status 字段不是 'idle' 时运行 thunk。我们已经有一个 selectPostsStatus 选择器可用,因此可以添加 condition 选项并检查该值:
export const fetchPosts = createAppAsyncThunk(
  'posts/fetchPosts',
  async () => {
    const response = await client.get<Post[]>('/fakeApi/posts')
    return response.data
  },
  {
    condition(arg, thunkApi) {
      const postsStatus = selectPostsStatus(thunkApi.getState())
      if (postsStatus !== 'idle') {
        return false
      }
    }
  }
)
现在,当我们重新加载页面并查看 <PostsList> 时,应该只会看到一组帖子,没有重复项,并且在 Redux DevTools 中也应该只看到一组派发的 action。
你并不需要为所有 thunk 都添加 condition,但有时它对于确保一次只发出一个请求很有用。
请注意 RTK Query 会为你管理这一点! 它会在所有组件中对请求进行去重,因此每个请求只发生一次,你无需自己处理。
显示加载状态
我们的 <PostsList> 组件已经在检查 Redux 中存储的帖子的任何更新,并在列表更改时重新渲染自身。因此,如果我们刷新页面,应该会看到来自模拟 API 的随机帖子出现在屏幕上。但是,似乎存在一些延迟——<PostsList> 最初是空的,几秒钟后帖子才会显示。
真实的 API 调用可能需要一些时间才能返回响应,因此在 UI 中显示某种"加载中..."指示器通常是个好主意,这样用户就知道我们正在等待数据。
我们可以更新 <PostsList> 组件,根据 state.posts.status 值展示不同的 UI:加载时显示旋转图标,失败时显示错误信息,获取到数据时展示实际帖子列表。
同时,这可能是抽离 <PostExcerpt> 组件的好时机,用于封装列表中单个帖子的渲染逻辑。
最终效果如下:
import React, { useEffect } from 'react'
import { Link } from 'react-router-dom'

import { useAppSelector, useAppDispatch } from '@/app/hooks'

import { Spinner } from '@/components/Spinner'
import { TimeAgo } from '@/components/TimeAgo'

import { PostAuthor } from './PostAuthor'
import { ReactionButtons } from './ReactionButtons'
import {
  Post,
  selectAllPosts,
  selectPostsError,
  fetchPosts
} from './postsSlice'

interface PostExcerptProps {
  post: Post
}

function PostExcerpt({ post }: PostExcerptProps) {
  return (
    <article className="post-excerpt" key={post.id}>
      <h3>
        <Link to={`/posts/${post.id}`}>{post.title}</Link>
      </h3>
      <div>
        <PostAuthor userId={post.user} />
        <TimeAgo timestamp={post.date} />
      </div>
      <p className="post-content">{post.content.substring(0, 100)}</p>
      <ReactionButtons post={post} />
    </article>
  )
}

export const PostsList = () => {
  const dispatch = useAppDispatch()
  const posts = useAppSelector(selectAllPosts)
  const postStatus = useAppSelector(selectPostsStatus)
  const postsError = useAppSelector(selectPostsError)

  useEffect(() => {
    if (postStatus === 'idle') {
      dispatch(fetchPosts())
    }
  }, [postStatus, dispatch])

  let content: React.ReactNode

  if (postStatus === 'pending') {
    content = <Spinner text="Loading..." />
  } else if (postStatus === 'succeeded') {
    // Sort posts in reverse chronological order by datetime string
    const orderedPosts = posts
      .slice()
      .sort((a, b) => b.date.localeCompare(a.date))

    content = orderedPosts.map(post => (
      <PostExcerpt key={post.id} post={post} />
    ))
  } else if (postStatus === 'rejected') {
    content = <div>{postsError}</div>
  }

  return (
    <section className="posts-list">
      <h2>Posts</h2>
      {content}
    </section>
  )
}
您可能会注意到 API 调用需要较长时间完成,加载微调器会持续显示约两秒。我们的模拟 API 服务器配置了 2 秒的响应延迟,专门用于可视化加载状态。如需调整此行为,可修改 api/server.ts 中的这行代码:
// Add an extra delay to all endpoints, so loading spinners show up.
const ARTIFICIAL_DELAY_MS = 2000
您可以根据需要随时启用或禁用此延迟效果以加速 API 调用。
可选:在 createSlice 内部定义 Thunk
当前,fetchPosts thunk 定义在 postsSlice.ts 文件中,但位于 createSlice() 调用之外。
可通过修改 reducers 字段的定义方式,将 thunk 定义在 createSlice 内部(如需尝试,请参考详细说明):
Defining Thunks in createSlice
We've seen that the standard way to write the createSlice.reducers field is as an object, where the keys become the action names, and the values are reducers. We also saw that the values can be an object with the {reducer, prepare} functions for creating an action object with the values we want.
Alternately, the reducers field can be a callback function that receives a create object. This is somewhat similar to what we saw with extraReducers, but with a different set of methods for creating reducers and actions:
create.reducer<PayloadType>(caseReducer): defines a case reducercreate.preparedReducer(prepare, caseReducer): defines a reducer with a prepare callback
Then, return an object like before with the reducer names as the fields, but call the create methods to make each reducer. Here's what the postsSlice would look like converted to this syntax:
const postsSlice = createSlice({
  name: 'posts',
  initialState,
  reducers: create => {
    return {
      postAdded: create.preparedReducer(
        (title: string, content: string, userId: string) => {
          return {
            payload: {
              id: nanoid(),
              date: new Date().toISOString(),
              title,
              content,
              user: userId,
              reactions: initialReactions
            }
          }
        },
        (state, action) => {
          state.posts.push(action.payload)
        }
      ),
      postUpdated: create.reducer<PostUpdate>((state, action) => {
        const { id, title, content } = action.payload
        const existingPost = state.posts.find(post => post.id === id)
        if (existingPost) {
          existingPost.title = title
          existingPost.content = content
        }
      }),
      reactionAdded: create.reducer<{ postId: string; reaction: ReactionName }>(
        (state, action) => {
          const { postId, reaction } = action.payload
          const existingPost = state.posts.find(post => post.id === postId)
          if (existingPost) {
            existingPost.reactions[reaction]++
          }
        }
      )
    }
  },
  extraReducers: builder => {
    // same as before
  }
})
Writing reducers as a callback opens the door for extending the capabilities of createSlice. In particular, it's possible to make a special version of createSlice that has the ability to use createAsyncThunk baked in.
First, import buildCreateSlice and asyncThunkCreator, then call buildCreateSlice like this:
import { buildCreateSlice, asyncThunkCreator } from '@reduxjs/toolkit'

export const createAppSlice = buildCreateSlice({
  creators: { asyncThunk: asyncThunkCreator }
})
That gives you a version of createSlice with the ability to write thunks inside.
Finally, we can use that createAppSlice method to define our postsSlice with the fetchPosts thunk inside. When we do that, a couple other things change:
- We can't pass in the
RootStategeneric directly, so we have to dogetState() as RootStateto cast it - We can pass in all of the reducers that handle the thunk actions as part of the options to
create.asyncThunk(), and remove those from theextraReducersfield:
const postsSlice = createAppSlice({
  name: 'posts',
  initialState,
  reducers: create => {
    return {
      // omit the other reducers
      fetchPosts: create.asyncThunk(
        // Payload creator function to fetch the data
        async () => {
          const response = await client.get<Post[]>('/fakeApi/posts')
          return response.data
        },
        {
          // Options for `createAsyncThunk`
          options: {
            condition(arg, thunkApi) {
              const { posts } = thunkApi.getState() as RootState
              if (posts.status !== 'idle') {
                return false
              }
            }
          },
          // The case reducers to handle the dispatched actions.
          // Each of these is optional, but must use these names.
          pending: (state, action) => {
            state.status = 'pending'
          },
          fulfilled: (state, action) => {
            state.status = 'succeeded'
            // Add any fetched posts to the array
            state.posts.push(...action.payload)
          },
          rejected: (state, action) => {
            state.status = 'rejected'
            state.error = action.error.message ?? 'Unknown Error'
          }
        }
      )
    }
  },
  extraReducers: builder => {
    builder.addCase(userLoggedOut, state => {
      // Clear out the list of posts whenever the user logs out
      return initialState
    })
    // The thunk handlers have been removed here
  }
})
Remember, the create callback syntax is optional! The only time you have to use it is if you really want to write thunks inside of createSlice. That said, it does remove the need to use the PayloadAction type, and cuts down on extraReducers as well.
加载用户数据
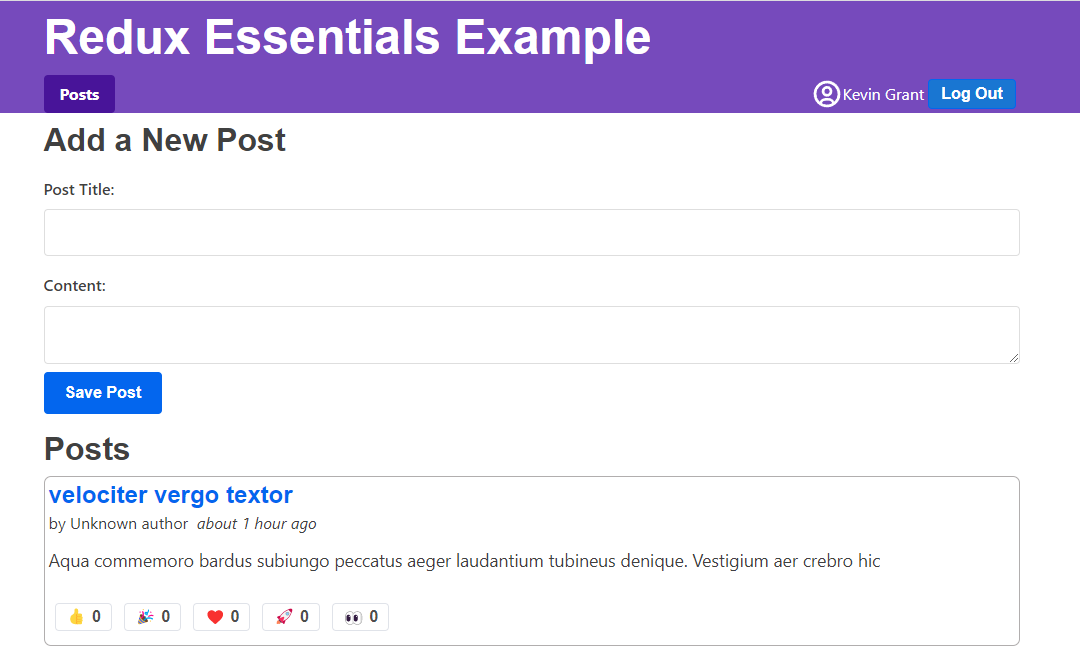
虽然已成功获取并显示帖子列表,但存在一个问题:所有帖子作者均显示为"Unknown author":

这是因为帖子数据由模拟 API 服务器随机生成,每次刷新页面时都会生成新的虚拟用户数据。我们需要更新用户切片,在应用启动时获取用户数据。
与之前类似,我们将创建另一个异步 thunk 从 API 获取用户数据,然后在 extraReducers 切片字段中处理 fulfilled 动作(暂不处理加载状态):
import { createSlice, PayloadAction } from '@reduxjs/toolkit'

import { client } from '@/api/client'

import type { RootState } from '@/app/store'
import { createAppAsyncThunk } from '@/app/withTypes'

interface User {
  id: string
  name: string
}

export const fetchUsers = createAppAsyncThunk('users/fetchUsers', async () => {
  const response = await client.get<User[]>('/fakeApi/users')
  return response.data
})

const initialState: User[] = []

const usersSlice = createSlice({
  name: 'users',
  initialState,
  reducers: {},
  extraReducers(builder) {
    builder.addCase(fetchUsers.fulfilled, (state, action) => {
      return action.payload
    })
  }
})

export default usersSlice.reducer

// omit selectors
您可能注意到本次 case reducer 未使用 state 变量,而是直接返回 action.payload。Immer 支持两种状态更新方式:直接修改现有状态值,或返回全新结果。返回新值会完全替换当前状态(注意:手动返回新值时需自行处理不可变更新逻辑)。
初始状态为空数组,本可通过 state.push(...action.payload) 直接修改。但当前需求是用服务器返回数据完全替换用户列表,这种方式可避免意外复制用户列表的风险。
有关 Immer 状态更新机制的更多说明,请参阅 RTK 文档中的《使用 Immer 编写 Reducers》指南。
用户数据只需在应用启动时获取一次。我们可在 main.tsx 文件中直接派发 fetchUsers thunk(因 store 在此可用):
// omit other imports

import store from './app/store'
import { fetchUsers } from './features/users/usersSlice'

import { worker } from './api/server'

async function start() {
  // Start our mock API server
  await worker.start({ onUnhandledRequest: 'bypass' })

  store.dispatch(fetchUsers())

  const root = createRoot(document.getElementById('root')!)

  root.render(
    <React.StrictMode>
      <Provider store={store}>
        <App />
      </Provider>
    </React.StrictMode>
  )
}

start()
注意这是有效的启动数据获取方式:实际在渲染 React 组件前就已启动数据获取流程,因此数据能更快就绪(此原则同样适用于 React Router 数据加载器)。
现在每篇帖子应能正常显示用户名,<AddPostForm> 中的"作者"下拉菜单也应显示相同用户列表。
添加新帖子
本节我们还有最后一步。当通过 <AddPostForm> 添加新帖子时,该帖子目前仅被添加到应用内的 Redux store 中。我们需要实际发起 API 调用,在模拟 API 服务器中创建新帖子条目以实现"保存"。(由于是模拟 API,重新加载页面后新帖子不会持久保存;但若使用真实后端服务器,下次加载时数据将仍然可用。)
使用 Thunk 发送数据
我们可以使用 createAsyncThunk 来协助发送数据,而不仅仅是获取数据。我们将创建一个 thunk,它接受来自 <AddPostForm> 的值作为参数,并向模拟 API 发起 HTTP POST 请求来保存数据。
在这个过程中,我们将改变 reducer 中处理新帖子对象的方式。当前,postsSlice 在 postAdded 的 prepare 回调中创建新帖子对象并生成唯一 ID。在大多数保存数据到服务器的应用中,服务器会负责生成唯一 ID 并填充额外字段,通常在其响应中返回完整数据。因此,我们可以向服务器发送类似 { title, content, user: userId } 的请求体,然后将其返回的完整帖子对象添加到 postsSlice 状态中。我们还将提取 NewPost 类型来表示传递给 thunk 的对象。
type PostUpdate = Pick<Post, 'id' | 'title' | 'content'>
type NewPost = Pick<Post, 'title' | 'content' | 'user'>

export const addNewPost = createAppAsyncThunk(
  'posts/addNewPost',
  // The payload creator receives the partial `{title, content, user}` object
  async (initialPost: NewPost) => {
    // We send the initial data to the fake API server
    const response = await client.post<Post>('/fakeApi/posts', initialPost)
    // The response includes the complete post object, including unique ID
    return response.data
  }
)

const postsSlice = createSlice({
  name: 'posts',
  initialState,
  reducers: {
    // The existing `postAdded` reducer and prepare callback were deleted
    reactionAdded(state, action) {}, // omit logic
    postUpdated(state, action) {} // omit logic
  },
  extraReducers(builder) {
    builder
      // omit the cases for `fetchPosts` and `userLoggedOut`
      .addCase(addNewPost.fulfilled, (state, action) => {
        // We can directly add the new post object to our posts array
        state.posts.push(action.payload)
      })
  }
})

// Remove `postAdded`
export const { postUpdated, reactionAdded } = postsSlice.actions
在组件中检查 Thunk 结果
最后,我们将更新 <AddPostForm> 组件,使其派发 addNewPost thunk 而非原有的 postAdded action。由于这是对服务器的另一个 API 调用,它需要时间且_可能_失败。addNewPost() thunk 会自动将其 pending/fulfilled/rejected action 派发到 Redux store,而我们已经处理了这些 action。
如果需要,我们_本可以_在 postsSlice 中使用第二个加载联合类型来跟踪请求状态。但在此示例中,我们将加载状态跟踪限制在组件内部,以展示其他可行方案。
在等待请求时,我们至少应该禁用"保存帖子"按钮,这样用户就不会意外尝试保存帖子两次。如果请求失败,我们可能还需要在表单中显示错误信息,或者将其记录到控制台。
我们可以让组件逻辑等待异步 thunk 完成,并在完成后检查结果:
import React, { useState } from 'react'

import { useAppDispatch, useAppSelector } from '@/app/hooks'

import { selectCurrentUsername } from '@/features/auth/authSlice'

import { addNewPost } from './postsSlice'

// omit field types

export const AddPostForm = () => {
  const [addRequestStatus, setAddRequestStatus] = useState<'idle' | 'pending'>(
    'idle'
  )

  const dispatch = useAppDispatch()
  const userId = useAppSelector(selectCurrentUsername)!

  const handleSubmit = async (e: React.FormEvent<AddPostFormElements>) => {
    // Prevent server submission
    e.preventDefault()

    const { elements } = e.currentTarget
    const title = elements.postTitle.value
    const content = elements.postContent.value

    const form = e.currentTarget

    try {
      setAddRequestStatus('pending')
      await dispatch(addNewPost({ title, content, user: userId })).unwrap()

      form.reset()
    } catch (err) {
      console.error('Failed to save the post: ', err)
    } finally {
      setAddRequestStatus('idle')
    }
  }

  // omit rendering logic
}
我们可以使用 React 的 useState Hook 添加加载状态,类似于在 postsSlice 中跟踪帖子获取状态的方式。这种情况下,我们只需知道请求是否正在进行中。
当我们调用 dispatch(addNewPost()) 时,异步 thunk 会从 dispatch 返回一个 Promise。我们可以在此处 await 该 Promise 以了解 thunk 何时完成请求。但此时我们还不知道请求是成功还是失败。
createAsyncThunk 在内部处理所有错误,因此我们在日志中不会看到任何关于"被拒绝的 Promise"(rejected Promises)的消息。它会返回派发的最终 action:如果成功则为 fulfilled action,如果失败则为 rejected action。这意味着 await dispatch(someAsyncThunk()) 总是"成功",且结果是 action 对象本身。
然而,我们通常需要编写逻辑来检查实际请求的成功或失败。Redux Toolkit 向返回的 Promise 添加了 .unwrap() 方法,它会返回一个新的 Promise:若成功则解析为来自 fulfilled action 的实际 action.payload 值;若失败则抛出 rejected action 的错误。这让我们可以在组件中使用常规的 try/catch 逻辑处理成功和失败。因此,如果帖子创建成功,我们将清除输入字段以重置表单;如果失败,则将错误记录到控制台。
若想观察 addNewPost API 调用失败的情况,可尝试新建帖子并在"内容"字段仅输入"error"(不带引号)。服务器会识别该关键词并返回失败响应,此时控制台将记录相应错误信息。
学习要点
异步逻辑与数据获取始终是复杂主题。如您所见,Redux Toolkit 提供了自动化处理典型 Redux 数据获取模式的工具。
当前从模拟 API 获取数据的应用效果如下:
提醒一下,本节涵盖的核心内容:
- Redux 通过称为"中间件"的插件实现异步逻辑
- 标准异步中间件
redux-thunk已集成在 Redux Toolkit 中 - Thunk 函数接收
dispatch和getState作为参数,可在异步逻辑中使用
- 标准异步中间件
- 可调度附加 action 跟踪 API 调用加载状态
- 典型模式:调用前调度"pending" action,成功返回数据时调度"succeeded",失败时调度"failure"包含错误信息
- 加载状态通常应存储为联合字符串字面量,如
'idle' | 'pending' | 'succeeded' | 'rejected'
- Redux Toolkit 提供
createAsyncThunkAPI 自动调度这些 actioncreateAsyncThunk接收返回 Promise 的"payload creator"回调函数,自动生成pending/fulfilled/rejectedaction 类型- 生成的 action creator(如
fetchPosts)根据返回的 Promise 调度对应 action - 可在
createSlice的extraReducers字段监听这些 action 类型,并在 reducer 中更新状态 createAsyncThunk的condition选项可根据 Redux 状态取消请求- Thunk 可返回 Promise。特别对于
createAsyncThunk,可通过await dispatch(someThunk()).unwrap()在组件层级处理请求成功/失败
下一步是什么?
我们还有最后一组核心 Redux Toolkit API 和使用模式需要探讨。在第 6 部分:性能优化与数据规范化中,我们将分析 Redux 使用对 React 性能的影响,并介绍优化应用性能的多种方法。