Redux 핵심 가이드, 파트 5: 비동기 로직과 데이터 패칭
이 페이지는 PageTurner AI로 번역되었습니다(베타). 프로젝트 공식 승인을 받지 않았습니다. 오류를 발견하셨나요? 문제 신고 →
- 비동기 로직을 위한 Redux "thunk" 미들웨어 사용법
- 비동기 요청 상태 처리 패턴
- Redux Toolkit의
createAsyncThunkAPI를 사용한 비동기 호출 관리
- 서버 REST API에서 데이터를 가져오고 업데이트하기 위한 HTTP 요청 사용 경험
소개
파트 4: Redux 데이터 사용하기에서는 React 컴포넌트 내에서 Redux 스토어의 여러 데이터 조각을 사용하는 방법, 디스패치 전 액션 객체 내용을 커스터마이징하는 방법, 리듀서에서 더 복잡한 업데이트 로직을 처리하는 방법을 살펴보았습니다.
지금까지 우리가 다룬 모든 데이터는 React 클라이언트 애플리케이션 내부에 직접 존재했습니다. 그러나 대부분의 실제 애플리케이션은 HTTP API 호출을 통해 서버에서 데이터를 가져오고 저장해야 합니다.
이번 섹션에서는 소셜 미디어 앱을 개조하여 API에서 게시물과 사용자 데이터를 가져오고, 새 게시물을 API에 저장하여 추가하도록 하겠습니다.
Redux Toolkit에는 RTK Query 데이터 패칭 및 캐싱 API가 포함되어 있습니다. RTK Query는 Redux 앱을 위해 특별히 제작된 데이터 패칭 및 캐싱 솔루션으로, 데이터 패칭 관리를 위한 thunk나 리듀서 같은 추가 Redux 로직을 전혀 작성하지 않아도 됩니다. 데이터 패칭의 기본 접근 방식으로 RTK Query를 특별히 가르칩니다.
RTK Query는 이 페이지에서 보여준 패턴을 기반으로 구축되었으므로, 이 섹션은 Redux에서 데이터 패칭이 작동하는 기본 메커니즘을 이해하는 데 도움이 될 것입니다.
RTK Query 사용법은 파트 7: RTK Query 기초에서 다루겠습니다.
예제 REST API 및 클라이언트
예제 프로젝트를 격리하면서도 현실적으로 유지하기 위해, 초기 프로젝트 설정에는 이미 가짜 메모리 내 REST API가 포함되어 있습니다(Mock Service Worker 모의 API 도구 사용). 이 API는 엔드포인트 기본 URL로 /fakeApi를 사용하며, /fakeApi/posts, /fakeApi/users, fakeApi/notifications에 대해 일반적인 GET/POST/PUT/DELETE HTTP 메서드를 지원합니다. src/api/server.ts에 정의되어 있습니다.
프로젝트에는 또한 axios 같은 인기 HTTP 라이브러리와 유사한 client.get() 및 client.post() 메서드를 노출하는 소형 HTTP API 클라이언트 객체가 포함되어 있습니다. src/api/client.ts에 정의되어 있습니다.
이 섹션에서는 이 client 객체를 사용해 메모리 내 가짜 REST API에 HTTP 호출을 할 것입니다.
또한 모의 서버는 페이지가 로드될 때마다 동일한 랜덤 시드를 재사용하도록 설정되어 있어 동일한 가짜 사용자 및 게시물 목록을 생성합니다. 이를 재설정하려면 브라우저의 로컬 스토리지에서 'randomTimestampSeed' 값을 삭제하고 페이지를 새로 고치거나, src/api/server.ts를 수정하여 useSeededRNG를 false로 설정하면 됩니다.
상기하자면, 코드 예제는 각 섹션의 핵심 개념과 변경 사항에 초점을 맞춥니다. 애플리케이션의 전체 변경 사항은 CodeSandbox 프로젝트 및 프로젝트 저장소의 tutorial-steps-ts 브랜치에서 확인하세요.
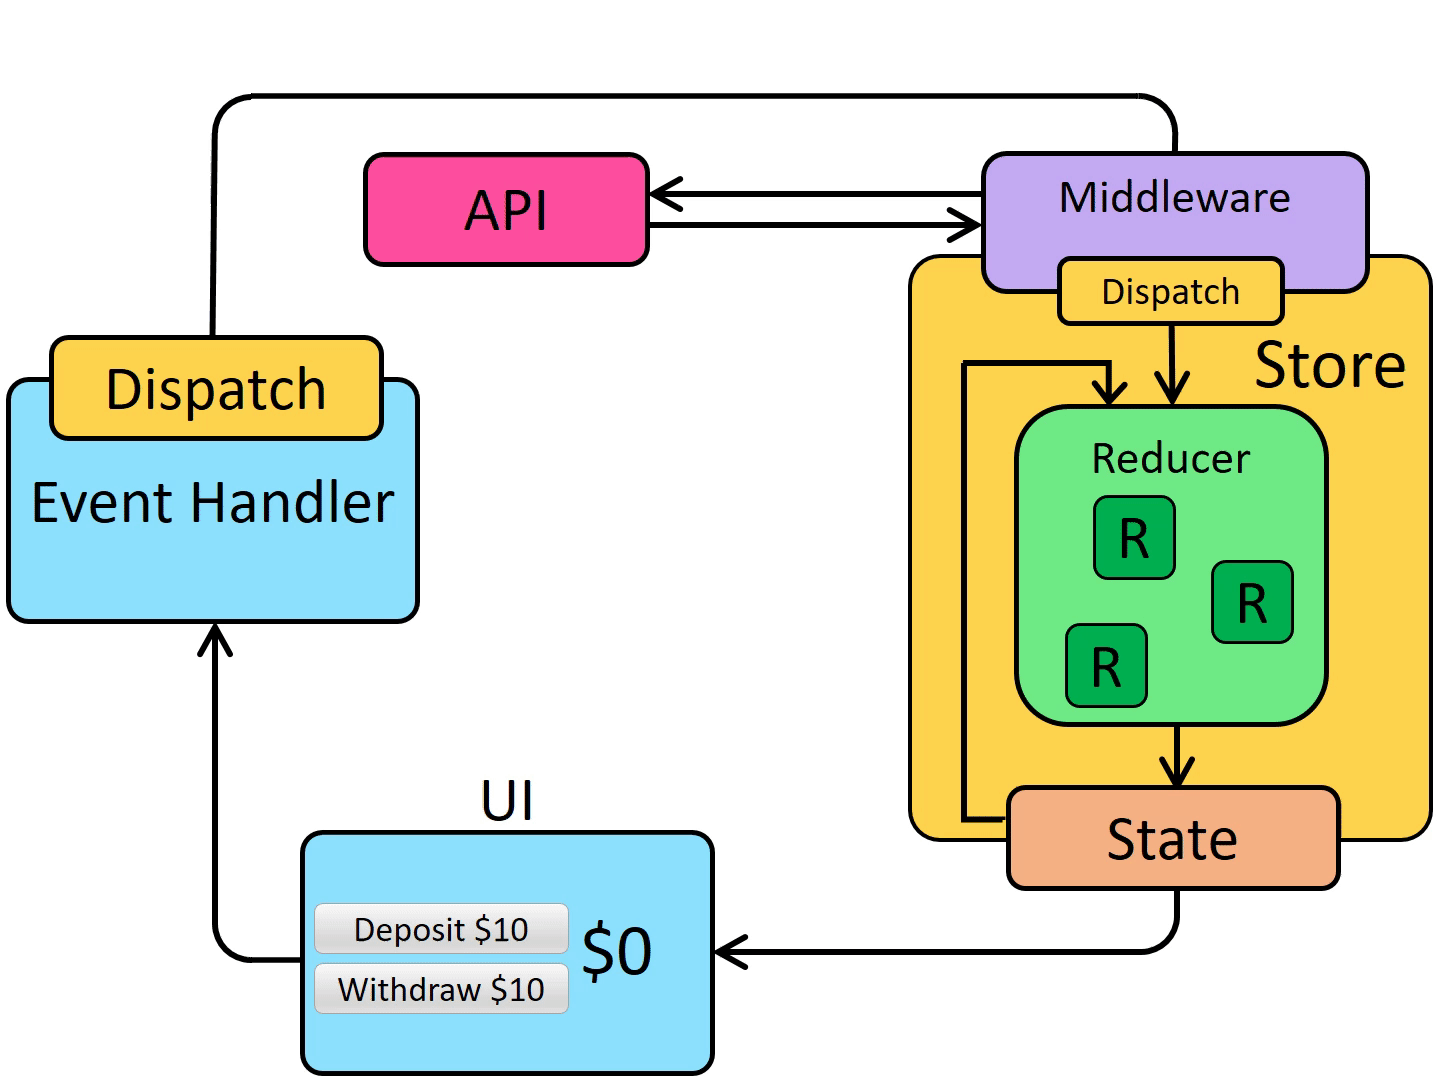
미들웨어를 통한 비동기 로직 활성화
Redux 스토어 자체는 비동기 로직에 대해 아무것도 알지 못합니다. 동기적으로 액션을 디스패치하고, 루트 리듀서 함수를 호출하여 상태를 업데이트하며, UI에 변경 사항을 알리는 방법만 알고 있습니다. 모든 비동기 작업은 스토어 외부에서 발생해야 합니다.
하지만 비동기 로직이 액션을 디스패치하거나 현재 스토어 상태를 확인하는 방식으로 스토어와 상호작용해야 한다면 어떻게 해야 할까요? 바로 Redux 미들웨어가 필요한 순간입니다. 미들웨어는 스토어를 확장하여 추가 기능을 제공하며 다음을 가능하게 합니다:
-
모든 액션이 디스패치될 때 추가 로직 실행하기(예: 액션과 상태 로깅)
-
디스패치된 액션을 일시 중지, 수정, 지연, 교체 또는 중단하기
-
dispatch및getState에 접근할 수 있는 추가 코드 작성하기 -
dispatch가 일반 액션 객체 외에도 함수나 프로미스 같은 값을 허용하도록 가르치기(이를 가로채서 실제 액션 객체 디스패치) -
비동기 로직이나 다른 부수 효과를 사용하는 코드 작성하기
미들웨어 사용의 가장 일반적인 이유는 다양한 비동기 로직이 스토어와 상호작용할 수 있도록 하기 위함입니다. 이를 통해 액션을 디스패치하고 스토어 상태를 확인하는 코드를 작성할 수 있으며, 해당 로직을 UI와 분리된 상태로 유지할 수 있습니다.
미들웨어가 Redux 스토어를 어떻게 사용자 정의하는지에 대한 자세한 내용은 다음을 참조하세요:
미들웨어와 Redux 데이터 흐름
이전에 우리는 Redux의 동기적 데이터 흐름을 살펴보았습니다.
미들웨어는 dispatch 시작 부분에 추가 단계를 도입하여 Redux 데이터 흐름을 업데이트합니다. 이렇게 하면 미들웨어가 HTTP 요청과 같은 로직을 실행한 후 액션을 디스패치할 수 있습니다. 따라서 비동기 데이터 흐름은 다음과 같이 됩니다:
썽크(Thunks)와 비동기 로직
Redux에는 다양한 비동기 미들웨어가 있으며 각기 다른 문법으로 로직을 작성할 수 있습니다. 가장 일반적인 비동기 미들웨어는 redux-thunk로, 비동기 로직을 직접 포함할 수 있는 일반 함수를 작성할 수 있게 해줍니다. Redux Toolkit의 configureStore 함수는 기본적으로 썽크 미들웨어를 자동 설정하며, Redux에서 비동기 로직 작성 시 썽크를 표준 접근법으로 권장합니다.
썽크 함수
썽크 미들웨어가 Redux 스토어에 추가되면 _썽크 함수_를 store.dispatch에 직접 전달할 수 있습니다. 썽크 함수는 항상 (dispatch, getState)를 인자로 받으며, 필요에 따라 이들을 썽크 내부에서 사용할 수 있습니다.
썽크 함수는 동기 또는 비동기 어떤 로직도 포함할 수 있습니다.
썽크는 일반적으로 dispatch(increment())처럼 액션 생성자를 사용해 일반 액션을 디스패치합니다:
const store = configureStore({ reducer: counterReducer })

const exampleThunkFunction = (
  dispatch: AppDispatch,
  getState: () => RootState
) => {
  const stateBefore = getState()
  console.log(`Counter before: ${stateBefore.counter}`)
  dispatch(increment())
  const stateAfter = getState()
  console.log(`Counter after: ${stateAfter.counter}`)
}

store.dispatch(exampleThunkFunction)
일반 액션 객체 디스패치와의 일관성을 위해, 우리는 일반적으로 이를 _썽크 액션 생성자_로 작성합니다. 이 액션 생성자는 썽크 함수를 반환하며, 썽크 내부에서 사용할 수 있는 인수를 받을 수 있습니다.
const logAndAdd = (amount: number) => {
  return (dispatch: AppDispatch, getState: () => RootState) => {
    const stateBefore = getState()
    console.log(`Counter before: ${stateBefore.counter}`)
    dispatch(incrementByAmount(amount))
    const stateAfter = getState()
    console.log(`Counter after: ${stateAfter.counter}`)
  }
}

store.dispatch(logAndAdd(5))
Thunk는 일반적으로 "슬라이스" 파일에 작성됩니다. thunk 데이터 가져오기는 일반적으로 특정 슬라이스의 업데이트 로직과 개념적으로 관련이 있기 때문입니다. 이 섹션을 진행하면서 thunk를 정의하는 몇 가지 다른 방법을 살펴보겠습니다.
비동기 Thunk 작성하기
Thunk 내부에는 setTimeout, Promise, async/await과 같은 비동기 로직이 포함될 수 있습니다. 이로 인해 Thunk는 서버 API에 HTTP 호출을 수행하기에 좋은 장소가 됩니다.
Redux의 데이터 가져오기 로직은 일반적으로 예측 가능한 패턴을 따릅니다:
-
요청이 진행 중임을 나타내기 위해 요청 전에 "시작(start)" 액션이 디스패치됩니다. 이는 중복 요청을 건너뛰거나 UI에 로딩 표시기를 보여주기 위해 로딩 상태를 추적하는 데 사용될 수 있습니다.
-
fetch또는 래퍼 라이브러리를 사용하여 결과에 대한 프로미스와 함께 비동기 요청이 수행됩니다 -
요청 프로미스가 해결되면 비동기 로직은 결과 데이터를 포함한 "성공(success)" 액션이나 오류 세부 정보를 포함한 "실패(failure)" 액션을 디스패치합니다. 리듀서 로직은 두 경우 모두 로딩 상태를 지우고, 성공한 경우 결과 데이터를 처리하거나 표시할 수 있도록 오류 값을 저장합니다.
이러한 단계는 필수는 아니지만 일반적으로 사용됩니다. (성공적인 결과만 신경 쓴다면, 요청이 끝날 때 단일 "성공(success)" 액션만 디스패치하고 "시작(start)" 및 "실패(failure)" 액션을 건너뛸 수 있습니다.)
Redux Toolkit은 비동기 요청을 설명하는 액션의 생성 및 디스패치를 구현하기 위해 createAsyncThunk API를 제공합니다.
기본적인 createAsyncThunk 사용법은 다음과 같습니다:
import { createAsyncThunk } from '@reduxjs/toolkit'

export const fetchItemById = createAsyncThunk(
  'items/fetchItemById',
  async (itemId: string) => {
    const item = await someHttpRequest(itemId)
    return item
  }
)
createAsyncThunk가 비동기 요청에 대한 액션 디스패치 코드를 어떻게 단순화하는지에 대한 자세한 내용은 이 상세 섹션을 참조하세요. 곧 실제 사용 방법을 살펴보겠습니다.
Detailed Explanation: Dispatching Request Status Actions in Thunks
If we were to write out the code for a typical async thunk by hand, it might look like this:
const getRepoDetailsStarted = () => ({
  type: 'repoDetails/fetchStarted'
})
const getRepoDetailsSuccess = (repoDetails: RepoDetails) => ({
  type: 'repoDetails/fetchSucceeded',
  payload: repoDetails
})
const getRepoDetailsFailed = (error: any) => ({
  type: 'repoDetails/fetchFailed',
  error
})

const fetchIssuesCount = (org: string, repo: string) => {
  return async (dispatch: AppDispatch) => {
    dispatch(getRepoDetailsStarted())
    try {
      const repoDetails = await getRepoDetails(org, repo)
      dispatch(getRepoDetailsSuccess(repoDetails))
    } catch (err) {
      dispatch(getRepoDetailsFailed(err.toString()))
    }
  }
}
However, writing code using this approach is tedious. Each separate type of request needs repeated similar implementation:
- Unique action types need to be defined for the three different cases
- Each of those action types usually has a corresponding action creator function
- A thunk has to be written that dispatches the correct actions in the right sequence
createAsyncThunk abstracts this pattern by generating the action types and action creators, and generating a thunk that dispatches those actions automatically. You provide a callback function that makes the async call and returns a Promise with the result.
It's also easy to make mistakes with error handling when writing thunk logic yourself. In this case, the try block will actually catch errors from both a failed request, and any errors while dispatching. Handling this correctly would require restructuring the logic to separate those. createAsyncThunk already handles errors correctly for you internally.
Redux Thunk 타이핑하기
수동 작성 Thunk 타이핑하기
thunk를 직접 작성하는 경우, thunk 인수를 (dispatch: AppDispatch, getState: () => RootState)와 같이 명시적으로 타이핑할 수 있습니다. 이는 흔한 패턴이므로 재사용 가능한 AppThunk 타입을 정의하고 대신 사용할 수도 있습니다:
import { Action, ThunkAction, configureStore } from '@reduxjs/toolkit'

// omit actual store setup

// Infer the type of `store`
export type AppStore = typeof store
// Infer the `AppDispatch` type from the store itself
export type AppDispatch = typeof store.dispatch
// Same for the `RootState` type
export type RootState = ReturnType<typeof store.getState>
// Export a reusable type for handwritten thunks
export type AppThunk = ThunkAction<void, RootState, unknown, Action>
그런 다음 그것을 사용하여 작성 중인 thunk 함수를 설명할 수 있습니다:
// Use `AppThunk` as the return type, since we return a thunk function
const logAndAdd = (amount: number): AppThunk => {
  return (dispatch, getState) => {
    const stateBefore = getState()
    console.log(`Counter before: ${stateBefore.counter}`)
    dispatch(incrementByAmount(amount))
    const stateAfter = getState()
    console.log(`Counter after: ${stateAfter.counter}`)
  }
}
createAsyncThunk 타이핑
createAsyncThunk 타이핑하기: async (userId: string)
createAsyncThunk 내부에서 dispatch 또는 getState에 접근해야 할 경우, RTK는 createAsyncThunk.withTypes()를 호출해 올바른 dispatch와 getState 타입이 내장된 "사전 입력된" 버전을 정의할 수 있는 방법을 제공합니다. 이는 useSelector 및 useDispatch의 사전 입력된 버전을 정의한 방식과 동일합니다. 새로운 src/app/withTypes 파일을 생성하고, 해당 파일에서 내보내겠습니다:
import { createAsyncThunk } from '@reduxjs/toolkit'

import type { RootState, AppDispatch } from './store'

export const createAppAsyncThunk = createAsyncThunk.withTypes<{
  state: RootState
  dispatch: AppDispatch
}>()
TypeScript로 thunk를 정의하는 방법에 대한 자세한 내용은 다음을 참조하세요:
게시물 불러오기
지금까지 postsSlice는 하드코딩된 샘플 데이터를 초기 상태로 사용했습니다. 이를 게시물이 빈 배열로 시작하도록 변경한 다음 서버에서 게시물 목록을 가져오도록 하겠습니다.
이를 위해서는 API 요청의 현재 상태를 추적할 수 있도록 postsSlice의 상태 구조를 변경해야 합니다.
요청에 대한 로딩 상태
API 호출을 수행할 때, 우리는 그 진행 상황을 네 가지 가능한 상태 중 하나일 수 있는 작은 상태 머신으로 볼 수 있습니다:
-
요청이 아직 시작되지 않음
-
요청이 진행 중임
-
요청이 성공했으며 필요한 데이터를 확보함
-
요청이 실패했으며 오류 메시지가 있음
이 정보를 isLoading: true와 같은 불리언 값으로 추적할 수도 있지만, 이러한 상태를 단일 유니온 값으로 추적하는 것이 더 좋습니다. 이를 위한 좋은 패턴은 다음과 같은 상태 섹션을 갖는 것입니다(TypeScript 문자열 유니온 타입 표기법 사용):
{
  // Multiple possible status string union values
  status: 'idle' | 'pending' | 'succeeded' | 'failed',
  error: string | null
}
이러한 필드는 실제 저장되는 데이터와 함께 존재합니다. 특정 문자열 상태 이름은 필수 사항이 아니며, 원하는 경우 'pending' 대신 'loading'을, 'succeeded' 대신 'completed'와 같은 다른 이름을 자유롭게 사용할 수 있습니다.
이 정보를 사용하여 요청 진행 중에 UI에 무엇을 표시할지 결정할 수 있으며, 리듀서에 로직을 추가하여 데이터를 두 번 로드하는 경우를 방지할 수도 있습니다.
이 패턴을 사용하여 '게시물 가져오기' 요청의 로딩 상태를 추적하도록 postsSlice를 업데이트해 보겠습니다. 상태를 게시물 배열 그 자체에서 {posts, status, error} 형태로 변경할 것입니다. 또한 초기 상태에서 이전 샘플 게시물 항목을 제거하고, 로딩 및 오류 필드에 대한 몇 가지 새로운 셀렉터를 추가할 것입니다:
import { createSlice, nanoid } from '@reduxjs/toolkit'

// omit reactions and other types

interface PostsState {
  posts: Post[]
  status: 'idle' | 'pending' | 'succeeded' | 'failed'
  error: string | null
}

const initialState: PostsState = {
  posts: [],
  status: 'idle',
  error: null
}

const postsSlice = createSlice({
  name: 'posts',
  initialState,
  reducers: {
    postAdded: {
      reducer(state, action: PayloadAction<Post>) {
        state.posts.push(action.payload)
      },
      prepare(title: string, content: string, userId: string) {
        // omit prepare logic
      }
    },
    postUpdated(state, action: PayloadAction<PostUpdate>) {
      const { id, title, content } = action.payload
      const existingPost = state.posts.find(post => post.id === id)
      if (existingPost) {
        existingPost.title = title
        existingPost.content = content
      }
    },
    reactionAdded(
      state,
      action: PayloadAction<{ postId: string; reaction: ReactionName }>
    ) {
      const { postId, reaction } = action.payload
      const existingPost = state.posts.find(post => post.id === postId)
      if (existingPost) {
        existingPost.reactions[reaction]++
      }
    }
  },
  extraReducers: builder => {
    builder.addCase(userLoggedOut, state => {
      // Clear out the list of posts whenever the user logs out
      return initialState
    })
  }
})

export const { postAdded, postUpdated, reactionAdded } = postsSlice.actions

export default postsSlice.reducer


export const selectAllPosts = (state: RootState) => state.posts.posts

export const selectPostById = (state: RootState, postId: string) =>
  state.posts.posts.find(post => post.id === postId)

export const selectPostsStatus = (state: RootState) => state.posts.status
export const selectPostsError = (state: RootState) => state.posts.error
이 변경의 일환으로, 배열이 이제 한 단계 더 깊어졌기 때문에 state를 배열로 사용하는 모든 부분을 state.posts로 변경해야 합니다.
네, 이제 state.posts.posts처럼 중복되고 다소 어색해 보이는 중첩 객체 경로가 생겼습니다 :) 이를 피하려면 중첩 배열 이름을 items나 data 등으로 변경할 수도 있지만, 지금은 그대로 두겠습니다.
createAsyncThunk로 데이터 가져오기
Redux Toolkit의 createAsyncThunk API는 '시작/성공/실패' 액션을 자동으로 디스패치하는 thunk를 생성합니다.
게시물 목록을 가져오기 위해 HTTP 요청을 수행하는 thunk를 추가하는 것으로 시작해 보겠습니다. src/api 폴더에서 client 유틸리티를 가져오고, 이를 사용하여 '/fakeApi/posts'로 요청을 보낼 것입니다.
import { createSlice, nanoid, PayloadAction } from '@reduxjs/toolkit'
import { client } from '@/api/client'

import type { RootState } from '@/app/store'
import { createAppAsyncThunk } from '@/app/withTypes'

// omit other imports and types

export const fetchPosts = createAppAsyncThunk('posts/fetchPosts', async () => {
  const response = await client.get<Post[]>('/fakeApi/posts')
  return response.data
})

const initialState: PostsState = {
  posts: [],
  status: 'idle',
  error: null
}
createAsyncThunk는 두 가지 인수를 받습니다:
-
생성된 액션 타입의 접두사로 사용될 문자열
-
일부 데이터를 포함하는 Promise 또는 오류와 함께 거부된 Promise를 반환해야 하는 '페이로드 생성기' 콜백 함수
페이로드 생성기는 일반적으로 HTTP 요청을 생성하며, HTTP 요청에서 반환된 Promise를 직접 반환하거나 API 응답에서 일부 데이터를 추출하여 반환할 수 있습니다. 일반적으로 JS async/await 구문을 사용하여 작성하며, 이는 somePromise.then() 체인 대신 표준 try/catch 로직을 사용하면서 프로미스를 활용하는 함수를 작성할 수 있게 합니다.
이 경우 액션 타입 접두사로 'posts/fetchPosts'를 전달합니다.
이 경우 fetchPosts에 대한 페이로드 생성 콜백은 인수가 필요 없으며, API 호출이 응답을 반환할 때까지 기다리기만 하면 됩니다. 응답 객체는 {data: []} 형태이며, 디스패치된 Redux 액션의 페이로드가 게시물 배열만 포함하기를 원합니다. 따라서 response.data를 추출하여 콜백에서 반환합니다.
dispatch(fetchPosts())를 호출하면 fetchPosts thunk는 먼저 'posts/fetchPosts/pending' 액션 타입을 디스패치합니다:
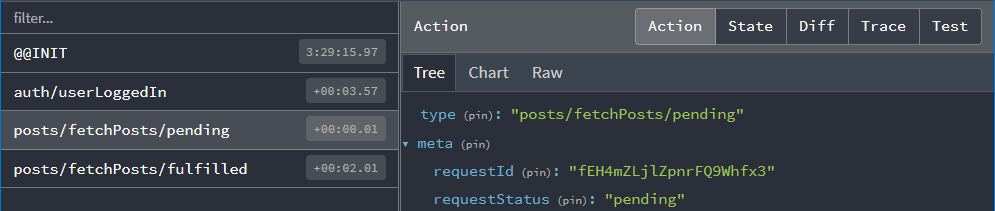
리듀서에서 이 액션을 수신하여 요청 상태를 'pending'으로 표시할 수 있습니다.
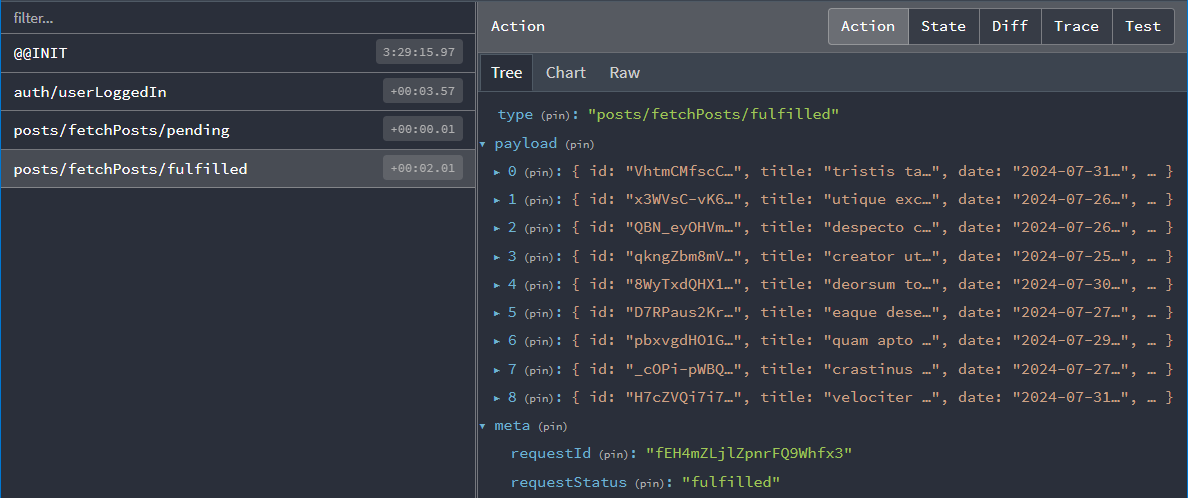
Promise가 해결되면 fetchPosts thunk는 콜백에서 반환한 response.data 배열을 가져와 게시물 배열을 action.payload로 포함하는 'posts/fetchPosts/fulfilled' 액션을 디스패치합니다:
리듀서와 로딩 액션
다음으로 리듀서에서 이러한 액션들을 처리해야 합니다. 여기서 지금까지 사용해온 createSlice API를 좀 더 깊이 살펴볼 필요가 있습니다.
이미 살펴본 바와 같이 createSlice는 reducers 필드에 정의한 모든 리듀서 함수에 대해 액션 생성자를 생성하며, 생성된 액션 타입에는 다음과 같이 슬라이스 이름이 포함됩니다:
console.log(
  postUpdated({ id: '123', title: 'First Post', content: 'Some text here' })
)
/*
{
  type: 'posts/postUpdated',
  payload: {
    id: '123',
    title: 'First Post',
    content: 'Some text here'
  }
}
*/
또한 슬라이스 외부에서 정의된 액션에 응답하기 위해 createSlice의 extraReducers 필드를 사용할 수 있음을 확인했습니다.
이 경우 fetchPosts 썽크가 디스패치하는 "pending" 및 "fulfilled" 액션 타입을 수신해야 합니다. 이러한 액션 생성자들은 실제 fetchPosts 함수에 연결되어 있으며, 해당 액션들을 수신하기 위해 extraReducers에 전달할 수 있습니다:
export const fetchPosts = createAsyncThunk('posts/fetchPosts', async () => {
  const response = await client.get<Post[]>('/fakeApi/posts')
  return response.data
})

const postsSlice = createSlice({
  name: 'posts',
  initialState,
  reducers: {
    // omit existing reducers here
  },

  extraReducers: builder => {
    builder
      .addCase(userLoggedOut, state => {
        // Clear out the list of posts whenever the user logs out
        return initialState
      })
      .addCase(fetchPosts.pending, (state, action) => {
        state.status = 'pending'
      })
      .addCase(fetchPosts.fulfilled, (state, action) => {
        state.status = 'succeeded'
        // Add any fetched posts to the array
        state.posts.push(...action.payload)
      })
      .addCase(fetchPosts.rejected, (state, action) => {
        state.status = 'failed'
        state.error = action.error.message ?? 'Unknown Error'
      })
  }
})
반환한 Promise 기반으로 썽크가 디스패치할 수 있는 세 가지 액션 타입을 모두 처리합니다:
-
요청이 시작되면
status를'pending'으로 설정합니다 -
요청이 성공하면
status를'succeeded'로 표시하고 가져온 게시물을state.posts에 추가합니다 -
요청이 실패하면
status를'failed'로 표시하고 오류 메시지를 상태에 저장해 표시할 수 있게 합니다
컴포넌트에서 썽크 디스패치하기
이제 fetchPosts 썽크를 작성하고 슬라이스가 해당 액션을 처리하도록 업데이트했으므로, 실제로 데이터 가져오기를 시작하도록 <PostsList> 컴포넌트를 업데이트해 보겠습니다.
컴포넌트에 fetchPosts 썽크를 가져옵니다. 다른 모든 액션 생성자와 마찬가지로 디스패치해야 하므로 useAppDispatch 훅도 추가해야 합니다. <PostsList>가 마운트될 때 이 데이터를 가져오려면 React useEffect 훅을 가져와 액션을 디스패치해야 합니다.
게시물 목록을 한 번만 가져오는 것이 중요합니다. <PostsList> 컴포넌트가 렌더링될 때마다 또는 뷰 전환으로 인해 컴포넌트가 재생성될 때마다 가져오게 되면 여러 번 게시물을 가져오게 될 수 있습니다. posts.status 값을 컴포넌트에 선택하여 실제 가져오기 시작 여부를 결정할 수 있습니다. 상태가 'idle'일 때만, 즉 아직 시작하지 않았을 때만 가져오기를 시작하면 됩니다.
import React, { useEffect } from 'react'
import { Link } from 'react-router-dom'

import { useAppSelector, useAppDispatch } from '@/app/hooks'
import { TimeAgo } from '@/components/TimeAgo'

import { PostAuthor } from './PostAuthor'
import { ReactionButtons } from './ReactionButtons'
import { fetchPosts, selectAllPosts, selectPostsStatus } from './postsSlice'

export const PostsList = () => {
  const dispatch = useAppDispatch()
  const posts = useAppSelector(selectAllPosts)
  const postStatus = useAppSelector(selectPostsStatus)

  useEffect(() => {
    if (postStatus === 'idle') {
      dispatch(fetchPosts())
    }
  }, [postStatus, dispatch])

  // omit rendering logic
}
이제 앱에 로그인한 후 표시되는 신선한 게시물 목록을 확인할 수 있습니다!
중복 가져오기 방지
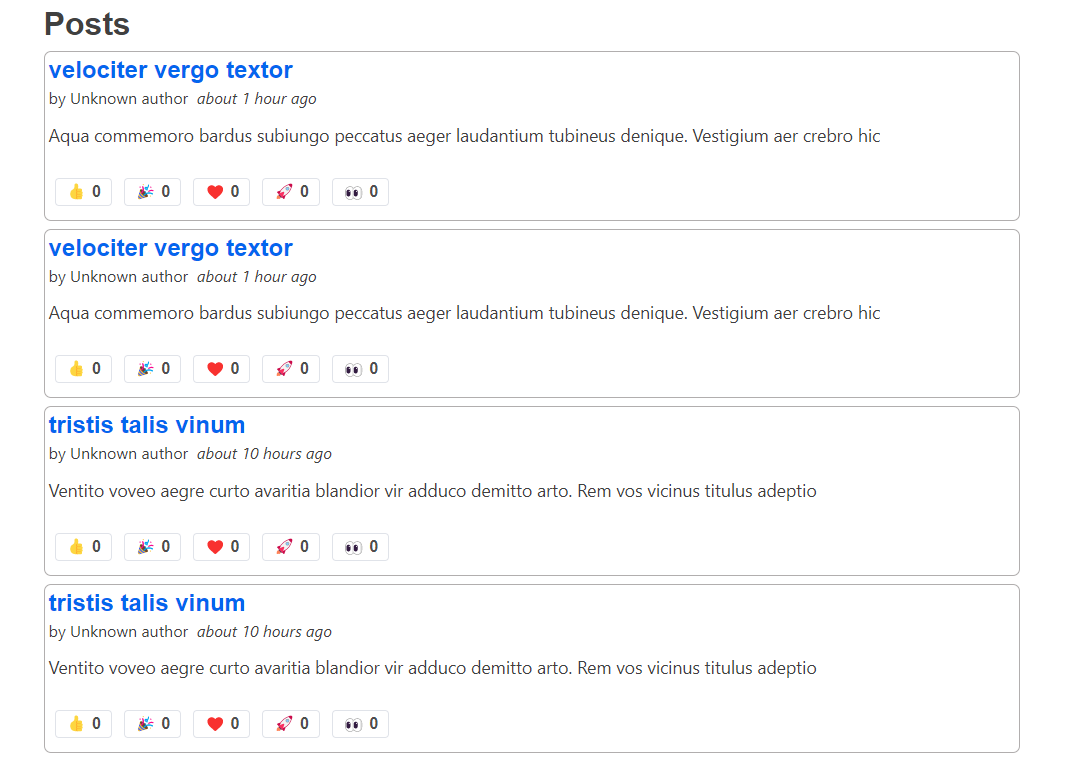
좋은 소식은 모의 서버 API에서 게시물 객체를 성공적으로 가져왔다는 것입니다.
안타깝게도 문제가 하나 있습니다. 현재 게시물 목록에 각 게시물이 중복으로 표시되고 있습니다:
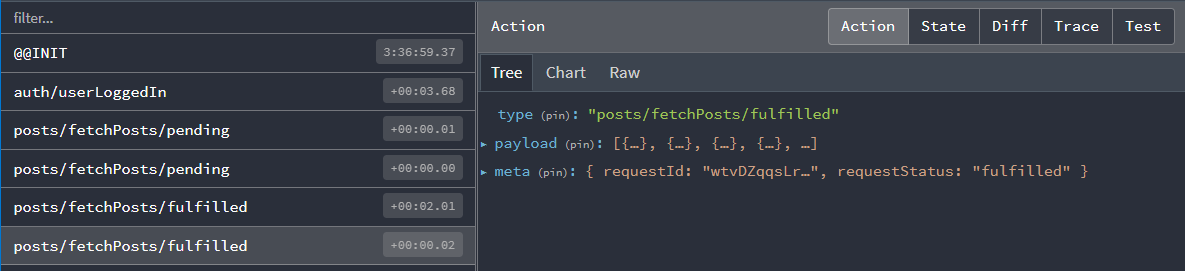
사실 Redux DevTools를 보면 'pending' 및 'fulfilled' 액션이 두 세트 디스패치된 것을 확인할 수 있습니다:
왜 그럴까요? postStatus === 'idle' 확인을 추가하지 않았나요? 썽크를 한 번만 디스패치하도록 보장해야 하지 않나요?
음, 그렇기도 하고... 아닐 수도 있습니다 :)
useEffect 내부의 실제 로직은 정확합니다. 문제는 현재 개발 빌드 환경에서 React가 <StrictMode> 컴포넌트 내부에서 마운트 시 모든 useEffect 훅을 두 번 실행하여 특정 버그를 더 명확하게 드러내기 때문입니다.
이 경우 발생한 상황은 다음과 같습니다:
-
<PostsList>컴포넌트가 마운트됨 -
첫 번째
useEffect훅 실행.postStatus값이'idle'이므로fetchPosts썽크 디스패치 -
fetchPosts가 즉시fetchPosts.pending액션을 디스패치하므로 Redux 스토어는 상태를'pending'으로 즉시 업데이트했습니다... -
하지만 React는 컴포넌트를 리렌더링하지 않고
useEffect를 다시 실행하므로, 이펙트는 여전히postStatus가'idle'이라고 판단하여fetchPosts를 두 번째로 디스패치합니다 -
두 썽크 모두 데이터 패칭을 완료하고
fetchPosts.fulfilled액션을 디스패치합니다. 결과적으로fulfilled리듀서가 두 번 실행되어 상태에 중복된 게시물 세트가 추가됩니다
그렇다면 이 문제를 어떻게 해결할 수 있을까요?
한 가지 방법은 앱에서 <StrictMode> 태그를 제거하는 것입니다. 하지만 React 팀은 이를 사용할 것을 권장하며 다른 문제를 찾는 데 유용합니다.
useRef 훅을 사용해 컴포넌트가 실제로 처음 렌더링되는지 추적하는 복잡한 로직을 작성하여 fetchPosts를 한 번만 디스패치할 수도 있습니다. 하지만 이 방법은 다소 번거롭습니다.
마지막 옵션은 Redux 상태에서 실제 state.posts.status 값을 사용해 이미 진행 중인 요청이 있는지 확인하고, 해당 경우에는 썽크 자체가 실행을 중단하도록 하는 것입니다. 다행히 createAsyncThunk는 이를 가능하게 하는 방법을 제공합니다.
비동기 썽크 실행 조건 확인하기
createAsyncThunk는 선택적 condition 콜백을 지원하며, 이를 통해 실행 여부를 확인할 수 있습니다. 제공된 경우 썽크 호출 시작 시 실행되며, condition이 false.를 반환하면 전체 썽크 실행이 취소됩니다.
이 경우 state.posts.status 필드가 'idle'이 아닐 때 썽크 실행을 피하려고 합니다. 여기서 사용할 수 있는 selectPostsStatus 셀렉터가 이미 있으므로, condition 옵션을 추가하고 해당 값을 확인할 수 있습니다:
export const fetchPosts = createAppAsyncThunk(
  'posts/fetchPosts',
  async () => {
    const response = await client.get<Post[]>('/fakeApi/posts')
    return response.data
  },
  {
    condition(arg, thunkApi) {
      const postsStatus = selectPostsStatus(thunkApi.getState())
      if (postsStatus !== 'idle') {
        return false
      }
    }
  }
)
이제 페이지를 새로고침하고 <PostsList>를 보면 중복 없이 하나의 게시물 세트만 표시되며, Redux DevTools에도 하나의 액션 세트만 표시되어야 합니다.
모든 썽크에 condition을 추가할 필요는 없지만, 한 번에 하나의 요청만 보장해야 할 때 유용할 수 있습니다.
참고: RTK Query는 이를 자동으로 관리합니다! 모든 컴포넌트에서 요청을 중복 제거하므로 각 요청은 한 번만 발생하며, 이를 직접 처리할 필요가 없습니다.
로딩 상태 표시하기
<PostsList> 컴포넌트는 이미 Redux에 저장된 게시물 업데이트를 확인하고 있으며, 목록이 변경될 때마다 자체적으로 리렌더링됩니다. 따라서 페이지를 새로고침하면 가짜 API의 무작위 게시물이 화면에 표시되어야 합니다. 하지만 약간의 지연이 있는 것처럼 보입니다—<PostsList>가 처음에는 비어 있다가 몇 초 후에 게시물이 표시됩니다.
실제 API 호출은 응답을 반환하는 데 시간이 걸릴 수 있으므로, 일반적으로 사용자에게 데이터를 기다리고 있음을 알리기 위해 UI에 "로딩 중..." 표시기를 보여주는 것이 좋습니다.
state.posts.status 값에 따라 다른 UI를 표시하도록 <PostsList>를 업데이트할 수 있습니다: 로딩 중이면 스피너, 실패 시 오류 메시지, 데이터가 있으면 실제 게시물 목록을 표시합니다.
이 작업과 동시에 목록의 개별 항목 렌더링을 캡슐화하기 위해 <PostExcerpt> 컴포넌트를 추출하는 것이 좋습니다.
결과는 다음과 같을 수 있습니다:
import React, { useEffect } from 'react'
import { Link } from 'react-router-dom'

import { useAppSelector, useAppDispatch } from '@/app/hooks'

import { Spinner } from '@/components/Spinner'
import { TimeAgo } from '@/components/TimeAgo'

import { PostAuthor } from './PostAuthor'
import { ReactionButtons } from './ReactionButtons'
import {
  Post,
  selectAllPosts,
  selectPostsError,
  fetchPosts
} from './postsSlice'

interface PostExcerptProps {
  post: Post
}

function PostExcerpt({ post }: PostExcerptProps) {
  return (
    <article className="post-excerpt" key={post.id}>
      <h3>
        <Link to={`/posts/${post.id}`}>{post.title}</Link>
      </h3>
      <div>
        <PostAuthor userId={post.user} />
        <TimeAgo timestamp={post.date} />
      </div>
      <p className="post-content">{post.content.substring(0, 100)}</p>
      <ReactionButtons post={post} />
    </article>
  )
}

export const PostsList = () => {
  const dispatch = useAppDispatch()
  const posts = useAppSelector(selectAllPosts)
  const postStatus = useAppSelector(selectPostsStatus)
  const postsError = useAppSelector(selectPostsError)

  useEffect(() => {
    if (postStatus === 'idle') {
      dispatch(fetchPosts())
    }
  }, [postStatus, dispatch])

  let content: React.ReactNode

  if (postStatus === 'pending') {
    content = <Spinner text="Loading..." />
  } else if (postStatus === 'succeeded') {
    // Sort posts in reverse chronological order by datetime string
    const orderedPosts = posts
      .slice()
      .sort((a, b) => b.date.localeCompare(a.date))

    content = orderedPosts.map(post => (
      <PostExcerpt key={post.id} post={post} />
    ))
  } else if (postStatus === 'rejected') {
    content = <div>{postsError}</div>
  }

  return (
    <section className="posts-list">
      <h2>Posts</h2>
      {content}
    </section>
  )
}
API 호출이 완료되는 데 시간이 걸리고 로딩 스피너가 몇 초 동안 화면에 유지되는 것을 알 수 있습니다. 모의 API 서버는 모든 응답에 2초 지연을 추가하도록 구성되어 있어 로딩 스피너가 표시될 때를 시각화하는 데 도움이 됩니다. 이 동작을 변경하려면 api/server.ts를 열고 다음 줄을 수정하세요:
// Add an extra delay to all endpoints, so loading spinners show up.
const ARTIFICIAL_DELAY_MS = 2000
API 호출을 더 빠르게 완료하려면 필요에 따라 이 설정을 켜고 끌 수 있습니다.
선택 사항: createSlice 내부에서 Thunk 정의하기
현재 fetchPosts thunk는 postsSlice.ts 파일에 정의되어 있지만 createSlice() 호출 외부에 있습니다.
createSlice 내부에서 thunk를 정의하는 선택적 방법이 있으며, 이는 reducers 필드 정의 방식을 변경해야 합니다. 자세한 내용은 다음 설명을 참조하세요:
Defining Thunks in createSlice
We've seen that the standard way to write the createSlice.reducers field is as an object, where the keys become the action names, and the values are reducers. We also saw that the values can be an object with the {reducer, prepare} functions for creating an action object with the values we want.
Alternately, the reducers field can be a callback function that receives a create object. This is somewhat similar to what we saw with extraReducers, but with a different set of methods for creating reducers and actions:
create.reducer<PayloadType>(caseReducer): defines a case reducercreate.preparedReducer(prepare, caseReducer): defines a reducer with a prepare callback
Then, return an object like before with the reducer names as the fields, but call the create methods to make each reducer. Here's what the postsSlice would look like converted to this syntax:
const postsSlice = createSlice({
  name: 'posts',
  initialState,
  reducers: create => {
    return {
      postAdded: create.preparedReducer(
        (title: string, content: string, userId: string) => {
          return {
            payload: {
              id: nanoid(),
              date: new Date().toISOString(),
              title,
              content,
              user: userId,
              reactions: initialReactions
            }
          }
        },
        (state, action) => {
          state.posts.push(action.payload)
        }
      ),
      postUpdated: create.reducer<PostUpdate>((state, action) => {
        const { id, title, content } = action.payload
        const existingPost = state.posts.find(post => post.id === id)
        if (existingPost) {
          existingPost.title = title
          existingPost.content = content
        }
      }),
      reactionAdded: create.reducer<{ postId: string; reaction: ReactionName }>(
        (state, action) => {
          const { postId, reaction } = action.payload
          const existingPost = state.posts.find(post => post.id === postId)
          if (existingPost) {
            existingPost.reactions[reaction]++
          }
        }
      )
    }
  },
  extraReducers: builder => {
    // same as before
  }
})
Writing reducers as a callback opens the door for extending the capabilities of createSlice. In particular, it's possible to make a special version of createSlice that has the ability to use createAsyncThunk baked in.
First, import buildCreateSlice and asyncThunkCreator, then call buildCreateSlice like this:
import { buildCreateSlice, asyncThunkCreator } from '@reduxjs/toolkit'

export const createAppSlice = buildCreateSlice({
  creators: { asyncThunk: asyncThunkCreator }
})
That gives you a version of createSlice with the ability to write thunks inside.
Finally, we can use that createAppSlice method to define our postsSlice with the fetchPosts thunk inside. When we do that, a couple other things change:
- We can't pass in the
RootStategeneric directly, so we have to dogetState() as RootStateto cast it - We can pass in all of the reducers that handle the thunk actions as part of the options to
create.asyncThunk(), and remove those from theextraReducersfield:
const postsSlice = createAppSlice({
  name: 'posts',
  initialState,
  reducers: create => {
    return {
      // omit the other reducers
      fetchPosts: create.asyncThunk(
        // Payload creator function to fetch the data
        async () => {
          const response = await client.get<Post[]>('/fakeApi/posts')
          return response.data
        },
        {
          // Options for `createAsyncThunk`
          options: {
            condition(arg, thunkApi) {
              const { posts } = thunkApi.getState() as RootState
              if (posts.status !== 'idle') {
                return false
              }
            }
          },
          // The case reducers to handle the dispatched actions.
          // Each of these is optional, but must use these names.
          pending: (state, action) => {
            state.status = 'pending'
          },
          fulfilled: (state, action) => {
            state.status = 'succeeded'
            // Add any fetched posts to the array
            state.posts.push(...action.payload)
          },
          rejected: (state, action) => {
            state.status = 'rejected'
            state.error = action.error.message ?? 'Unknown Error'
          }
        }
      )
    }
  },
  extraReducers: builder => {
    builder.addCase(userLoggedOut, state => {
      // Clear out the list of posts whenever the user logs out
      return initialState
    })
    // The thunk handlers have been removed here
  }
})
Remember, the create callback syntax is optional! The only time you have to use it is if you really want to write thunks inside of createSlice. That said, it does remove the need to use the PayloadAction type, and cuts down on extraReducers as well.
사용자 데이터 로딩
이제 게시물 목록을 가져와 표시하고 있습니다. 하지만 게시물을 보면 문제가 있습니다: 모든 게시물 작성자가 "알 수 없는 작성자"로 표시됩니다:

이는 게시물 항목이 가짜 API 서버에 의해 무작위 생성되며, 페이지를 다시 로드할 때마다 가짜 사용자 집합도 무작위로 생성되기 때문입니다. 애플리케이션이 시작될 때 이러한 사용자를 가져오도록 사용자 슬라이스를 업데이트해야 합니다.
지난 번과 마찬가지로 API에서 사용자를 가져와 반환하는 또 다른 비동기 thunk를 생성한 다음, extraReducers 슬라이스 필드에서 fulfilled 액션을 처리합니다. 지금은 로딩 상태를 고려하지 않겠습니다:
import { createSlice, PayloadAction } from '@reduxjs/toolkit'

import { client } from '@/api/client'

import type { RootState } from '@/app/store'
import { createAppAsyncThunk } from '@/app/withTypes'

interface User {
  id: string
  name: string
}

export const fetchUsers = createAppAsyncThunk('users/fetchUsers', async () => {
  const response = await client.get<User[]>('/fakeApi/users')
  return response.data
})

const initialState: User[] = []

const usersSlice = createSlice({
  name: 'users',
  initialState,
  reducers: {},
  extraReducers(builder) {
    builder.addCase(fetchUsers.fulfilled, (state, action) => {
      return action.payload
    })
  }
})

export default usersSlice.reducer

// omit selectors
이번에는 케이스 리듀서가 state 변수를 전혀 사용하지 않는다는 것을 눈치챘을 것입니다. 대신 action.payload를 직접 반환합니다. Immer는 기존 상태 값을 변이하거나 새 결과를 반환하는 두 가지 방법으로 상태 업데이트를 허용합니다. 새 값을 반환하면 기존 상태를 반환된 값으로 완전히 대체합니다. (수동으로 새 값을 반환하려면 필요한 불변성 업데이트 로직을 직접 작성해야 합니다.)
초기 상태는 빈 배열이었으며 state.push(...action.payload)를 사용하여 변이할 수도 있었습니다. 하지만 서버에서 반환된 사용자 목록으로 기존 목록을 완전히 교체하는 것이 목적이며, 이렇게 하면 상태에서 사용자 목록이 실수로 중복되는 것을 방지할 수 있습니다.
Immer를 사용한 상태 업데이트 방법에 대한 자세한 내용은 RTK 문서의 "Writing Reducers with Immer" 가이드를 참조하세요.
사용자 목록은 한 번만 가져오면 되며 애플리케이션이 시작될 때 바로 수행해야 합니다. main.tsx 파일에서 이 작업을 수행할 수 있으며, store가 바로 있으므로 fetchUsers thunk를 직접 디스패치합니다:
// omit other imports

import store from './app/store'
import { fetchUsers } from './features/users/usersSlice'

import { worker } from './api/server'

async function start() {
  // Start our mock API server
  await worker.start({ onUnhandledRequest: 'bypass' })

  store.dispatch(fetchUsers())

  const root = createRoot(document.getElementById('root')!)

  root.render(
    <React.StrictMode>
      <Provider store={store}>
        <App />
      </Provider>
    </React.StrictMode>
  )
}

start()
이것이 시작 시 데이터를 가져오는 유효한 방법입니다. 이 방법은 실제로 React 컴포넌트 렌더링을 시작하기 전에 가져오기 프로세스를 시작하므로 데이터를 더 빨리 사용할 수 있습니다. (React Router 데이터 로더를 사용할 때도 동일한 원칙이 적용됩니다.)
이제 각 게시물에 다시 사용자 이름이 표시되며, <AddPostForm>의 "작성자" 드롭다운에도 동일한 사용자 목록이 표시되어야 합니다.
새 게시물 추가하기
이 섹션을 위한 한 단계가 더 남았습니다. <AddPostForm>에서 새 게시물을 추가할 때, 해당 게시물은 우리 앱 내부의 Redux 저장소에만 추가됩니다. 실제로 가짜 API 서버에 새 게시물 항목을 생성하는 API 호출을 해야 "저장"됩니다. (이것은 가짜 API이므로 페이지를 새로 고침하면 새 게시물은 유지되지 않지만, 실제 백엔드 서버가 있었다면 다음에 새로 고침할 때 사용할 수 있을 것입니다.)
Thunk를 사용하여 데이터 보내기
createAsyncThunk를 사용하면 데이터를 가져오는 것뿐만 아니라 보내는 작업도 처리할 수 있습니다. <AddPostForm>에서 전달받은 값을 인수로 사용해 가짜 API에 HTTP POST 요청을 보내 데이터를 저장하는 thunk를 생성하겠습니다.
이 과정에서 리듀서에서 새 게시물 객체를 처리하는 방식을 변경할 것입니다. 현재 postsSlice는 postAdded 액션의 prepare 콜백에서 새 게시물 객체를 생성하고 고유 ID를 생성합니다. 서버에 데이터를 저장하는 대부분의 앱에서는 서버가 고유 ID 생성과 추가 필드 채우기를 처리하며, 일반적으로 완성된 데이터를 응답으로 반환합니다. 따라서 { title, content, user: userId } 같은 요청 본문을 서버에 보낸 후, 서버에서 반환한 완성된 게시물 객체를 postsSlice 상태에 추가할 수 있습니다. 또한 thunk에 전달되는 객체를 나타내는 NewPost 타입을 추출하겠습니다.
type PostUpdate = Pick<Post, 'id' | 'title' | 'content'>
type NewPost = Pick<Post, 'title' | 'content' | 'user'>

export const addNewPost = createAppAsyncThunk(
  'posts/addNewPost',
  // The payload creator receives the partial `{title, content, user}` object
  async (initialPost: NewPost) => {
    // We send the initial data to the fake API server
    const response = await client.post<Post>('/fakeApi/posts', initialPost)
    // The response includes the complete post object, including unique ID
    return response.data
  }
)

const postsSlice = createSlice({
  name: 'posts',
  initialState,
  reducers: {
    // The existing `postAdded` reducer and prepare callback were deleted
    reactionAdded(state, action) {}, // omit logic
    postUpdated(state, action) {} // omit logic
  },
  extraReducers(builder) {
    builder
      // omit the cases for `fetchPosts` and `userLoggedOut`
      .addCase(addNewPost.fulfilled, (state, action) => {
        // We can directly add the new post object to our posts array
        state.posts.push(action.payload)
      })
  }
})

// Remove `postAdded`
export const { postUpdated, reactionAdded } = postsSlice.actions
컴포넌트에서 Thunk 결과 확인하기
마지막으로 <AddPostForm>이 기존 postAdded 액션 대신 addNewPost thunk를 디스패치하도록 업데이트합니다. 이는 서버에 대한 또 다른 API 호출이므로 시간이 소요될 수 있으며 _실패할 가능성_도 있습니다. addNewPost() thunk는 자동으로 pending/fulfilled/rejected 액션을 Redux 저장소에 디스패치하며, 이는 이미 처리 중입니다.
원한다면 postsSlice에서 두 번째 로딩 유니온 타입을 사용해 요청 상태를 추적할 수도 있습니다. 하지만 이 예제에서는 다른 가능성을 보여주기 위해 로딩 상태 추적을 컴포넌트로 제한하겠습니다.
최소한 요청 대기 중에는 "게시물 저장" 버튼을 비활성화하는 것이 좋습니다. 그래야 사용자가 실수로 게시물을 두 번 저장하려는 시도를 방지할 수 있습니다. 요청이 실패할 경우 폼에 오류 메시지를 표시하거나 콘솔에 로깅할 수도 있습니다.
컴포넌트 로직이 비동기 thunk가 완료될 때까지 기다린 후 결과를 확인하도록 설정할 수 있습니다:
import React, { useState } from 'react'

import { useAppDispatch, useAppSelector } from '@/app/hooks'

import { selectCurrentUsername } from '@/features/auth/authSlice'

import { addNewPost } from './postsSlice'

// omit field types

export const AddPostForm = () => {
  const [addRequestStatus, setAddRequestStatus] = useState<'idle' | 'pending'>(
    'idle'
  )

  const dispatch = useAppDispatch()
  const userId = useAppSelector(selectCurrentUsername)!

  const handleSubmit = async (e: React.FormEvent<AddPostFormElements>) => {
    // Prevent server submission
    e.preventDefault()

    const { elements } = e.currentTarget
    const title = elements.postTitle.value
    const content = elements.postContent.value

    const form = e.currentTarget

    try {
      setAddRequestStatus('pending')
      await dispatch(addNewPost({ title, content, user: userId })).unwrap()

      form.reset()
    } catch (err) {
      console.error('Failed to save the post: ', err)
    } finally {
      setAddRequestStatus('idle')
    }
  }

  // omit rendering logic
}
게시물 가져오기를 위해 postsSlice에서 로딩 상태를 추적하는 방식과 유사하게 React useState 훅으로 로딩 상태를 추가할 수 있습니다. 이 경우 요청이 진행 중인지 여부만 알면 됩니다.
dispatch(addNewPost())를 호출하면 비동기 thunk가 dispatch에서 Promise를 반환합니다. 이 프로미스를 await하면 thunk가 요청을 완료한 시점을 알 수 있습니다. 하지만 아직 해당 요청의 성공 여부는 알 수 없습니다.
createAsyncThunk는 내부적으로 모든 오류를 처리하므로 로그에 "거부된 프로미스(rejected Promises)" 관련 메시지가 나타나지 않습니다. 그 후 성공 시 fulfilled 액션을, 실패 시 rejected 액션을 반환합니다. 즉, await dispatch(someAsyncThunk())는 항상 "성공"하며 결과는 액션 객체 자체입니다.
하지만 실제 요청의 성공/실패 여부를 확인하는 로직을 작성하는 것이 일반적입니다. Redux Toolkit은 반환된 프로미스에 .unwrap() 함수를 추가합니다. 이 함수는 fulfilled 액션의 실제 action.payload 값을 갖는 새 프로미스를 반환하거나 rejected 액션인 경우 오류를 발생시킵니다. 이렇게 하면 일반적인 try/catch 로직으로 컴포넌트에서 성공과 실패를 처리할 수 있습니다. 따라서 게시물이 성공적으로 생성되면 입력 필드를 지워 폼을 재설정하고, 실패 시 오류를 콘솔에 기록합니다.
addNewPost API 호출이 실패하는 경우를 확인하려면 "Content" 필드에 "error"(따옴표 제외) 단어만 입력하여 새 게시물을 생성해 보세요. 서버가 이를 감지하고 실패 응답을 반환하므로 콘솔에 메시지가 기록되는 것을 확인할 수 있습니다.
학습 내용 요약
비동기 로직과 데이터 패칭은 항상 복잡한 주제입니다. 지금까지 살펴본 것처럼 Redux Toolkit에는 일반적인 Redux 데이터 패칭 패턴을 자동화하는 도구가 포함되어 있습니다.
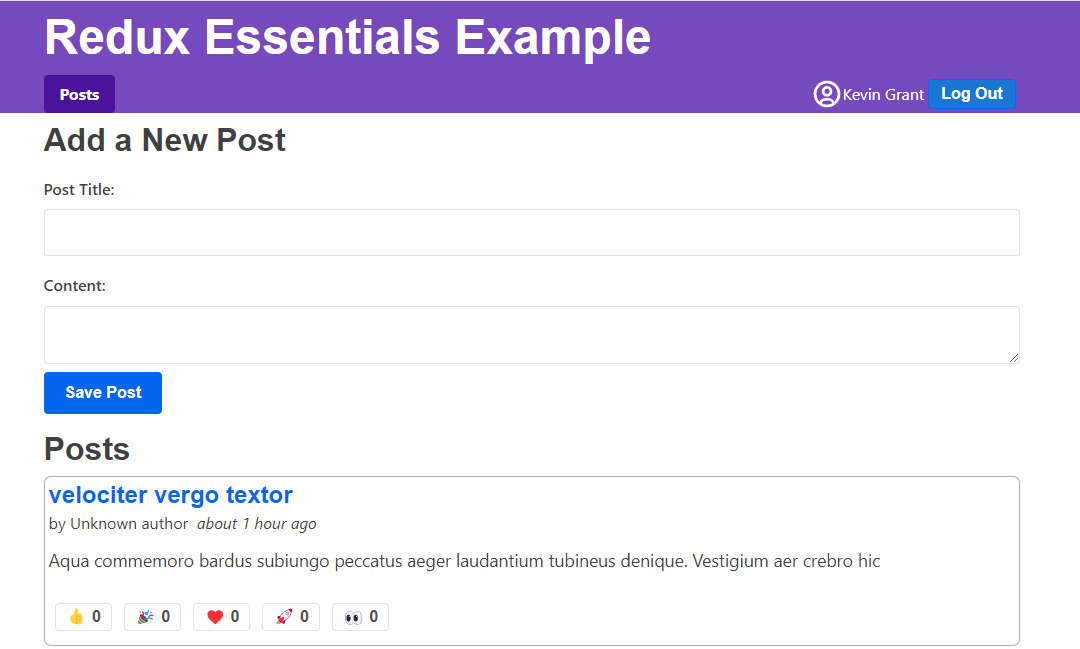
가상 API에서 데이터를 가져오는 현재 앱의 모습은 다음과 같습니다:
이번 섹션에서 다룬 내용을 다시 정리해 보겠습니다:
- Redux는 "미들웨어" 플러그인을 사용해 비동기 로직을 활성화합니다
- 표준 비동기 미들웨어는
redux-thunk라고 하며 Redux Toolkit에 포함되어 있습니다 - 썽크 함수는
dispatch및getState를 인수로 받아 비동기 로직의 일부로 사용할 수 있습니다
- 표준 비동기 미들웨어는
- API 호출의 로딩 상태 추적을 위해 추가 액션을 디스패치할 수 있습니다
- 일반적인 패턴은 호출 전 "pending" 액션을 디스패치한 후 데이터가 포함된 "success" 또는 오류가 포함된 "failure" 액션을 디스패치하는 것입니다
- 로딩 상태는 일반적으로
'idle' | 'pending' | 'succeeded' | 'rejected'와 같은 문자열 리터럴의 유니온으로 저장해야 합니다
- Redux Toolkit은 이러한 액션을 자동으로 디스패치하는
createAsyncThunkAPI를 제공합니다createAsyncThunk는 Promise를 반환해야 하는 "페이로드 생성자" 콜백을 받아 자동으로pending/fulfilled/rejected액션 유형을 생성합니다fetchPosts와 같은 생성된 액션 생성자는 반환한 Promise를 기반으로 이러한 액션을 디스패치합니다createSlice의extraReducers필드에서 이러한 액션 유형을 수신하고 해당 액션 기반으로 리듀서에서 상태를 업데이트할 수 있습니다createAsyncThunk에는 Redux 상태를 기반으로 요청을 취소하는 데 사용할 수 있는condition옵션이 있습니다- 썽크는 Promise를 반환할 수 있습니다. 특히
createAsyncThunk의 경우await dispatch(someThunk()).unwrap()을 사용해 컴포넌트 수준에서 요청 성공 또는 실패를 처리할 수 있습니다
다음 단계
Redux Toolkit의 핵심 API와 사용 패턴을 다루기 위한 마지막 주제가 남아있습니다. 6부: 성능 및 데이터 정규화에서는 Redux 사용이 React 성능에 미치는 영향과 애플리케이션 성능을 개선하기 위한 최적화 방법을 살펴보겠습니다.