Redux 핵심 가이드, 2부: Redux Toolkit 앱 구조
이 페이지는 PageTurner AI로 번역되었습니다(베타). 프로젝트 공식 승인을 받지 않았습니다. 오류를 발견하셨나요? 문제 신고 →
- 일반적인 React + Redux Toolkit 앱의 구조
- Redux DevTools 확장 프로그램에서 상태 변경 사항 확인 방법
소개
1부: Redux 개요 및 핵심 개념에서는 Redux의 유용성, Redux 코드의 다양한 부분을 설명하는 용어와 개념, 그리고 Redux 앱에서 데이터가 어떻게 흐르는지 살펴보았습니다.
이제 실제 작동 예시를 통해 이러한 조각들이 어떻게 맞춰지는지 확인해 보겠습니다.
카운터 예제 앱
살펴볼 샘플 프로젝트는 버튼을 클릭할 때마다 숫자를 더하거나 빼는 간단한 카운터 애플리케이션입니다. 매우 흥미롭지는 않지만, React+Redux 애플리케이션의 모든 중요한 구성 요소가 실제로 동작하는 모습을 보여줍니다.
이 프로젝트는 Vite용 공식 Redux Toolkit 템플릿의 축약 버전으로 생성되었습니다. 바로 사용할 수 있도록 Redux Toolkit을 사용해 Redux 스토어와 로직을 생성하고, React-Redux로 Redux 스토어와 React 컴포넌트를 연결하는 표준 Redux 애플리케이션 구조로 이미 구성되어 있습니다.
실시간으로 동작하는 프로젝트를 확인할 수 있습니다. 오른쪽의 앱 미리보기에서 버튼을 클릭해 직접 사용해보고, 왼쪽에서 소스 파일을 탐색할 수 있습니다.
컴퓨터에서 이 프로젝트를 설정하려면 다음 명령어로 로컬 복사본을 생성하세요:
npx degit reduxjs/redux-templates/packages/rtk-app-structure-example my-app
Vite용 전체 Redux Toolkit 템플릿으로 새 프로젝트를 생성할 수도 있습니다:
npx degit reduxjs/redux-templates/packages/vite-template-redux my-app
카운터 앱 사용하기
카운터 앱은 사용 과정에서 내부에서 발생하는 상황을 관찰할 수 있도록 미리 설정되어 있습니다.
브라우저의 개발자 도구를 열고, 개발자 도구에서 "Redux" 탭을 선택한 후 상단 오른쪽 도구 모음에서 "State" 버튼을 클릭하세요. 다음과 비슷한 내용이 표시됩니다:
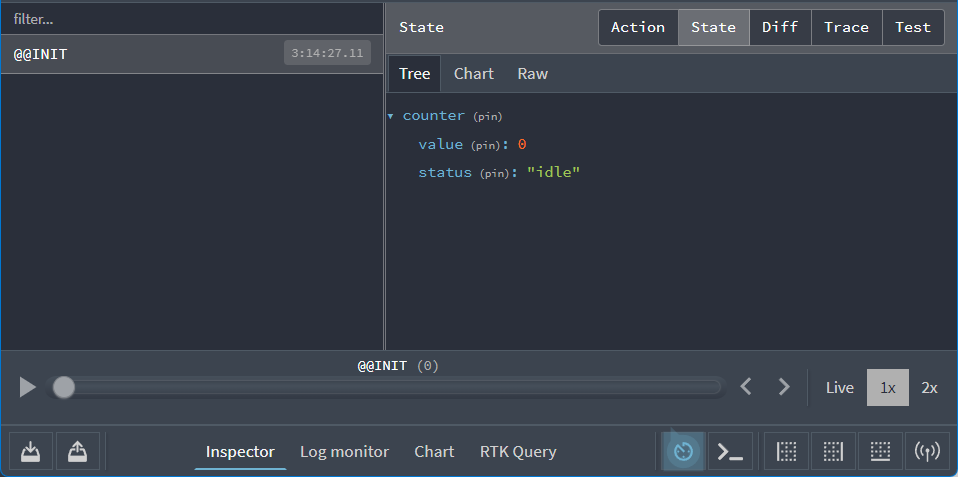
오른쪽에서 Redux 스토어가 다음과 같은 앱 상태 값으로 시작하는 것을 볼 수 있습니다:
{
  counter: {
    value: 0
    status: 'idle'
  }
}
개발자 도구는 앱을 사용하면서 스토어 상태가 어떻게 변경되는지 보여줍니다.
먼저 앱을 사용해 어떤 기능이 있는지 확인해 봅시다. 앱에서 "+" 버튼을 클릭한 후 Redux 개발자 도구의 "Diff" 탭을 확인하세요:
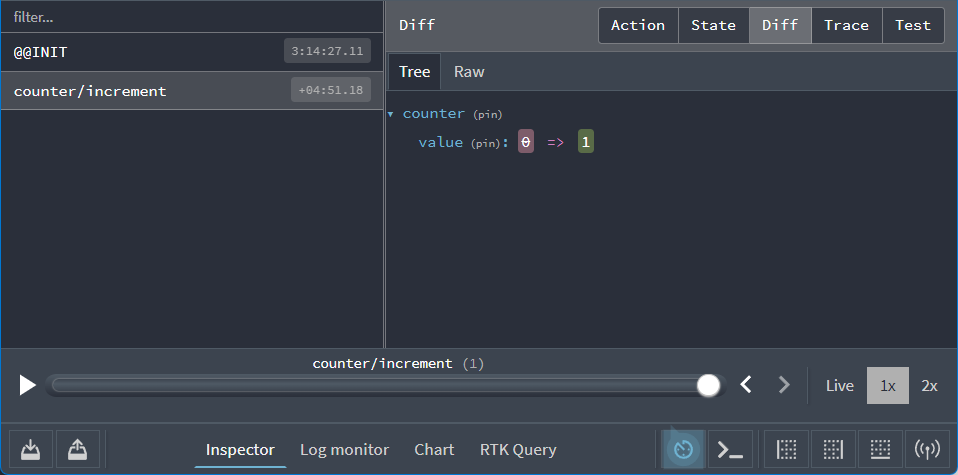
여기서 두 가지 중요한 사항을 확인할 수 있습니다:
-
"+" 버튼을 클릭했을 때,
"counter/increment"타입의 액션이 스토어에 디스패치되었습니다 -
해당 액션이 디스패치되면
state.counter.value필드 값이0에서1로 변경되었습니다
이제 다음 단계를 시도해 보세요:
-
"+" 버튼을 다시 클릭하세요. 표시된 값은 이제 2가 됩니다.
-
"-" 버튼을 한 번 클릭하세요. 표시된 값은 이제 1이 됩니다.
-
"Add Amount" 버튼을 클릭하세요. 표시된 값은 이제 3이 됩니다.
-
텍스트 상자의 숫자 "2"를 "3"으로 변경하세요
-
"Add Async" 버튼을 클릭하세요. 버튼에 진행 표시줄이 채워지는 것을 볼 수 있으며, 몇 초 후 표시된 값이 6으로 변경됩니다.
Redux DevTools로 돌아가세요. 버튼을 클릭할 때마다 디스패치된 총 다섯 개의 액션이 표시될 것입니다. 이제 왼쪽 목록에서 마지막 "counter/incrementByAmount" 항목을 선택하고 오른쪽의 "Action" 탭을 클릭하세요:
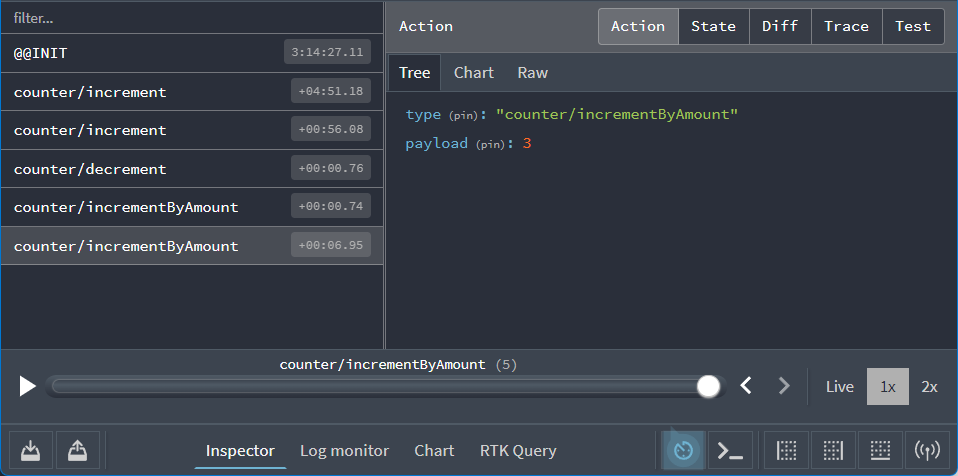
이 액션 객체가 다음과 같이 표시된 것을 확인할 수 있습니다:
{
  type: 'counter/incrementByAmount',
  payload: 3
}
"Diff" 탭을 클릭하면 해당 액션에 대한 응답으로 state.counter.value 필드가 3에서 6으로 변경된 것을 볼 수 있습니다.
앱 내부에서 무슨 일이 일어나는지, 상태가 시간에 따라 어떻게 변하는지 확인할 수 있는 기능은 매우 강력합니다!
DevTools에는 앱 디버깅을 돕기 위한 추가 명령어와 옵션이 더 있습니다. 오른쪽 상단의 "Trace" 탭을 클릭해보세요. 액션이 스토어에 도달했을 때 실행 중이었던 코드 라인을 보여주는 소스 코드 섹션과 함께 JavaScript 함수 호출 스택이 패널에 표시될 것입니다. 특히 한 줄이 강조 표시될 텐데, 바로 <Counter> 컴포넌트에서 이 액션을 디스패치한 코드 라인입니다:
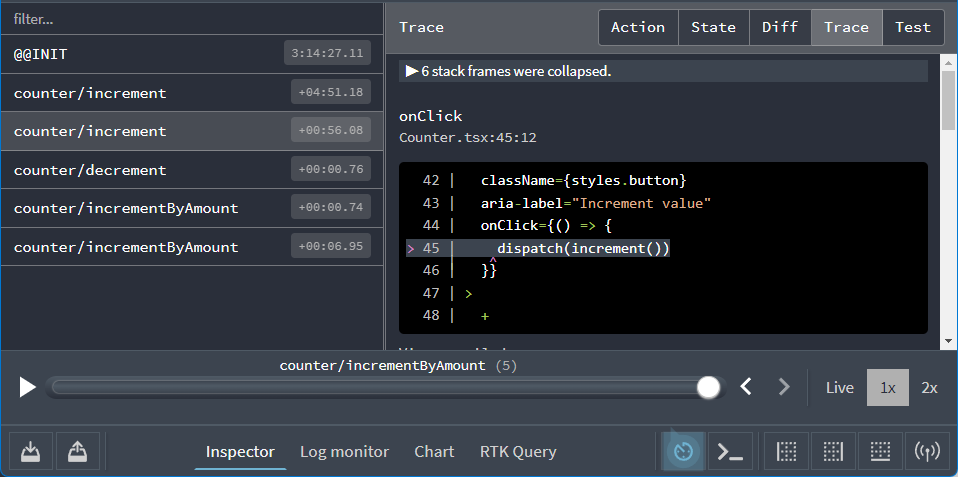
이를 통해 특정 액션을 디스패치한 코드 부분을 쉽게 추적할 수 있습니다.
애플리케이션 구성
이제 앱이 무엇을 하는지 알았으니, 어떻게 작동하는지 살펴보겠습니다.
애플리케이션을 구성하는 주요 파일은 다음과 같습니다:
/srcmain.tsx: 앱의 시작점App.tsx: 최상위 React 컴포넌트/appstore.ts: Redux 스토어 인스턴스 생성hooks.ts: 미리 타입이 지정된 React-Redux 훅 내보내기
/features/counterCounter.tsx: 카운터 기능의 UI를 표시하는 React 컴포넌트counterSlice.ts: 카운터 기능을 위한 Redux 로직
먼저 Redux 스토어가 어떻게 생성되는지 살펴보겠습니다.
Redux 스토어 생성하기
app/store.ts 파일을 열어보면 다음과 같습니다:
import type { Action, ThunkAction } from '@reduxjs/toolkit'
import { configureStore } from '@reduxjs/toolkit'
import counterReducer from '@/features/counter/counterSlice'

export const store = configureStore({
  reducer: {
    counter: counterReducer
  }
})

// Infer the type of `store`
export type AppStore = typeof store
export type RootState = ReturnType<AppStore['getState']>
// Infer the `AppDispatch` type from the store itself
export type AppDispatch = AppStore['dispatch']
// Define a reusable type describing thunk functions
export type AppThunk<ThunkReturnType = void> = ThunkAction<
  ThunkReturnType,
  RootState,
  unknown,
  Action
>
Redux 스토어는 Redux Toolkit의 configureStore 함수로 생성됩니다. configureStore는 reducer 인수를 필수로 요구합니다.
애플리케이션은 다양한 기능으로 구성될 수 있으며, 각 기능은 자체 리듀서 함수를 가질 수 있습니다. configureStore를 호출할 때 모든 리듀서를 객체 형태로 전달할 수 있습니다. 객체의 키 이름은 최종 상태 값의 키를 정의합니다.
features/counter/counterSlice.ts 파일은 카운터 로직을 위한 리듀서 함수를 ESM "default" 내보내기로 제공합니다. 이 파일에서 해당 함수를 가져올 수 있습니다. 기본 내보내기이므로 가져올 때 원하는 변수명을 지정할 수 있습니다. 여기서는 counterReducer로 명명하고 스토어 생성 시 포함시킵니다. (참고: 이 가져오기/내보내기 동작은 표준 ES Module 구문이며 Redux에 특화된 것이 아닙니다.)
{counter: counterReducer} 같은 객체를 전달하면 Redux 상태 객체에 state.counter 섹션이 생성되고, 액션이 디스패치될 때마다 counterReducer 함수가 state.counter 섹션을 업데이트할지 여부와 방법을 결정합니다.
Redux는 다양한 플러그인("미들웨어" 및 "인핸서")으로 스토어 설정을 사용자 정의할 수 있습니다. configureStore는 기본적으로 좋은 개발자 경험을 제공하기 위해 여러 미들웨어를 자동으로 추가하고, Redux DevTools 확장 프로그램이 내용을 검사할 수 있도록 스토어를 설정합니다.
TypeScript 사용을 위해 스토어 기반의 재사용 가능한 타입(예: RootState 및 AppDispatch 타입)도 내보냅니다. 이들의 사용법은 나중에 살펴보겠습니다.
Redux 슬라이스
"슬라이스"는 앱의 단일 기능을 위한 Redux 리듀서 로직과 액션의 집합입니다. 일반적으로 단일 파일에 함께 정의됩니다. 이 이름은 루트 Redux 상태 객체를 여러 상태 "조각"으로 분할하는 개념에서 유래했습니다.
예를 들어 블로그 앱에서 스토어 설정은 다음과 같을 수 있습니다:
import { configureStore } from '@reduxjs/toolkit'
import usersReducer from '../features/users/usersSlice'
import postsReducer from '../features/posts/postsSlice'
import commentsReducer from '../features/comments/commentsSlice'

export const store = configureStore({
  reducer: {
    users: usersReducer,
    posts: postsReducer,
    comments: commentsReducer
  }
})
이 예시에서 state.users, state.posts, state.comments는 각각 Redux 상태의 개별 "슬라이스"입니다. usersReducer가 state.users 슬라이스를 업데이트하므로, 이를 "슬라이스 리듀서" 함수라고 부릅니다.
Detailed Explanation: Reducers and State Structure
A Redux store needs to have a single "root reducer" function passed in when it's created. So if we have many different slice reducer functions, how do we get a single root reducer instead, and how does this define the contents of the Redux store state?
If we tried calling all of the slice reducers by hand, it might look like this:
function rootReducer(state = {}, action) {
  return {
    users: usersReducer(state.users, action),
    posts: postsReducer(state.posts, action),
    comments: commentsReducer(state.comments, action)
  }
}
That calls each slice reducer individually, passes in the specific slice of the Redux state, and includes each return value in the final new Redux state object.
Redux has a function called combineReducers that does this for us automatically. It accepts an object full of slice reducers as its argument, and returns a function that calls each slice reducer whenever an action is dispatched. The result from each slice reducer are all combined together into a single object as the final result. We can do the same thing as the previous example using combineReducers:
const rootReducer = combineReducers({
  users: usersReducer,
  posts: postsReducer,
  comments: commentsReducer
})
When we pass an object of slice reducers to configureStore, it passes those to combineReducers for us to generate the root reducer.
As we saw earlier, you can also pass a reducer function directly as the reducer argument:
const store = configureStore({
  reducer: rootReducer
})
슬라이스 리듀서와 액션 생성하기
counterReducer 함수가 features/counter/counterSlice.ts에서 온다는 것을 알고 있으므로, 이 파일의 내용을 단계별로 살펴보겠습니다.
import { createAsyncThunk, createSlice } from '@reduxjs/toolkit'
import type { PayloadAction } from '@reduxjs/toolkit'

// Define the TS type for the counter slice's state
export interface CounterState {
  value: number
  status: 'idle' | 'loading' | 'failed'
}

// Define the initial value for the slice state
const initialState: CounterState = {
  value: 0,
  status: 'idle'
}

// Slices contain Redux reducer logic for updating state, and
// generate actions that can be dispatched to trigger those updates.
export const counterSlice = createSlice({
  name: 'counter',
  initialState,
  // The `reducers` field lets us define reducers and generate associated actions
  reducers: {
    increment: state => {
      // Redux Toolkit allows us to write "mutating" logic in reducers. It
      // doesn't actually mutate the state because it uses the Immer library,
      // which detects changes to a "draft state" and produces a brand new
      // immutable state based off those changes
      state.value += 1
    },
    decrement: state => {
      state.value -= 1
    },
    // Use the PayloadAction type to declare the contents of `action.payload`
    incrementByAmount: (state, action: PayloadAction<number>) => {
      state.value += action.payload
    }
  }
})

// Export the generated action creators for use in components
export const { increment, decrement, incrementByAmount } = counterSlice.actions

// Export the slice reducer for use in the store configuration
export default counterSlice.reducer
앞서 UI의 다양한 버튼 클릭 시 세 가지 Redux 액션 타입이 디스패치되는 것을 확인했습니다:
-
{type: "counter/increment"} -
{type: "counter/decrement"} -
{type: "counter/incrementByAmount"}
액션은 type 필드를 가진 일반 객체이며, type 필드는 항상 문자열입니다. 일반적으로 액션 객체를 생성하고 반환하는 "액션 생성자" 함수를 사용합니다. 그렇다면 이러한 액션 객체, 타입 문자열, 액션 생성자는 어디에 정의되어 있을까요?
매번 수동으로 작성할 수는 있지만, 이는 번거로운 작업입니다. 게다가 Redux에서 진정으로 중요한 것은 리듀서 함수와 새로운 상태를 계산하는 로직입니다.
Redux Toolkit에는 createSlice 함수가 있습니다. 이 함수는 액션 타입 문자열, 액션 생성자 함수, 액션 객체 생성 작업을 처리합니다. 여러분이 해야 할 일은 슬라이스 이름을 정의하고, 리듀서 함수가 포함된 객체를 작성하는 것뿐입니다. 그러면 해당 액션 코드가 자동으로 생성됩니다. name 옵션의 문자열은 각 액션 타입의 첫 부분으로 사용되며, 각 리듀서 함수의 키 이름이 두 번째 부분으로 사용됩니다. 따라서 "counter" 이름과 "increment" 리듀서 함수 조합은 {type: "counter/increment"} 액션 타입을 생성합니다. (컴퓨터가 처리할 수 있는 작업을 왜 수동으로 하겠습니까!)
name 필드 외에도 createSlice는 리듀서의 초기 상태 값을 필요로 합니다. 이렇게 해야 처음 호출될 때 state가 존재합니다. 이 예시에서는 value 필드가 0으로 시작하고 status 필드가 'idle'로 시작하는 객체를 제공합니다.
여기에는 세 개의 리듀서 함수가 있으며, 이는 다양한 버튼 클릭으로 디스패치된 세 가지 액션 타입에 대응합니다.
createSlice는 우리가 작성한 리듀서 함수와 동일한 이름의 액션 생성자를 자동으로 생성합니다. 다음처럼 호출하여 반환 값을 확인할 수 있습니다:
console.log(counterSlice.actions.increment())
// {type: "counter/increment"}
또한 이 함수는 모든 액션 타입에 응답하는 방법을 아는 슬라이스 리듀서 함수도 생성합니다:
const newState = counterSlice.reducer(
  { value: 10 },
  counterSlice.actions.increment()
)
console.log(newState)
// {value: 11}
리듀서의 규칙
앞서 리듀서는 항상 특별한 규칙을 따라야 한다고 언급했습니다:
-
오직
state와action인수를 기반으로 새 상태 값을 계산해야 합니다 -
기존
state를 수정할 수 없습니다. 대신 기존state를 복사하고 복사본에 변경 사항을 적용하는 _불변성 업데이트_를 수행해야 합니다 -
"순수" 함수여야 합니다. 즉, 비동기 로직이나 다른 "사이드 이펙트"를 수행할 수 없습니다
이 규칙들이 중요한 이유는 무엇일까요? 몇 가지 이유가 있습니다:
-
Redux의 목표 중 하나는 코드를 예측 가능하게 만드는 것입니다. 함수의 출력이 입력 인수로만 계산될 때, 코드 작동 방식을 이해하고 테스트하기가 더 쉽습니다
-
반면에 함수가 외부 변수에 의존하거나 무작위로 동작한다면, 실행 시 어떤 일이 발생할지 절대 알 수 없습니다.
-
함수가 인수를 포함한 다른 값을 수정하면 애플리케이션이 예상치 못하게 동작할 수 있습니다. 이는 "상태를 업데이트했는데 UI가 제때 업데이트되지 않아요!"와 같은 흔한 버그 원인이 됩니다.
-
Redux DevTools의 일부 기능은 리듀서가 이 규칙을 올바르게 따를 때만 동작합니다
"불변 업데이트" 규칙은 특히 중요하므로 더 자세히 살펴보겠습니다.
리듀서와 불변 업데이트
앞서 "변이(mutation)"(기존 객체/배열 값 수정)와 "불변성(immutability)"(값을 변경할 수 없는 것으로 취급)에 대해 이야기했습니다.
Redux에서 리듀서는 절대 원본/현재 상태 값을 변이(mutate)해서는 안 됩니다!
// ❌ Illegal - by default, this will mutate the state!
state.value = 123
Redux에서 상태를 변이하지 말아야 하는 이유는 다음과 같습니다:
-
UI가 최신 값을 제대로 표시하지 못하는 등 버그 발생
-
상태가 왜, 어떻게 업데이트되었는지 이해하기 어려워짐
-
테스트 작성이 어려워짐
-
시간 여행 디버깅 기능이 정상적으로 작동하지 않음
-
Redux의 의도된 설계 철학과 사용 패턴에 위배됨
그렇다면 원본을 변경할 수 없다면 업데이트된 상태를 어떻게 반환할까요?
리듀서는 원본 값의 복사본 을 만든 후, 그 복사본을 변이할 수 있습니다.
// ✅ This is safe, because we made a copy
return {
  ...state,
  value: 123
}
앞서 수동으로 불변 업데이트 작성하기를 배웠는데, JavaScript의 배열/객체 전개 연산자나 원본 복사본을 반환하는 함수를 사용합니다. 하지만 "이런 식으로 수동으로 불변 업데이트를 작성하는 건 기억하기도 어렵고 실수하기 쉽다"고 생각한다면... 맞습니다! :)
수동 불변 업데이트 로직 작성은 어렵습니다, 게다가 리듀서에서 실수로 상태를 변이하는 것은 Redux 사용자의 가장 흔한 실수입니다.
바로 이 때문에 Redux Toolkit의 createSlice 함수가 불변 업데이트를 더 쉽게 작성할 수 있게 해줍니다!
createSlice는 내부에서 Immer 라이브러리를 사용합니다. Immer는 Proxy라는 특별한 JS 도구로 데이터를 감싼 후, 감싼 데이터를 "변이"하는 코드 작성을 허용합니다. 하지만 Immer는 변경 시도한 모든 내용을 추적한 후, 그 변경 목록을 사용해 마치 수동으로 작성한 것처럼 안전하게 불변 업데이트된 값을 반환합니다.
따라서 이런 코드 대신:
function handwrittenReducer(state, action) {
  return {
    ...state,
    first: {
      ...state.first,
      second: {
        ...state.first.second,
        [action.someId]: {
          ...state.first.second[action.someId],
          fourth: action.someValue
        }
      }
    }
  }
}
이렇게 작성할 수 있습니다:
function reducerWithImmer(state, action) {
  state.first.second[action.someId].fourth = action.someValue
}
훨씬 읽기 쉽죠!
하지만 반드시 기억해야 할 점이 있습니다:
"변이" 로직은 Redux Toolkit의 createSlice와 createReducer에서만 작성할 수 있습니다! 내부에서 Immer를 사용하기 때문입니다. Immer 없이 코드에 변이 로직을 작성하면 상태가 실제로 변이되어 버그가 발생합니다!
이 점을 염두에 두고 카운터 슬라이스의 실제 리듀서를 살펴보겠습니다.
export const counterSlice = createSlice({
  name: 'counter',
  initialState,
  // The `reducers` field lets us define reducers and generate associated actions
  reducers: {
    increment: state => {
      // Redux Toolkit allows us to write "mutating" logic in reducers. It
      // doesn't actually mutate the state because it uses the Immer library,
      // which detects changes to a "draft state" and produces a brand new
      // immutable state based off those changes
      state.value += 1
    },
    decrement: state => {
      state.value -= 1
    },
    // Use the PayloadAction type to declare the contents of `action.payload`
    incrementByAmount: (state, action: PayloadAction<number>) => {
      state.value += action.payload
    }
  }
})
increment 리듀서는 항상 state.value에 1을 더하는 것을 볼 수 있습니다. Immer가 드래프트(draft) state 객체에 변경 사항이 있음을 인지하므로 여기서는 명시적으로 값을 반환할 필요가 없습니다. 마찬가지로 decrement 리듀서는 1을 뺍니다.
두 리듀서 모두 실제로 action 객체를 확인할 필요가 없습니다. 어차피 전달되지만 사용하지 않으므로 리듀서 매개변수에서 action 선언을 생략할 수 있습니다.
반면 incrementByAmount 리듀서는 반드시 알아야 할 사항이 있습니다: 카운터 값에 얼마를 더해야 하는지입니다. 따라서 이 리듀서는 state와 action 두 인자를 모두 선언합니다. 이 경우 'amount' 입력란에 입력한 값이 action.payload 필드에 저장되므로 이 값을 state.value에 추가할 수 있습니다.
TypeScript를 사용한다면 TS에 action.payload의 타입이 무엇인지 알려야 합니다. PayloadAction 타입은 "이것은 액션 객체이며, action.payload의 타입은..." 여러분이 지정한 타입임을 선언합니다. 여기서는 UI가 'amount' 텍스트박스에 입력된 숫자 문자열을 가져와 숫자로 변환한 후 이 값으로 액션을 디스패치하려 한다는 것을 알고 있으므로 action: PayloadAction<number>로 선언합니다.
불변성(immutability)과 불변 업데이트 작성에 대한 자세한 내용은 공식 문서의 "불변 업데이트 패턴"과 React 및 Redux에서의 불변성 완전 가이드를 참조하세요.
Immer를 사용한 "변경 가능한" 불변 업데이트에 대한 자세한 내용은 Immer 문서와 "Immer로 리듀서 작성하기"를 확인하세요.
추가 Redux 로직
Redux의 핵심은 리듀서, 액션, 스토어입니다. 일반적으로 사용되는 추가적인 Redux 함수 유형도 있습니다.
셀렉터로 데이터 읽기
store.getState()를 호출해 현재 전체 루트 상태 객체를 가져올 수 있으며, state.counter.value처럼 필드에 접근할 수 있습니다.
해당 상태 필드 조회를 대신해주는 "셀렉터" 함수를 작성하는 것이 표준입니다. 여기서는 counterSlice.ts가 재사용 가능한 두 셀렉터 함수를 내보냅니다:
// Selector functions allows us to select a value from the Redux root state.
// Selectors can also be defined inline in the `useSelector` call
// in a component, or inside the `createSlice.selectors` field.
export const selectCount = (state: RootState) => state.counter.value
export const selectStatus = (state: RootState) => state.counter.status
셀렉터 함수는 일반적으로 전체 Redux 루트 상태 객체를 인자로 받습니다. 루트 상태에서 특정 값을 읽거나 계산을 수행해 새 값을 반환할 수 있습니다.
TypeScript를 사용한다면 각 셀렉터에서 state 인자의 타입을 정의하기 위해 store.ts에서 내보낸 RootState 타입을 사용해야 합니다.
모든 슬라이스의 모든 필드에 대해 별도 셀렉터 함수를 만들 필요는 없습니다! (이 예시에서는 셀렉터 작성 개념을 보여주기 위해 만들었지만 어차피 counterSlice.ts에는 두 필드뿐이었습니다) 대신 셀렉터 사용에 균형을 유지하세요.
셀렉터 함수에 대해서는 4부: Redux 데이터 사용하기에서 더 자세히 배우고, 6부: 성능에서 최적화 방법을 살펴볼 것입니다.
셀렉터 함수 사용 이유와 방법에 대한 자세한 내용은 셀렉터로 데이터 파생하기를 참조하세요.
썽크로 비동기 로직 작성하기
지금까지 애플리케이션의 모든 로직은 동기식이었습니다. 액션이 디스패치되고 스토어가 리듀서를 실행해 새 상태를 계산하며 디스패치 함수가 완료됩니다. 하지만 JavaScript에는 비동기 코드 작성 방법이 다양하며, 일반적으로 API에서 데이터를 가져오는 등의 비동기 로직이 필요합니다. Redux 앱에서 이 비동기 로직을 배치할 장소가 필요합니다.
썽크(thunk) 는 비동기 로직을 포함할 수 있는 특수한 Redux 함수 유형입니다. 썽크는 두 함수를 사용해 작성됩니다:
-
내부 thunk 함수는
dispatch와getState를 인자로 받습니다. -
외부 생성자 함수는 thunk 함수를 생성하고 반환합니다.
counterSlice에서 내보내진 다음 함수는 thunk 액션 생성자의 예시입니다:
// The function below is called a thunk, which can contain both sync and async logic
// that has access to both `dispatch` and `getState`. They can be dispatched like
// a regular action: `dispatch(incrementIfOdd(10))`.
// Here's an example of conditionally dispatching actions based on current state.
export const incrementIfOdd = (amount: number): AppThunk => {
  return (dispatch, getState) => {
    const currentValue = selectCount(getState())
    if (currentValue % 2 === 1) {
      dispatch(incrementByAmount(amount))
    }
  }
}
이 thunk에서는 getState()를 사용해 스토어의 현재 루트 상태 값을 가져오고, dispatch()를 사용해 다른 액션을 디스패치합니다. 또한 setTimeout이나 await 같은 비동기 로직도 여기에 쉽게 추가할 수 있습니다.
일반적인 Redux 액션 생성자와 동일한 방식으로 사용할 수 있습니다:
store.dispatch(incrementIfOdd(6))
thunk 사용을 위해서는 Redux 스토어 생성 시 redux-thunk 미들웨어(Redux용 플러그인 유형)를 추가해야 합니다. 다행히 Redux Toolkit의 configureStore 함수가 이를 자동으로 설정해주므로 바로 thunk를 사용할 수 있습니다.
thunk 작성 시 dispatch와 getState 메서드의 타입이 올바르게 지정되었는지 확인해야 합니다. thunk 함수를 (dispatch: AppDispatch, getState: () => RootState)로 정의할 수 있지만, 스토어 파일에서 재사용 가능한 AppThunk 타입을 정의하는 것이 표준 방식입니다.
서버에서 데이터를 가져오기 위해 HTTP 호출이 필요할 때는 이 호출을 thunk에 넣을 수 있습니다. 정의 방식을 보여주기 위해 조금 길게 작성된 예시는 다음과 같습니다:
// the outside "thunk creator" function
const fetchUserById = (userId: string): AppThunk => {
  // the inside "thunk function"
  return async (dispatch, getState) => {
    try {
      dispatch(userPending())
      // make an async call in the thunk
      const user = await userAPI.fetchById(userId)
      // dispatch an action when we get the response back
      dispatch(userLoaded(user))
    } catch (err) {
      // If something went wrong, handle it here
    }
  }
}
Redux Toolkit은 모든 디스패치 작업을 처리해주는 createAsyncThunk 메서드를 포함합니다. counterSlice.ts의 다음 함수는 카운터 값을 사용해 모의 API 요청을 수행하는 비동기 thunk입니다. 이 thunk를 디스패치하면 요청 전에 pending 액션이 디스패치되고, 비동기 로직 완료 후에는 fulfilled 또는 rejected 액션이 디스패치됩니다.
// Thunks are commonly used for async logic like fetching data.
// The `createAsyncThunk` method is used to generate thunks that
// dispatch pending/fulfilled/rejected actions based on a promise.
// In this example, we make a mock async request and return the result.
// The `createSlice.extraReducers` field can handle these actions
// and update the state with the results.
export const incrementAsync = createAsyncThunk(
  'counter/fetchCount',
  async (amount: number) => {
    const response = await fetchCount(amount)
    // The value we return becomes the `fulfilled` action payload
    return response.data
  }
)
createAsyncThunk 사용 시 createSlice.extraReducers에서 해당 액션을 처리합니다. 이 경우 세 가지 액션 유형을 모두 처리하며 status 필드를 업데이트하고 value도 갱신합니다:
export const counterSlice = createSlice({
  name: 'counter',
  initialState,
  reducers: {
    // omit reducers
  },
  // The `extraReducers` field lets the slice handle actions defined elsewhere,
  // including actions generated by createAsyncThunk or in other slices.
  extraReducers: builder => {
    builder
      // Handle the action types defined by the `incrementAsync` thunk defined below.
      // This lets the slice reducer update the state with request status and results.
      .addCase(incrementAsync.pending, state => {
        state.status = 'loading'
      })
      .addCase(incrementAsync.fulfilled, (state, action) => {
        state.status = 'idle'
        state.value += action.payload
      })
      .addCase(incrementAsync.rejected, state => {
        state.status = 'failed'
      })
  }
})
비동기 로직에 thunk를 사용하는 _이유_가 궁금하다면 다음 심층 설명을 참고하세요:
Detailed Explanation: Thunks and Async Logic
We know that we're not allowed to put any kind of async logic in reducers. But, that logic has to live somewhere.
If we had access to the Redux store, we could write some async code and call store.dispatch() when we're done:
const store = configureStore({ reducer: counterReducer })

setTimeout(() => {
  store.dispatch(increment())
}, 250)
But, in a real Redux app, we're not allowed to import the store into other files, especially in our React components, because it makes that code harder to test and reuse.
In addition, we often need to write some async logic that we know will be used with some store, eventually, but we don't know which store.
The Redux store can be extended with "middleware", which are a kind of add-on or plugin that can add extra abilities. The most common reason to use middleware is to let you write code that can have async logic, but still talk to the store at the same time. They can also modify the store so that we can call dispatch() and pass in values that are not plain action objects, like functions or Promises.
The Redux Thunk middleware modifies the store to let you pass functions into dispatch. In fact, it's short enough we can paste it here:
const thunkMiddleware =
  ({ dispatch, getState }) =>
  next =>
  action => {
    if (typeof action === 'function') {
      return action(dispatch, getState)
    }

    return next(action)
  }
It looks to see if the "action" that was passed into dispatch is actually a function instead of a plain action object. If it's actually a function, it calls the function, and returns the result. Otherwise, since this must be an action object, it passes the action forward to the store.
This gives us a way to write whatever sync or async code we want, while still having access to dispatch and getState.
5부: 비동기 로직과 데이터 불러오기에서 thunk 사용법을 확인할 수 있습니다.
더 많은 정보는 Redux Thunk 문서, 포스트 Thunk란 무엇인가?, 그리고 Redux FAQ의 "비동기 처리를 위해 미들웨어가 필요한 이유"를 참고하세요.
React 카운터 컴포넌트
이전에 독립 실행형 React <Counter> 컴포넌트의 모습을 살펴봤습니다. React+Redux 앱에도 유사한 <Counter> 컴포넌트가 있지만 몇 가지 차이점이 있습니다.
Counter.tsx 컴포넌트 파일부터 살펴보겠습니다:
import { useState } from 'react'

// Use pre-typed versions of the React-Redux
// `useDispatch` and `useSelector` hooks
import { useAppDispatch, useAppSelector } from '@/app/hooks'
import {
  decrement,
  increment,
  incrementAsync,
  incrementByAmount,
  incrementIfOdd,
  selectCount,
  selectStatus
} from './counterSlice'

import styles from './Counter.module.css'

export function Counter() {
  const dispatch = useAppDispatch()
  const count = useAppSelector(selectCount)
  const status = useAppSelector(selectStatus)
  const [incrementAmount, setIncrementAmount] = useState('2')

  const incrementValue = Number(incrementAmount) || 0

  return (
    <div>
      <div className={styles.row}>
        <button
          className={styles.button}
          aria-label="Decrement value"
          onClick={() => {
            dispatch(decrement())
          }}
        >
          -
        </button>
        <span aria-label="Count" className={styles.value}>
          {count}
        </span>
        <button
          className={styles.button}
          aria-label="Increment value"
          onClick={() => {
            dispatch(increment())
          }}
        >
          +
        </button>
        {/* omit additional rendering output here */}
      </div>
    </div>
  )
}
이전의 일반 React 예시와 마찬가지로 Counter라는 함수 컴포넌트가 있으며 useState 훅을 사용해 일부 데이터를 저장합니다.
하지만 이 컴포넌트에서는 실제 현재 카운터 값을 상태로 저장하지 않는 것 같습니다. count라는 변수는 있지만 useState 훅에서 비롯된 것이 아닙니다.
React에는 useState와 useEffect 같은 여러 내장 훅이 있지만, 다른 라이브러리들은 React의 훅을 활용해 커스텀 로직을 구축하는 커스텀 훅을 만들 수 있습니다.
React-Redux 라이브러리는 React 컴포넌트가 Redux 스토어와 상호작용할 수 있게 해주는 커스텀 훅 세트를 제공합니다.
useSelector로 데이터 읽기
먼저 useSelector 훅은 컴포넌트가 Redux 스토어 상태에서 필요한 데이터 조각을 추출할 수 있게 합니다.
앞서 우리는 state를 인자로 받아 상태 값의 일부를 반환하는 "셀렉터" 함수를 작성할 수 있음을 확인했습니다. 특히 counterSlice.ts 파일은 셀렉터로 데이터 읽기 섹션에서 selectCount와 selectStatus를 익스포트하고 있습니다.
Redux 스토어에 접근할 수 있다면 현재 카운터 값을 다음과 같이 조회할 수 있습니다:
const count = selectCount(store.getState())
console.log(count)
// 0
컴포넌트 파일에 스토어를 직접 임포트할 수 없으므로 컴포넌트는 Redux 스토어와 직접 통신할 수 없습니다. 하지만 useSelector는 배후에서 Redux 스토어와의 통신을 처리합니다. 셀렉터 함수를 전달하면 someSelector(store.getState())를 호출한 결과를 반환합니다.
따라서 현재 스토어의 카운터 값을 다음과 같이 가져올 수 있습니다:
const count = useSelector(selectCount)
이미 익스포트된 셀렉터만 사용해야 하는 것은 아닙니다. 예를 들어 useSelector에 인라인 셀렉터 함수를 작성할 수도 있습니다:
const countPlusTwo = useSelector((state: RootState) => state.counter.value + 2)
액션이 디스패치되고 Redux 스토어가 업데이트될 때마다 useSelector는 셀렉터 함수를 재실행합니다. 셀렉터가 이전과 다른 값을 반환하면 useSelector는 컴포넌트가 새 값으로 리렌더링되도록 합니다.
useDispatch로 액션 디스패치하기
마찬가지로 Redux 스토어에 접근할 수 있다면 store.dispatch(increment())처럼 액션 생성자를 사용해 액션을 디스패치할 수 있습니다. 스토어 자체에 접근할 수 없으므로 dispatch 메서드에 접근할 방법이 필요합니다.
useDispatch 훅이 이 작업을 처리하며 Redux 스토어의 실제 dispatch 메서드를 제공합니다:
const dispatch = useDispatch()
이를 통해 사용자가 버튼 클릭 같은 동작을 할 때 액션을 디스패치할 수 있습니다:
<button
  className={styles.button}
  aria-label="Increment value"
  onClick={() => {
    dispatch(increment())
  }}
>
  +
</button>
사전 타이핑된 React-Redux 훅 정의하기
기본적으로 useSelector 훅은 매번 (state: RootState)를 선언해야 합니다. : RootState 부분을 반복하지 않도록 사전 타이핑된 버전의 useSelector와 useDispatch 훅을 생성할 수 있습니다.
import { useDispatch, useSelector } from 'react-redux'
import type { AppDispatch, RootState } from './store'

// Use throughout your app instead of plain `useDispatch` and `useSelector`
export const useAppDispatch = useDispatch.withTypes<AppDispatch>()
export const useAppSelector = useSelector.withTypes<RootState>()
그런 다음 컴포넌트에서 useAppSelector와 useAppDispatch 훅을 임포트해 원본 버전 대신 사용할 수 있습니다.
컴포넌트 상태와 폼
지금쯤 "앱의 모든 상태를 항상 Redux 스토어에 넣어야 하나요?"라는 의문이 들 수 있습니다.
대답은 아니오입니다. 앱 전체에서 필요한 전역 상태는 Redux 스토어에 넣어야 하지만, 한 곳에서만 필요한 상태는 컴포넌트 상태로 유지해야 합니다.
이 예시에서 사용자는 추가할 다음 숫자를 입력할 수 있는 텍스트 박스가 있습니다:
const [incrementAmount, setIncrementAmount] = useState('2')

const incrementValue = Number(incrementAmount) || 0

// later
return (
  <div className={styles.row}>
    <input
      className={styles.textbox}
      aria-label="Set increment amount"
      value={incrementAmount}
      onChange={e => setIncrementAmount(e.target.value)}
    />
    <button
      className={styles.button}
      onClick={() => dispatch(incrementByAmount(incrementValue))}
    >
      Add Amount
    </button>
    <button
      className={styles.asyncButton}
      onClick={() => dispatch(incrementAsync(incrementValue))}
    >
      Add Async
    </button>
  </div>
)
입력의 onChange 핸들러에서 액션을 디스패치하고 리듀서에 저장함으로써 현재 숫자 문자열을 Redux 스토어에 보관할 수 있습니다. 하지만 이렇게 해도 이점이 없습니다. 이 텍스트 문자열이 사용되는 유일한 곳은 <Counter> 컴포넌트입니다. (이 예시에는 <App> 컴포넌트 하나만 더 있지만, 더 큰 애플리케이션에서도 이 입력 값은 오직 <Counter>만 관심을 가집니다.)
따라서 이 값을 <Counter> 컴포넌트의 useState 훅에 보관하는 것이 합리적입니다.
마찬가지로 isDropdownOpen이라는 불리언 플래그가 있다면, 앱의 다른 컴포넌트들은 이 값을 신경 쓰지 않을 것이므로 로컬 상태로 유지해야 합니다.
React + Redux 앱에서는 전역 상태를 Redux 스토어에, 로컬 상태는 React 컴포넌트에 유지해야 합니다.
어디에 넣을지 확실하지 않다면, 어떤 데이터를 Redux에 넣어야 하는지 판단하는 일반적인 경험 법칙은 다음과 같습니다:
-
애플리케이션의 다른 부분이 이 데이터를 신경 쓰나요?
-
이 원본 데이터를 기반으로 추가 파생 데이터를 생성해야 하나요?
-
동일한 데이터가 여러 컴포넌트를 구동하는 데 사용되나요?
-
특정 시점으로 이 상태를 복원할 수 있는 기능(예: 시간 여행 디버깅)이 가치가 있나요?
-
데이터를 캐시하고 싶나요? (예: 이미 상태에 존재하면 재요청하지 않고 사용)
-
UI 컴포넌트를 핫 리로딩할 때 이 데이터를 일관되게 유지하고 싶나요? (컴포넌트 교체 시 내부 상태가 유실될 수 있음)
이것은 또한 Redux에서 폼을 어떻게 생각해야 하는지에 대한 좋은 예시입니다. 대부분의 폼 상태는 Redux에 보관하지 않는 것이 좋습니다. 대신 편집 중인 데이터는 폼 컴포넌트에 두고, 사용자가 완료했을 때 Redux 액션을 디스패치하여 스토어를 업데이트하세요.
다음으로 넘어가기 전에 주목할 점 하나: counterSlice.ts의 incrementAsync 썽크(thunk)를 기억하시나요? 이 컴포넌트에서 사용하고 있습니다. 일반 액션 생성자와 동일한 방식으로 디스패치하는 것에 주목하세요. 이 컴포넌트는 일반 액션을 디스패치하는지 비동기 로직을 시작하는지 신경 쓰지 않습니다. 단지 버튼을 클릭하면 무언가를 디스패치한다는 것만 알 뿐입니다.
스토어 제공하기
컴포넌트가 useSelector와 useDispatch 훅을 사용해 Redux 스토어와 통신하는 것을 확인했습니다. 그런데 스토어를 임포트하지 않았다면, 이 훅들은 어떤 Redux 스토어와 통신해야 하는지 어떻게 알 수 있을까요?
애플리케이션의 모든 조각을 살펴보았으니, 이제 애플리케이션의 시작점으로 돌아가 마지막 퍼즐 조각이 어떻게 맞춰지는지 확인해볼 시간입니다.
import React from 'react'
import { createRoot } from 'react-dom/client'
import { Provider } from 'react-redux'

import App from './App'
import { store } from './app/store'

import './index.css'

const container = document.getElementById('root')!
const root = createRoot(container)

root.render(
  <React.StrictMode>
    <Provider store={store}>
      <App />
    </Provider>
  </React.StrictMode>
)
항상 root.render(<App />)를 호출해 루트 <App> 컴포넌트 렌더링을 시작하라고 React에 알려야 합니다. useSelector 같은 훅이 제대로 동작하려면, <Provider> 컴포넌트를 사용해 Redux 스토어를 뒷단에서 전달해야 합니다. 이렇게 하면 훅들이 스토어에 접근할 수 있습니다.
이미 app/store.ts에서 스토어를 생성했으므로 여기서 임포트할 수 있습니다. 그런 다음 전체 <App>을 <Provider> 컴포넌트로 감싸고 스토어를 전달합니다: <Provider store={store}>.
이제 useSelector나 useDispatch를 호출하는 모든 React 컴포넌트는 <Provider>에 제공한 Redux 스토어와 통신하게 됩니다.
학습 내용 요약
카운터 예제 앱은 아주 작지만 React + Redux 애플리케이션이 함께 동작하는 모든 핵심 요소를 보여줍니다. 다음 내용을 다뤘습니다:
- Redux Toolkit의
configureStoreAPI로 Redux 스토어 생성 가능configureStore는reducer함수를 명명된 인자로 받음configureStore는 적절한 기본 설정으로 스토어를 자동 구성
- Redux 로직은 일반적으로 "슬라이스(slice)"라는 파일로 구성됨
- "슬라이스"는 Redux 상태의 특정 기능/영역과 관련된 리듀서 로직과 액션을 포함
- Redux Toolkit의
createSliceAPI는 제공한 각 리듀서 함수에 대한 액션 생성자와 액션 타입을 생성
- Redux 리듀서는 특정 규칙을 따라야 함
state와action인자를 기반으로 새 상태 값만 계산해야 함- 기존 상태를 복사하여 _불변 업데이트(immutable updates)_를 수행해야 함
- 비동기 로직이나 다른 "사이드 이펙트"를 포함할 수 없음
- Redux Toolkit의
createSliceAPI는 Immer를 사용해 "변경(mutating)" 방식의 불변 업데이트 허용
- 상태에서 값을 읽는 것은 "셀렉터(selector)" 함수로 수행됨
- 셀렉터는
(state: RootState)를 인자로 받아 상태의 값을 반환하거나 새 값을 파생 - 셀렉터는 슬라이스 파일에 작성하거나
useSelector훅에 인라인으로 작성 가능
- 셀렉터는
- 비동기 로직은 일반적으로 "썽크(thunk)"라는 특수 함수에 작성됨
- 썽크는
dispatch와getState를 인자로 받음 - Redux Toolkit은 기본적으로
redux-thunk미들웨어를 활성화
- 썽크는
- React-Redux는 React 컴포넌트가 Redux 스토어와 상호작용할 수 있게 함
- 앱을
<Provider store={store}>로 감싸면 모든 컴포넌트가 스토어 사용 가능 useSelector훅은 React 컴포넌트가 Redux 스토어에서 값을 읽게 함useDispatch훅은 컴포넌트가 액션을 디스패치하게 함- TS 사용을 위해 미리 타이핑된
useAppSelector와useAppDispatch훅 생성 - 전역 상태는 Redux 스토어에, 로컬 상태는 React 컴포넌트에 유지해야 함
- 앱을
다음 단계
이제 Redux 앱의 모든 구성 요소가 실제로 동작하는 모습을 보셨으니, 직접 작성해 볼 시간입니다! 이 튜토리얼의 나머지 부분에서는 Redux를 사용하는 더 큰 예제 애플리케이션을 구축하게 됩니다. 이 과정에서 Redux를 올바르게 사용하기 위해 필요한 모든 핵심 개념을 다룰 것입니다.
예제 앱 구축을 시작하려면 Part 3: Basic Redux Data Flow로 계속 진행하세요.