Redux Essentials 第2部: Redux Toolkit アプリ構造
このページは PageTurner AI で翻訳されました(ベータ版)。プロジェクト公式の承認はありません。 エラーを見つけましたか? 問題を報告 →
- 典型的な React + Redux Toolkit アプリの構造
- Redux DevTools Extension で状態変化を確認する方法
はじめに
第1部: Reduxの概要と基本概念では、Reduxがなぜ有用か、Reduxコードの各部分を説明する用語と概念、そしてデータがReduxアプリをどのように流れるかを見てきました。
ここでは実際に動作するサンプルを見ながら、これらのパーツがどのように連携するのかを確認しましょう。
カウンターサンプルアプリ
今回見ていくサンプルプロジェクトは、ボタンをクリックすると数値を加算・減算できる小さなカウンターアプリケーションです。シンプルですが、React+Reduxアプリケーションの重要な構成要素が実際に動作する様子をすべて示しています。
このプロジェクトはVite向け公式Redux Toolkitテンプレートの簡易版を使用して作成されています。すぐに使える状態で標準的なReduxアプリケーション構造が構成されており、Redux ToolkitでReduxストアとロジックを作成し、React-ReduxでReduxストアとReactコンポーネントを連携させています。
以下がプロジェクトのライブバージョンです。右側のアプリプレビューでボタンをクリックして操作したり、左側でソースファイルを閲覧したりできます。
このプロジェクトを自分のコンピューターにセットアップしたい場合は、次のコマンドでローカルコピーを作成できます:
npx degit reduxjs/redux-templates/packages/rtk-app-structure-example my-app
完全版のRedux Toolkitテンプレートを使用して新しいプロジェクトを作成することもできます:
npx degit reduxjs/redux-templates/packages/vite-template-redux my-app
カウンターアプリの使用方法
カウンターアプリは、操作中の内部動作を観察できるように既に設定されています。
ブラウザのDevToolsを開いてください。DevToolsの「Redux」タブを選択し、右上ツールバーの「State」ボタンをクリックします。次のような表示が確認できるはずです:
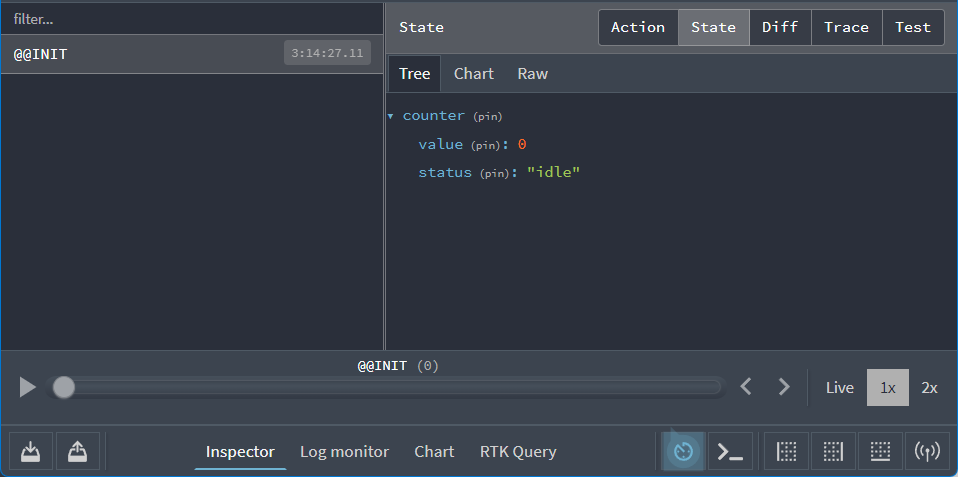
右側に、Reduxストアが次のようなアプリ状態値で開始されていることが表示されます:
{
  counter: {
    value: 0
    status: 'idle'
  }
}
DevToolsはアプリ操作に伴うストア状態の変化を表示します。
まずアプリを操作して動作を確認しましょう。アプリの「+」ボタンをクリックし、Redux DevToolsの「Diff」タブを見てください:
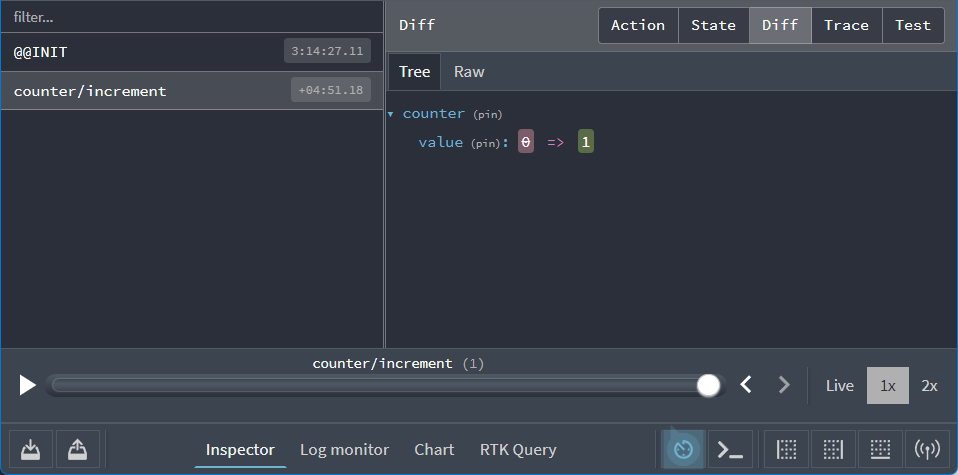
ここで2つの重要な点が確認できます:
-
「+」ボタンをクリックすると、タイプ
"counter/increment"のアクションがストアにディスパッチされた -
そのアクションがディスパッチされた際、
state.counter.valueフィールドの値が0から1に変化した
次に以下の手順を試してみてください:
-
「+」ボタンをもう一度クリック。表示値は2になるはず
-
「-」ボタンを1回クリック。表示値は1になるはず
-
「Add Amount」ボタンをクリック。表示値は3になるはず
-
テキストボックスの数字「2」を「3」に変更
-
「Add Async」ボタンをクリック。ボタンにプログレスバーが表示され、数秒後に表示値が6に変化するはず
Redux DevToolsに戻ってください。ボタンクリックごとにディスパッチされた5つのアクションが表示されているはずです。左側のリストから最後の"counter/incrementByAmount"エントリを選択し、右側の「Action」タブをクリックしてください:
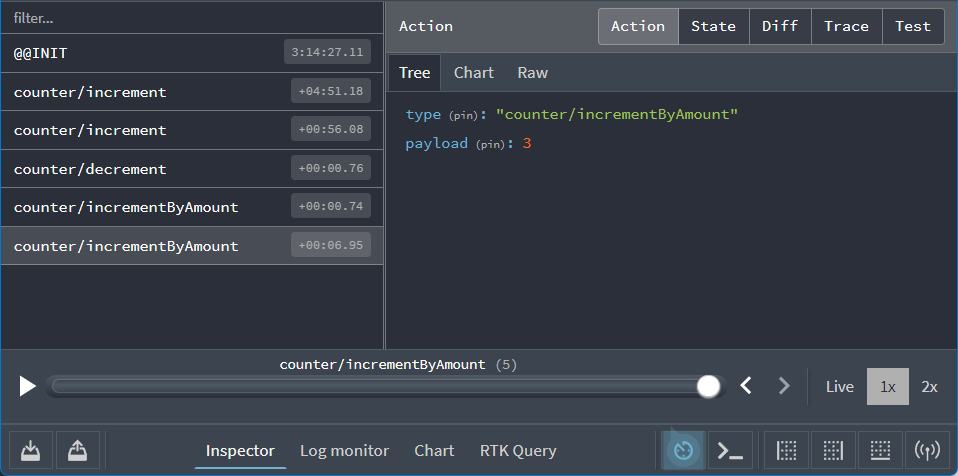
このアクションオブジェクトは次のような内容になっています:
{
  type: 'counter/incrementByAmount',
  payload: 3
}
「Diff」タブをクリックすると、このアクションに応答してstate.counter.valueフィールドが3から6に変更されたことが確認できます。
アプリ内部で何が起こっているか、状態が時間とともにどう変化するかを可視化できる機能は非常に強力です!
DevToolsにはアプリデバッグを支援する追加コマンドやオプションがあります。右上の「Trace」タブをクリックしてみてください。パネルにJavaScript関数のスタックトレースが表示され、アクションがストアに到達した時点で実行されていたソースコード行が複数セクションに分けて表示されます。特に注目すべきは<Counter>コンポーネントからこのアクションをディスパッチしたコード行のハイライトです:
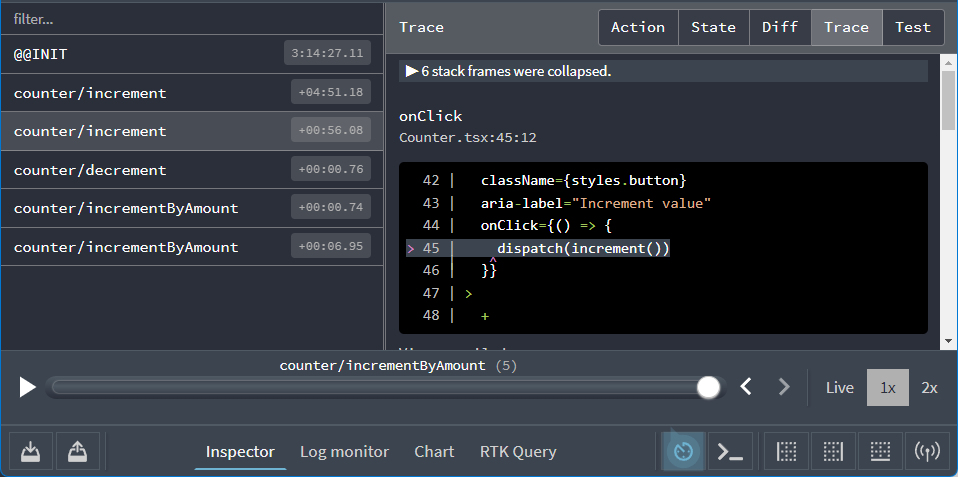
これにより特定のアクションをディスパッチしたコード箇所を容易に追跡できます。
アプリケーション構成
アプリの動作がわかったところで、その仕組みを見ていきましょう。
このアプリケーションを構成する主要ファイルは以下の通りです:
/srcmain.tsx: アプリケーションのエントリポイントApp.tsx: 最上位のReactコンポーネント/appstore.ts: Reduxストアインスタンスの作成hooks.ts: 事前型付けされたReact-Reduxフックのエクスポート
/features/counterCounter.tsx: カウンター機能のUIを表示するReactコンポーネントcounterSlice.ts: カウンター機能のReduxロジック
まずReduxストアの作成方法から見ていきましょう。
Reduxストアの作成
app/store.tsを開くと次のような内容になっています:
import type { Action, ThunkAction } from '@reduxjs/toolkit'
import { configureStore } from '@reduxjs/toolkit'
import counterReducer from '@/features/counter/counterSlice'

export const store = configureStore({
  reducer: {
    counter: counterReducer
  }
})

// Infer the type of `store`
export type AppStore = typeof store
export type RootState = ReturnType<AppStore['getState']>
// Infer the `AppDispatch` type from the store itself
export type AppDispatch = AppStore['dispatch']
// Define a reusable type describing thunk functions
export type AppThunk<ThunkReturnType = void> = ThunkAction<
  ThunkReturnType,
  RootState,
  unknown,
  Action
>
ReduxストアはRedux ToolkitのconfigureStore関数で作成されます。configureStoreにはreducer引数の指定が必須です。
アプリケーションは多くの機能で構成され、各機能が独自のreducer関数を持つ場合があります。configureStore呼び出し時には、すべてのreducerをオブジェクト形式で渡します。このオブジェクトのキー名が最終的な状態値のキーを定義します。
features/counter/counterSlice.tsファイルには、カウンターロジック用のreducer関数がESMのデフォルトエクスポートとして提供されています。この関数をインポートし(デフォルトエクスポートのため任意の変数名でインポート可能)、ここではcounterReducerとしてストア作成時に組み込みます(このインポート/エクスポート動作は標準ESモジュール構文でありRedux固有ではありません)。
{counter: counterReducer}のようなオブジェクトを渡すことで、Redux状態オブジェクトにstate.counterセクションを作成し、アクションがディスパッチされるたびにstate.counterセクションを更新するかどうか、どのように更新するかをcounterReducer関数に決定させます。
Reduxではストア設定を様々なプラグイン(「ミドルウェア」や「エンハンサー」)でカスタマイズできます。configureStoreはデフォルトで良好な開発者体験を提供するため複数ミドルウェアを自動追加し、Redux DevTools Extensionが内容を検査できるようストアを設定します。
TypeScript使用時には、RootStateやAppDispatchなどの型のように、ストアに基づいた再利用可能な型をエクスポートします。これらの使用方法は後ほど説明します。
Redux スライス
「スライス」は、アプリケーションの単一機能に関する Redux リデューサーとアクションの集合体であり、通常は1つのファイル内で定義されます。この名称は、ルートの Redux ステートオブジェクトを複数の状態「スライス」に分割することに由来しています。
例えばブログアプリでは、ストアの構成は次のようになるかもしれません:
import { configureStore } from '@reduxjs/toolkit'
import usersReducer from '../features/users/usersSlice'
import postsReducer from '../features/posts/postsSlice'
import commentsReducer from '../features/comments/commentsSlice'

export const store = configureStore({
  reducer: {
    users: usersReducer,
    posts: postsReducer,
    comments: commentsReducer
  }
})
この例では、state.users、state.posts、state.comments がそれぞれ Redux 状態の独立した「スライス」です。usersReducer が state.users スライスの更新を担当するため、これを**「スライスリデューサー」関数**と呼びます。
Detailed Explanation: Reducers and State Structure
A Redux store needs to have a single "root reducer" function passed in when it's created. So if we have many different slice reducer functions, how do we get a single root reducer instead, and how does this define the contents of the Redux store state?
If we tried calling all of the slice reducers by hand, it might look like this:
function rootReducer(state = {}, action) {
  return {
    users: usersReducer(state.users, action),
    posts: postsReducer(state.posts, action),
    comments: commentsReducer(state.comments, action)
  }
}
That calls each slice reducer individually, passes in the specific slice of the Redux state, and includes each return value in the final new Redux state object.
Redux has a function called combineReducers that does this for us automatically. It accepts an object full of slice reducers as its argument, and returns a function that calls each slice reducer whenever an action is dispatched. The result from each slice reducer are all combined together into a single object as the final result. We can do the same thing as the previous example using combineReducers:
const rootReducer = combineReducers({
  users: usersReducer,
  posts: postsReducer,
  comments: commentsReducer
})
When we pass an object of slice reducers to configureStore, it passes those to combineReducers for us to generate the root reducer.
As we saw earlier, you can also pass a reducer function directly as the reducer argument:
const store = configureStore({
  reducer: rootReducer
})
スライスリデューサーとアクションの作成
counterReducer 関数が features/counter/counterSlice.ts から来ていることは分かっているので、このファイルの内容を一部分ずつ見ていきましょう。
import { createAsyncThunk, createSlice } from '@reduxjs/toolkit'
import type { PayloadAction } from '@reduxjs/toolkit'

// Define the TS type for the counter slice's state
export interface CounterState {
  value: number
  status: 'idle' | 'loading' | 'failed'
}

// Define the initial value for the slice state
const initialState: CounterState = {
  value: 0,
  status: 'idle'
}

// Slices contain Redux reducer logic for updating state, and
// generate actions that can be dispatched to trigger those updates.
export const counterSlice = createSlice({
  name: 'counter',
  initialState,
  // The `reducers` field lets us define reducers and generate associated actions
  reducers: {
    increment: state => {
      // Redux Toolkit allows us to write "mutating" logic in reducers. It
      // doesn't actually mutate the state because it uses the Immer library,
      // which detects changes to a "draft state" and produces a brand new
      // immutable state based off those changes
      state.value += 1
    },
    decrement: state => {
      state.value -= 1
    },
    // Use the PayloadAction type to declare the contents of `action.payload`
    incrementByAmount: (state, action: PayloadAction<number>) => {
      state.value += action.payload
    }
  }
})

// Export the generated action creators for use in components
export const { increment, decrement, incrementByAmount } = counterSlice.actions

// Export the slice reducer for use in the store configuration
export default counterSlice.reducer
先ほど、UI の異なるボタンをクリックすると3種類の Redux アクションがディスパッチされていました:
-
{type: "counter/increment"} -
{type: "counter/decrement"} -
{type: "counter/incrementByAmount"}
アクションは type フィールドを持つプレーンオブジェクトであり、type フィールドは常に文字列で、通常はアクションオブジェクトを作成・返す「アクションクリエーター」関数が存在します。では、これらのアクションオブジェクト、タイプ文字列、アクションクリエーターはどこで定義されているのでしょうか?
毎回手作業でこれらを書くことも可能ですが、それは退屈です。何より Redux で本当に重要なのは、新しい状態を計算するロジックを持つリデューサー関数です。
Redux Toolkit には createSlice という関数があり、アクションタイプ文字列・アクションクリエーター関数・アクションオブジェクトの生成を担当します。開発者がするのは、このスライスの名前を定義し、リデューサー関数を含むオブジェクトを書くだけです(自動的に対応するアクションコードが生成されます)。name オプションの文字列が各アクションタイプの最初の部分に、各リデューサー関数のキー名が2番目の部分として使用されます。つまり "counter" という名前と "increment" リデューサー関数から {type: "counter/increment"} というアクションタイプが生成されます(手動で書く必要があるなら自動化した方が効率的です)。
createSlice には name フィールドに加えて、最初に呼び出されたときに state が存在するための初期状態値も渡す必要があります。この例では、0 で始まる value フィールドと 'idle' で始まる status フィールドを持つオブジェクトを提供しています。
ここには3つのリデューサー関数があることがわかりますが、これは異なるボタンをクリックすることでディスパッチされた3種類のアクションタイプに対応しています。
createSlice は、私たちが書いたリデューサー関数と同じ名前のアクションクリエーターを自動生成します。実際に1つを呼び出して何が返されるか確認できます:
console.log(counterSlice.actions.increment())
// {type: "counter/increment"}
また、これらすべてのアクションタイプに応答する方法を知っているスライスリデューサー関数も生成されます:
const newState = counterSlice.reducer(
  { value: 10 },
  counterSlice.actions.increment()
)
console.log(newState)
// {value: 11}
リデューサーのルール
前述のように、リデューサーは常に以下の特別なルールに従う必要があります:
-
stateとaction引数に基づいてのみ新しい状態値を計算する -
既存の
stateを変更してはならない。代わりに、既存のstateをコピーしコピーした値を変更するという不変的な更新を行う -
「純粋」でなければならない - 非同期ロジックや他の「副作用」を実行してはならない
では、なぜこれらのルールが重要なのでしょうか? いくつかの理由があります:
-
Redux の目標の1つはコードの予測可能性を高めることです。関数の出力が入力引数のみから計算される場合、そのコードの動作を理解しテストするのが容易になります。
-
一方で、関数が外部変数に依存していたりランダムな動作をする場合、実行時に何が起こるか予測できません。
-
関数が引数を含む他の値を変更すると、アプリケーションの動作が予期せず変化することがあります。これは「状態を更新したのにUIが更新されない!」といったバグの一般的な原因となり得ます。
-
Redux DevToolsの一部の機能は、あなたのリデューサーがこれらのルールを正しく守っていることに依存しています
「不変の更新」に関するルールは特に重要であり、さらに詳しく説明する価値があります。
リデューサーと不変更新
先ほど、「ミューテーション」(既存のオブジェクト/配列値の変更)と「イミュータビリティ」(値を変更不可能なものとして扱うこと)について説明しました。
Reduxでは、リデューサーが元の状態値を変更することは決して許されません!
// ❌ Illegal - by default, this will mutate the state!
state.value = 123
Reduxで状態を変更してはいけない理由はいくつかあります:
-
UIが最新値を正しく表示しないなどのバグを引き起こす
-
状態がなぜ・どのように更新されたかを理解しにくくなる
-
テストの作成が困難になる
-
「タイムトラベルデバッグ」機能が正しく動作しなくなる
-
Reduxの設計思想と使用パターンに反する
では、元の値を変更できない場合、更新された状態をどのように返せばよいのでしょうか?
リデューサーは元の値のコピーを作成し、そのコピーを変更できます。
// ✅ This is safe, because we made a copy
return {
  ...state,
  value: 123
}
JavaScriptの配列/オブジェクトスプレッド演算子や、元の値のコピーを返す関数を使用して手動で不変更新を書く方法は既に見ました。しかし、「この方法で手動で不変更新を書くのは覚えるのが難しく、正しく行うのが大変そうだ」と思っているなら...その通りです! :)
手動で不変更新ロジックを書くことは実際に難しく、リデューサー内で誤って状態を変更することはReduxユーザーが最も頻繁に犯すミスです。
これが、Redux ToolkitのcreateSlice関数が不変更新を簡単に書けるようにしている理由です!
createSliceは内部でImmerというライブラリを使用しています。ImmerはProxyと呼ばれる特別なJSツールを使用して提供されたデータをラップし、「変更」するコードを書けるようにします。しかし、Immerはあなたが行おうとしたすべての変更を追跡し、その変更リストを使用して安全に不変更新された値を返します。まるであなたが手動で不変更新ロジックを書いたかのようにです。
したがって、このようなコードの代わりに:
function handwrittenReducer(state, action) {
  return {
    ...state,
    first: {
      ...state.first,
      second: {
        ...state.first.second,
        [action.someId]: {
          ...state.first.second[action.someId],
          fourth: action.someValue
        }
      }
    }
  }
}
このようなコードを書くことができます:
function reducerWithImmer(state, action) {
  state.first.second[action.someId].fourth = action.someValue
}
これはずっと読みやすいです!
しかし、非常に重要なことを覚えておいてください:
「変更」ロジックはRedux ToolkitのcreateSliceとcreateReducer内でのみ書けます!これらは内部でImmerを使用しているからです!Immerなしで変更ロジックを書くと、状態が変更されてバグの原因になります!
このことを念頭に置いて、カウンタースライスの実際のリデューサーを見てみましょう。
export const counterSlice = createSlice({
  name: 'counter',
  initialState,
  // The `reducers` field lets us define reducers and generate associated actions
  reducers: {
    increment: state => {
      // Redux Toolkit allows us to write "mutating" logic in reducers. It
      // doesn't actually mutate the state because it uses the Immer library,
      // which detects changes to a "draft state" and produces a brand new
      // immutable state based off those changes
      state.value += 1
    },
    decrement: state => {
      state.value -= 1
    },
    // Use the PayloadAction type to declare the contents of `action.payload`
    incrementByAmount: (state, action: PayloadAction<number>) => {
      state.value += action.payload
    }
  }
})
incrementリデューサーは常にstate.valueに1を加算することがわかります。Immerはドラフトstateオブジェクトへの変更を認識しているため、ここで実際に何かを返す必要はありません。同様に、decrementリデューサーは1を減算します。
これらの両方のリデューサでは、実際にactionオブジェクトを参照する必要はありません。actionは渡されますが不要なので、リデューサのパラメータとしてactionを宣言するのを省略できます。
一方、incrementByAmountリデューサは何かを知る必要があります:カウンタ値にどれだけ加算すべきかです。そこで、このリデューサはstateとactionの両方の引数を持つように宣言します。この場合、「amount」入力欄に入力した値がaction.payloadフィールドに格納されるため、その値をstate.valueに加算できます。
TypeScriptを使用している場合、action.payloadの型をTSに伝える必要があります。PayloadAction型は「これはアクションオブジェクトであり、action.payloadの型は...」宣言し、指定した型が適用されます。この場合、UIは「amount」テキストボックスに入力された数値文字列を取得し数値に変換した後、その値でアクションをディスパッチしようとしているため、action: PayloadAction<number>と宣言します。
イミュータビリティ(不変性)とイミュータブルな更新について詳しくは、「イミュータブルな更新パターン」ドキュメントページとReactとReduxにおけるイミュータビリティ完全ガイドを参照してください。
Immerを使用してイミュータブルな更新を「変更」する詳細については、Immerドキュメントと「Immerでリデューサを書く」ドキュメントページを参照してください。
追加のReduxロジック
Reduxのコアはリデューサ、アクション、ストアです。さらに、一般的に使用される追加のRedux関数がいくつかあります。
セレクタでデータを読み取る
store.getState()を呼び出すと、現在のルートステートオブジェクト全体を取得でき、state.counter.valueのようにそのフィールドにアクセスできます。
これらのステートフィールド参照を代行する「セレクタ」関数を作成するのが標準的です。この場合、counterSlice.tsは再利用可能な2つのセレクタ関数をエクスポートしています:
// Selector functions allows us to select a value from the Redux root state.
// Selectors can also be defined inline in the `useSelector` call
// in a component, or inside the `createSlice.selectors` field.
export const selectCount = (state: RootState) => state.counter.value
export const selectStatus = (state: RootState) => state.counter.status
セレクタ関数は通常、引数としてReduxのルートステートオブジェクト全体を受け取ります。ルートステートから特定の値を読み取ったり、計算を行って新しい値を返したりできます。
TypeScriptを使用しているため、各セレクタのstate引数の型を定義するには、store.tsからエクスポートされたRootState型を使用する必要があります。
すべてのスライスのすべてのフィールドに対して個別のセレクタ関数を作成する必要はありません!(この例ではセレクタ作成の考え方を示すためだけに行っていますが、counterSlice.tsには元々2つのフィールドしかありません)代わりに、セレクタ作成数のバランスを見つけてください。
セレクタ関数について詳しくは、パート4: Reduxデータの使用で学び、最適化方法はパート6: パフォーマンスで確認します。
セレクタ関数を使用する理由と方法について詳しくは、セレクタでデータを導出するを参照してください。
Thunkで非同期ロジックを書く
これまで、アプリケーションのロジックはすべて同期的でした。アクションがディスパッチされ、ストアがリデューサを実行して新しいステートを計算し、ディスパッチ関数が終了します。しかしJavaScriptには非同期コードを書く方法が多数あり、通常、APIからデータを取得するなどの非同期ロジックがアプリに含まれます。Reduxアプリでその非同期ロジックを配置する場所が必要です。
Thunkは非同期ロジックを含むことができる特定の種類のRedux関数です。Thunkは2つの関数を使用して書かれます:
-
内部の thunk 関数(
dispatchとgetStateを引数として受け取る) -
外側の生成関数(thunk 関数を作成して返す)
counterSlice からエクスポートされる次の関数は、thunk アクションクリエーターの例です:
// The function below is called a thunk, which can contain both sync and async logic
// that has access to both `dispatch` and `getState`. They can be dispatched like
// a regular action: `dispatch(incrementIfOdd(10))`.
// Here's an example of conditionally dispatching actions based on current state.
export const incrementIfOdd = (amount: number): AppThunk => {
  return (dispatch, getState) => {
    const currentValue = selectCount(getState())
    if (currentValue % 2 === 1) {
      dispatch(incrementByAmount(amount))
    }
  }
}
この thunk では、getState() を使用してストアの現在のルート状態値を取得し、dispatch() を使用して別のアクションをディスパッチします。ここには setTimeout や await といった非同期ロジックも簡単に追加できます。
これらの関数は、通常の Redux アクションクリエーターと同じ方法で使用できます:
store.dispatch(incrementIfOdd(6))
thunk を使用するには、Redux ストア作成時に redux-thunk ミドルウェア(Redux 用のプラグイン)を追加する必要があります。幸い、Redux Toolkit の configureStore 関数はこれを自動で設定してくれるため、すぐに thunk を使用できます。
thunk を記述する際は、dispatch と getState メソッドの型を正しく設定する必要があります。thunk 関数を (dispatch: AppDispatch, getState: () => RootState) と定義することも可能ですが、ストアファイルで再利用可能な AppThunk 型を定義するのが一般的です。
サーバーからデータを取得するために HTTP 呼び出しを行う必要がある場合、その呼び出しを thunk 内に配置できます。以下は定義方法を示すために少し長めに記述した例です:
// the outside "thunk creator" function
const fetchUserById = (userId: string): AppThunk => {
  // the inside "thunk function"
  return async (dispatch, getState) => {
    try {
      dispatch(userPending())
      // make an async call in the thunk
      const user = await userAPI.fetchById(userId)
      // dispatch an action when we get the response back
      dispatch(userLoaded(user))
    } catch (err) {
      // If something went wrong, handle it here
    }
  }
}
Redux Toolkit には、ディスパッチ作業をすべて代行する createAsyncThunk メソッドが含まれています。counterSlice.ts の次の関数は、カウンター値を使用したモック API リクエストを行う非同期 thunk です。この thunk をディスパッチすると、リクエスト前に pending アクションがディスパッチされ、非同期ロジック完了後に fulfilled または rejected アクションがディスパッチされます。
// Thunks are commonly used for async logic like fetching data.
// The `createAsyncThunk` method is used to generate thunks that
// dispatch pending/fulfilled/rejected actions based on a promise.
// In this example, we make a mock async request and return the result.
// The `createSlice.extraReducers` field can handle these actions
// and update the state with the results.
export const incrementAsync = createAsyncThunk(
  'counter/fetchCount',
  async (amount: number) => {
    const response = await fetchCount(amount)
    // The value we return becomes the `fulfilled` action payload
    return response.data
  }
)
createAsyncThunk を使用する場合、そのアクションは createSlice.extraReducers で処理します。この例では、3つのアクションタイプを処理し、status フィールドを更新するとともに value も更新します:
export const counterSlice = createSlice({
  name: 'counter',
  initialState,
  reducers: {
    // omit reducers
  },
  // The `extraReducers` field lets the slice handle actions defined elsewhere,
  // including actions generated by createAsyncThunk or in other slices.
  extraReducers: builder => {
    builder
      // Handle the action types defined by the `incrementAsync` thunk defined below.
      // This lets the slice reducer update the state with request status and results.
      .addCase(incrementAsync.pending, state => {
        state.status = 'loading'
      })
      .addCase(incrementAsync.fulfilled, (state, action) => {
        state.status = 'idle'
        state.value += action.payload
      })
      .addCase(incrementAsync.rejected, state => {
        state.status = 'failed'
      })
  }
})
非同期ロジックに thunk を使用する理由について詳しく知りたい場合は、こちらの詳細な説明をご覧ください:
Detailed Explanation: Thunks and Async Logic
We know that we're not allowed to put any kind of async logic in reducers. But, that logic has to live somewhere.
If we had access to the Redux store, we could write some async code and call store.dispatch() when we're done:
const store = configureStore({ reducer: counterReducer })

setTimeout(() => {
  store.dispatch(increment())
}, 250)
But, in a real Redux app, we're not allowed to import the store into other files, especially in our React components, because it makes that code harder to test and reuse.
In addition, we often need to write some async logic that we know will be used with some store, eventually, but we don't know which store.
The Redux store can be extended with "middleware", which are a kind of add-on or plugin that can add extra abilities. The most common reason to use middleware is to let you write code that can have async logic, but still talk to the store at the same time. They can also modify the store so that we can call dispatch() and pass in values that are not plain action objects, like functions or Promises.
The Redux Thunk middleware modifies the store to let you pass functions into dispatch. In fact, it's short enough we can paste it here:
const thunkMiddleware =
  ({ dispatch, getState }) =>
  next =>
  action => {
    if (typeof action === 'function') {
      return action(dispatch, getState)
    }

    return next(action)
  }
It looks to see if the "action" that was passed into dispatch is actually a function instead of a plain action object. If it's actually a function, it calls the function, and returns the result. Otherwise, since this must be an action object, it passes the action forward to the store.
This gives us a way to write whatever sync or async code we want, while still having access to dispatch and getState.
thunk の使用例は パート5: 非同期ロジックとデータ取得 で紹介します
詳細については Redux Thunk ドキュメント、記事 What the heck is a thunk?、および Redux FAQ の「非同期処理になぜミドルウェアが必要か?」 を参照してください。
React カウンターコンポーネント
以前に、スタンドアロンの React <Counter> コンポーネントの例を見ました。今回の React+Redux アプリにも似た <Counter> コンポーネントがありますが、いくつか異なる点があります。
まず Counter.tsx コンポーネントファイルを見ていきましょう:
import { useState } from 'react'

// Use pre-typed versions of the React-Redux
// `useDispatch` and `useSelector` hooks
import { useAppDispatch, useAppSelector } from '@/app/hooks'
import {
  decrement,
  increment,
  incrementAsync,
  incrementByAmount,
  incrementIfOdd,
  selectCount,
  selectStatus
} from './counterSlice'

import styles from './Counter.module.css'

export function Counter() {
  const dispatch = useAppDispatch()
  const count = useAppSelector(selectCount)
  const status = useAppSelector(selectStatus)
  const [incrementAmount, setIncrementAmount] = useState('2')

  const incrementValue = Number(incrementAmount) || 0

  return (
    <div>
      <div className={styles.row}>
        <button
          className={styles.button}
          aria-label="Decrement value"
          onClick={() => {
            dispatch(decrement())
          }}
        >
          -
        </button>
        <span aria-label="Count" className={styles.value}>
          {count}
        </span>
        <button
          className={styles.button}
          aria-label="Increment value"
          onClick={() => {
            dispatch(increment())
          }}
        >
          +
        </button>
        {/* omit additional rendering output here */}
      </div>
    </div>
  )
}
以前のプレーンな React の例と同様に、Counter という関数コンポーネントがあり、useState フックを使用していくつかのデータを保持しています。
ただし、このコンポーネントでは実際の現在のカウンター値を状態として保持しているようには見えません。count という変数は存在しますが、これは useState フックから来ているわけではありません。
React には useState や useEffect といった組み込みフックがありますが、他のライブラリは React のフックを利用してカスタムロジックを構築する 独自フック を作成できます。
React-Redux ライブラリ には React コンポーネントが Redux ストアとやり取りするための独自フックセット が用意されています。
useSelector によるデータの読み取り
まず、useSelectorフックを使用すると、コンポーネントはReduxストアの状態から必要なデータを抽出できます。
前述のように、stateを引数に取り状態値の一部を返す「セレクター」関数を記述できます。具体的には、counterSlice.tsファイルがselectCountとselectStatusをエクスポートしています。
Reduxストアにアクセスできる場合、現在のカウンター値を次のように取得できます:
const count = selectCount(store.getState())
console.log(count)
// 0
コンポーネントはReduxストアと直接やり取りできません。コンポーネントファイルにインポートできないためです。しかし、useSelectorは背後でReduxストアとの通信を代行します。セレクター関数を渡すと、someSelector(store.getState())を呼び出し、結果を返します。
したがって、現在のストアのカウンター値は次のように取得できます:
const count = useSelector(selectCount)
エクスポート済みのセレクターだけを使う必要はありません。例えば、useSelectorのインライン引数としてセレクター関数を記述できます:
const countPlusTwo = useSelector((state: RootState) => state.counter.value + 2)
アクションがディスパッチされReduxストアが更新されるたびに、useSelectorはセレクター関数を再実行します。セレクターが前回と異なる値を返す場合、useSelectorはコンポーネントを新しい値で再レンダリングさせます。
useDispatchを使ったアクションのディスパッチ
同様に、Reduxストアにアクセスできる場合、store.dispatch(increment())のようにアクションクリエーターを使ってアクションをディスパッチできます。ストア自体にアクセスできないため、dispatchメソッドだけを利用する方法が必要です。
useDispatchフックがこれを実現し、Reduxストアから実際のdispatchメソッドを提供します:
const dispatch = useDispatch()
これにより、ユーザーがボタンをクリックするなどの操作を行った際にアクションをディスパッチできます:
<button
  className={styles.button}
  aria-label="Increment value"
  onClick={() => {
    dispatch(increment())
  }}
>
  +
</button>
事前に型付けされたReact-Reduxフックの定義
デフォルトでは、useSelectorフックを使用する際に毎回(state: RootState)と宣言する必要があります。useSelectorとuseDispatchの事前に型付けされたバージョンを作成することで、: RootStateの繰り返しを防げます。
import { useDispatch, useSelector } from 'react-redux'
import type { AppDispatch, RootState } from './store'

// Use throughout your app instead of plain `useDispatch` and `useSelector`
export const useAppDispatch = useDispatch.withTypes<AppDispatch>()
export const useAppSelector = useSelector.withTypes<RootState>()
その後、独自のコンポーネントでuseAppSelectorとuseAppDispatchフックをインポートし、元のバージョンの代わりに使用できます。
コンポーネントの状態とフォーム
「アプリの状態はすべてReduxストアに置かなければならないのか?」と疑問に思うかもしれません。
答えはNOです。アプリ全体で必要なグローバル状態はReduxストアに置き、一箇所だけで必要な状態はコンポーネント内に保持するべきです。
この例では、ユーザーがカウンターに加算する次の数値を入力できるテキストボックスがあります:
const [incrementAmount, setIncrementAmount] = useState('2')

const incrementValue = Number(incrementAmount) || 0

// later
return (
  <div className={styles.row}>
    <input
      className={styles.textbox}
      aria-label="Set increment amount"
      value={incrementAmount}
      onChange={e => setIncrementAmount(e.target.value)}
    />
    <button
      className={styles.button}
      onClick={() => dispatch(incrementByAmount(incrementValue))}
    >
      Add Amount
    </button>
    <button
      className={styles.asyncButton}
      onClick={() => dispatch(incrementAsync(incrementValue))}
    >
      Add Async
    </button>
  </div>
)
入力のonChangeハンドラーでアクションをディスパッチし、リデューサーで管理することで、現在の数値文字列をReduxストアに保持することも_可能_です。しかし、これには利点がありません。このテキスト文字列が使用されるのは、ここ<Counter>コンポーネント内だけだからです(この例では<App>コンポーネントしかありませんが、大規模なアプリケーションでもこの入力値に関心を持つのは<Counter>だけです)。
したがって、この値は<Counter>コンポーネント内のuseStateフックで保持するのが合理的です。
同様に、isDropdownOpenというブール値フラグがある場合、アプリ内の他のコンポーネントはこれに関心を持たないため、このコンポーネント内でローカルに保持すべきです。
React + Reduxアプリでは、グローバル状態はReduxストアに、ローカル状態はReactコンポーネント内に保持するべきです。
どこに配置すか迷った場合、以下の経験則がReduxに配置すべきデータの判断に役立ちます:
-
このデータはアプリケーションの他の部分に関係がありますか?
-
この元データからさらに派生データを作成する必要がありますか?
-
同じデータが複数のコンポーネントで使用されていますか?
-
特定の時点にこの状態を復元できること(例:タイムトラベルデバッグ)に価値がありますか?
-
データをキャッシュしたいですか(例:既に状態にあるデータを再リクエストせずに使用する)?
-
UIコンポーネントのホットリロード中にこのデータを一貫して保持したいですか(スワップ時に内部状態が失われる可能性があります)?
これは一般的にReduxでのフォームの扱い方を考える良い例でもあります。ほとんどのフォームの状態はReduxに保持すべきではありません。代わりに、編集中のデータはフォームコンポーネント内で保持し、ユーザーの操作が完了した時点でReduxアクションをディスパッチしてストアを更新します。
次に進む前に注目すべきもう1点:counterSlice.tsのincrementAsyncサンクを覚えていますか?このコンポーネントで使用しています。通常のアクションクリエイターと同じ方法でディスパッチしていることに注目してください。このコンポーネントは、通常のアクションをディスパッチしているのか非同期ロジックを開始しているのかを気にしません。ボタンクリック時に何かをディスパッチするだけを知っています。
ストアの提供
コンポーネントがuseSelectorとuseDispatchフックを使用してReduxストアと通信できることは確認しました。しかし、ストアをインポートしていないのに、これらのフックはどのReduxストアと通信すればよいのかを知っているのでしょうか?
アプリケーションの全パーツを見てきたので、アプリケーションの出発点に立ち戻り、パズルの最後のピースがどのように組み合わさるかを見てみましょう。
import React from 'react'
import { createRoot } from 'react-dom/client'
import { Provider } from 'react-redux'

import App from './App'
import { store } from './app/store'

import './index.css'

const container = document.getElementById('root')!
const root = createRoot(container)

root.render(
  <React.StrictMode>
    <Provider store={store}>
      <App />
    </Provider>
  </React.StrictMode>
)
ルートの<App>コンポーネントのレンダリングを開始するためには、常にroot.render(<App />)を呼び出す必要があります。useSelectorのようなフックが正しく機能するためには、背後でReduxストアを渡す<Provider>コンポーネントを使用し、フックがストアにアクセスできるようにする必要があります。
app/store.tsでストアは既に作成済みなので、ここでインポートできます。次に、<Provider>コンポーネントで<App>全体をラップし、ストアを渡します:<Provider store={store}>。
これで、useSelectorやuseDispatchを呼び出すReactコンポーネントは全て、<Provider>に渡したReduxストアと通信します。
学んだこと
カウンターアプリは非常に小規模ですが、React + Reduxアプリが連携して動作する主要なパーツを全て示しています。以下がカバーした内容です:
- Redux Toolkitの
configureStoreAPIを使用してReduxストアを作成できるconfigureStoreはreducer関数を名前付き引数として受け入れるconfigureStoreは適切なデフォルト設定でストアを自動セットアップする
- Reduxロジックは通常「スライス」と呼ばれるファイルに整理される
- 「スライス」には特定の機能/状態セクションに関連するreducerロジックとアクションが含まれる
- Redux Toolkitの
createSliceAPIは、提供された各reducer関数に対してアクションクリエイターとアクションタイプを生成する
- Redux reducerは特定のルールに従う必要がある
stateとaction引数に基づいて新しい状態値のみを計算する- 既存の状態をコピーして 不変更新(immutable updates) を行う必要がある
- 非同期ロジックや他の「副作用」を含んではならない
- Redux Toolkitの
createSliceAPIはImmerを使用して「変更的」な不変更新を可能にする
- 状態からの値の読み取りは「セレクター」関数で行う
- セレクターは
(state: RootState)を引数として受け取り、状態から値を返すか新しい値を導出する - セレクターはスライスファイル内または
useSelectorフック内にインラインで記述できる
- セレクターは
- 非同期ロジックは通常「サンク(thunks)」と呼ばれる特別な関数に記述される
- サンクは
dispatchとgetStateを引数として受け取る - Redux Toolkitはデフォルトで
redux-thunkミドルウェアを有効にする
- サンクは
- React-ReduxはReactコンポーネントがReduxストアと連携できるようにする
- アプリを
<Provider store={store}>でラップすると全コンポーネントがストアを使用可能になる useSelectorフックはReactコンポーネントがReduxストアから値を読み取ることを可能にするuseDispatchフックはコンポーネントがアクションをディスパッチすることを可能にする- TypeScript使用時は事前型定義された
useAppSelectorとuseAppDispatchフックを作成する - グローバル状態はReduxストアに、ローカル状態はReactコンポーネント内に保持する
- アプリを
次のステップ
これでReduxアプリの全要素を実際に動作させて確認できました。次は自分自身で作成してみましょう!このチュートリアルの残りのパートでは、Reduxを使用するより大規模なサンプルアプリケーションを構築していきます。その過程で、Reduxを正しく使用するために必要な主要な概念をすべてカバーします。
引き続きパート3: Reduxの基本データフローに進み、サンプルアプリケーションの構築を開始しましょう。