Redux Essentials Part 6: パフォーマンス、データ正規化、反応的ロジック
このページは PageTurner AI で翻訳されました(ベータ版)。プロジェクト公式の承認はありません。 エラーを見つけましたか? 問題を報告 →
createSelectorを使ったメモ化セレクター関数の作成方法- コンポーネントレンダリングパフォーマンスを最適化するパターン
createEntityAdapterを使った正規化データの保存と更新方法- 反応的ロジックのための
createListenerMiddlewareの使用方法
- データ取得フローを理解するためのPart 5の完了
はじめに
Part 5: 非同期ロジックとデータ取得では、非同期サンクを使ってサーバーAPIからデータを取得する方法と、非同期リクエストのローディング状態を扱うパターンを見てきました。
このセクションでは、アプリケーションのパフォーマンスを確保する最適化パターンと、ストア内データの一般的な更新を自動処理する技術を学びます。また、ディスパッチされたアクションに反応する反応的ロジックの記述方法についても見ていきます。
これまで、機能のほとんどはpostsフィーチャーを中心に構成されていました。ここではアプリにいくつかの新しいセクションを追加します。追加後、実装方法の詳細を確認し、これまでの実装の弱点と改善方法について議論します。
ユーザー機能の追加
ユーザーページの追加
偽装APIからユーザーリストを取得しており、新規投稿時に著者としてユーザーを選択できます。しかし、ソーシャルメディアアプリでは特定ユーザーのページを表示し、そのユーザーが作成した全投稿を見る機能が必要です。全ユーザーリストを表示するページと、特定ユーザーの全投稿を表示するページを追加しましょう。
新しい<UsersList>コンポーネントの追加から始めます。このコンポーネントは、useSelectorでストアからデータを読み取り、配列をマッピングして各ユーザーの個別ページへのリンク付きリストを表示するという通常のパターンに従います:
import { Link } from 'react-router-dom'

import { useAppSelector } from '@/app/hooks'

import { selectAllUsers } from './usersSlice'

export const UsersList = () => {
  const users = useAppSelector(selectAllUsers)

  const renderedUsers = users.map(user => (
    <li key={user.id}>
      <Link to={`/users/${user.id}`}>{user.name}</Link>
    </li>
  ))

  return (
    <section>
      <h2>Users</h2>

      <ul>{renderedUsers}</ul>
    </section>
  )
}
次に<UserPage>を追加します。これはルーターからuserIdパラメータを受け取る点で<SinglePostPage>と似ており、特定ユーザーの全投稿リストをレンダリングします。通常のパターンに従い、まずpostsSlice.tsにselectPostsByUserセレクターを追加します:
// omit rest of the file
export const selectPostById = (state: RootState, postId: string) =>
  state.posts.posts.find(post => post.id === postId)

export const selectPostsByUser = (state: RootState, userId: string) => {
  const allPosts = selectAllPosts(state)
  // ❌ This seems suspicious! See more details below
  return allPosts.filter(post => post.user === userId)
}

export const selectPostsStatus = (state: RootState) => state.posts.status
export const selectPostsError = (state: RootState) => state.posts.error
import { Link, useParams } from 'react-router-dom'

import { useAppSelector } from '@/app/hooks'
import { selectPostsByUser } from '@/features/posts/postsSlice'

import { selectUserById } from './usersSlice'

export const UserPage = () => {
  const { userId } = useParams()

  const user = useAppSelector(state => selectUserById(state, userId!))

  const postsForUser = useAppSelector(state =>
    selectPostsByUser(state, userId!)
  )

  if (!user) {
    return (
      <section>
        <h2>User not found!</h2>
      </section>
    )
  }

  const postTitles = postsForUser.map(post => (
    <li key={post.id}>
      <Link to={`/posts/${post.id}`}>{post.title}</Link>
    </li>
  ))

  return (
    <section>
      <h2>{user.name}</h2>

      <ul>{postTitles}</ul>
    </section>
  )
}
selectPostsByUser内でallPosts.filter()を使用していることに注意してください。これは実際には問題のあるパターンです! すぐにその理由を説明します。
usersSliceには既にselectAllUsersとselectUserByIdセレクターが用意されているため、コンポーネントでインポートして使用するだけです。
これまで見てきたように、あるuseSelector呼び出しやpropsからデータを取得し、それを別のuseSelector呼び出しでストアから読み取る内容を決定するのに利用できます。
通常通り、<App>にこれらのコンポーネントのルートを追加します:
          <Route path="/posts/:postId" element={<SinglePostPage />} />
          <Route path="/editPost/:postId" element={<EditPostForm />} />
          <Route path="/users" element={<UsersList />} />
          <Route path="/users/:userId" element={<UserPage />} />
<Navbar>に/usersへのリンクを持つ新しいタブも追加し、クリックして<UsersList>に遷移できるようにします:
export const Navbar = () => {
  // omit other logic

  navContent = (
    <div className="navContent">
      <div className="navLinks">
        <Link to="/posts">Posts</Link>
        <Link to="/users">Users</Link>
      </div>
      <div className="userDetails">
        <UserIcon size={32} />
        {user.name}
        <button className="button small" onClick={onLogoutClicked}>
          Log Out
        </button>
      </div>
    </div>
  )

  // omit other rendering
}
これで実際に各ユーザーのページを閲覧し、そのユーザーの投稿のみのリストを見られるようになりました。
サーバーへのログインリクエスト送信
現在、<LoginPage>とauthSliceは現在のユーザー名を追跡するクライアントサイドのReduxアクションをディスパッチしているだけです。実際には、サーバーにログインリクエストを送信する必要があります。投稿やユーザーと同様に、ログインとログアウト処理を非同期サンクに変換します。
import { createSlice, createAsyncThunk } from '@reduxjs/toolkit'

import { client } from '@/api/client'

import type { RootState } from '@/app/store'

import { createAppAsyncThunk } from '@/app/withTypes'

interface AuthState {
  username: string | null
}

export const login = createAppAsyncThunk(
  'auth/login',
  async (username: string) => {
    await client.post('/fakeApi/login', { username })
    return username
  }
)

export const logout = createAppAsyncThunk('auth/logout', async () => {
  await client.post('/fakeApi/logout', {})
})

const initialState: AuthState = {
  // Note: a real app would probably have more complex auth state,
  // but for this example we'll keep things simple
  username: null
}

const authSlice = createSlice({
  name: 'auth',
  initialState,
  // Remove the reducer definitions
  reducers: {},
  extraReducers: builder => {
    // and handle the thunk actions instead
    builder
      .addCase(login.fulfilled, (state, action) => {
        state.username = action.payload
      })
      .addCase(logout.fulfilled, state => {
        state.username = null
      })
  }
})

// Removed the exported actions

export default authSlice.reducer
これに伴い、<Navbar>と<LoginPage>を更新し、以前のアクションクリエーターの代わりに新しいサンクをインポートしてディスパッチするようにします:
import { Link } from 'react-router-dom'

import { useAppDispatch, useAppSelector } from '@/app/hooks'

import { logout } from '@/features/auth/authSlice'
import { selectCurrentUser } from '@/features/users/usersSlice'

import { UserIcon } from './UserIcon'

export const Navbar = () => {
  const dispatch = useAppDispatch()
  const user = useAppSelector(selectCurrentUser)

  const isLoggedIn = !!user

  let navContent: React.ReactNode = null

  if (isLoggedIn) {
    const onLogoutClicked = () => {
      dispatch(logout())
    }
import React from 'react'
import { useNavigate } from 'react-router-dom'

import { useAppDispatch, useAppSelector } from '@/app/hooks'
import { selectAllUsers } from '@/features/users/usersSlice'

import { login } from './authSlice'

// omit types

export const LoginPage = () => {
  const dispatch = useAppDispatch()
  const users = useAppSelector(selectAllUsers)
  const navigate = useNavigate()

  const handleSubmit = async (e: React.FormEvent<LoginPageFormElements>) => {
    e.preventDefault()

    const username = e.currentTarget.elements.username.value
    await dispatch(login(username))
    navigate('/posts')
  }
userLoggedOutアクションクリエーターはpostsSliceで使用されていたため、logout.fulfilledをリッスンするように更新できます:
import { createAsyncThunk, createSlice, PayloadAction } from '@reduxjs/toolkit'
import { client } from '@/api/client'

import type { RootState } from '@/app/store'

// Import this thunk instead
import { logout } from '@/features/auth/authSlice'

// omit types and setup

const postsSlice = createSlice({
  name,
  initialState,
  reducers: {
    /* omitted */
  },
  extraReducers: builder => {
    builder
      // switch to handle the thunk fulfilled action
      .addCase(logout.fulfilled, state => {
        // Clear out the list of posts whenever the user logs out
        return initialState
      })
    // omit other cases
  }
})
通知機能の追加
誰かがメッセージを送信した、コメントを残した、あるいは投稿に反応したことを知らせる通知が表示されなければ、ソーシャルメディアアプリは完成とは言えません。
実際のアプリケーションでは、クライアントはバックエンドサーバーと常時通信を行い、何かイベントが発生するたびにサーバーがクライアントに更新をプッシュします。この小さなサンプルアプリでは、ダミーAPIから通知エントリーを取得するボタンを追加することでそのプロセスを模倣します。また実際のユーザーがメッセージを送信したり投稿に反応したりすることはないため、ダミーAPIはリクエストのたびにランダムな通知エントリーを生成します(ここでの目的はRedux自体の使用方法を理解することです)。
通知スライス
これはアプリの新機能であるため、まず通知用のスライスを作成し、APIから通知エントリーを取得する非同期thunkを追加します。現実的な通知を作成するため、最新通知のタイムスタンプをステートに保持します。これによりモックサーバーはそのタイムスタンプ以降の新しい通知を生成できます。
import { createSlice } from '@reduxjs/toolkit'

import { client } from '@/api/client'

import type { RootState } from '@/app/store'
import { createAppAsyncThunk } from '@/app/withTypes'

export interface ServerNotification {
  id: string
  date: string
  message: string
  user: string
}

export const fetchNotifications = createAppAsyncThunk(
  'notifications/fetchNotifications',
  async (_unused, thunkApi) => {
    const allNotifications = selectAllNotifications(thunkApi.getState())
    const [latestNotification] = allNotifications
    const latestTimestamp = latestNotification ? latestNotification.date : ''
    const response = await client.get<ServerNotification[]>(
      `/fakeApi/notifications?since=${latestTimestamp}`
    )
    return response.data
  }
)

const initialState: ServerNotification[] = []

const notificationsSlice = createSlice({
  name: 'notifications',
  initialState,
  reducers: {},
  extraReducers(builder) {
    builder.addCase(fetchNotifications.fulfilled, (state, action) => {
      state.push(...action.payload)
      // Sort with newest first
      state.sort((a, b) => b.date.localeCompare(a.date))
    })
  }
})

export default notificationsSlice.reducer

export const selectAllNotifications = (state: RootState) => state.notifications
他のスライスと同様に、notificationsReducerをstore.tsにインポートし、configureStore()呼び出しに追加します。
fetchNotificationsという非同期thunkを作成しました。これはサーバーから新しい通知リストを取得します。リクエストの一部として、最新通知の作成タイムスタンプを使用し、サーバーが実際に新しい通知のみを返すようにします。
通知の配列が返されることがわかっているため、state.push()に個別の引数として渡すと配列に各項目が追加されます。またサーバーが順不同で送信する可能性もあるため、最新通知が配列の先頭に来るようにソートします(array.sort()は常に既存の配列を変更することに注意してください。これはcreateSliceとImmer内部で使用している場合のみ安全です)。
Thunkの引数
fetchNotifications thunkを見ると、これまでに見たことのない新しい要素があります。thunkの引数について説明しましょう。
thunkアクションクリエーターに引数を渡せることは既に見てきました(例:dispatch(addPost(newPost)))。特にcreateAsyncThunkでは、渡せる引数は1つだけであり、渡した内容がペイロード作成コールバックの第1引数になります。何も渡さない場合、この引数はundefinedになります。
ペイロード作成コールバックの第2引数は、有用な関数や情報を含むthunkAPIオブジェクトです:
-
dispatchとgetState:Reduxストアから取得した実際のdispatchおよびgetStateメソッド。thunk内で追加のアクションをディスパッチしたり、最新のReduxストアステートを取得するために使用できます(別のアクションがディスパッチされた後の更新値を読み取る場合など)。 -
extra:ストア作成時にthunkミドルウェアに渡せる「追加引数」。通常はAPIラッパーであり、アプリケーションサーバーへのAPI呼び出し方法を知りデータを返す関数群などが該当します。これによりthunk内にURLやクエリロジックを直接記述する必要がなくなります。 -
requestId:このthunk呼び出しの一意なランダムID値。個々のリクエストのステータス追跡に有用です。 -
signal:進行中のリクエストをキャンセルするために使用できるAbortController.signal関数。 -
rejectWithValue:thunkがエラーを受け取った際にrejectedアクションの内容をカスタマイズするのに役立つユーティリティ。
(createAsyncThunkの代わりに手動でthunkを作成する場合、thunk関数は(dispatch, getState)を別々の引数として受け取ります。一つのオブジェクトにまとめるのではなく。)
これらの引数やサンクおよびリクエストのキャンセル処理についての詳細は、createAsyncThunk API リファレンスページを参照してください。
この場合、常に第2引数となる thunkApi 引数へのアクセスが必要です。つまり、第1引数には何らかの変数名を指定する必要があります。サンクをディスパッチする際には何も渡さず、ペイロードコールバック内でも使用しませんが、変数名は必要です。そのため、_unused という名前を付けます。
ここで、通知リストは Redux ストアのステートにあり、最新の通知が配列の先頭に来るはずです。thunkApi.getState() を呼び出してステートの値を読み取り、selectAllNotifications セレクタを使って通知の配列を取得できます。通知の配列は新しい順にソートされているので、配列の分割代入を使って最新の通知を取得できます。
通知リストの追加
notificationsSlice が作成できたので、<NotificationsList> コンポーネントを追加します。このコンポーネントは、ストアから通知リストを読み取り、各通知がいつ発生したか、誰が送信したかを表示する必要があります。すでに <PostAuthor> と <TimeAgo> コンポーネントがあるので、これらを再利用できます。ただし、<PostAuthor> には "by " という接頭辞が含まれており、ここでは適切ではありません。そこで showPrefix プロップを追加し、デフォルトを true とし、ここでは特に接頭辞を表示 しない ように修正します。
interface PostAuthorProps {
  userId: string
  showPrefix?: boolean
}

export const PostAuthor = ({ userId, showPrefix = true }: PostAuthorProps) => {
  const author = useAppSelector(state => selectUserById(state, userId))

  return (
    <span>
      {showPrefix ? 'by ' : null}
      {author?.name ?? 'Unknown author'}
    </span>
  )
}
import { useAppSelector } from '@/app/hooks'

import { TimeAgo } from '@/components/TimeAgo'

import { PostAuthor } from '@/features/posts/PostAuthor'

import { selectAllNotifications } from './notificationsSlice'

export const NotificationsList = () => {
  const notifications = useAppSelector(selectAllNotifications)

  const renderedNotifications = notifications.map(notification => {
    return (
      <div key={notification.id} className="notification">
        <div>
          <b>
            <PostAuthor userId={notification.user} showPrefix={false} />
          </b>{' '}
          {notification.message}
        </div>
        <TimeAgo timestamp={notification.date} />
      </div>
    )
  })

  return (
    <section className="notificationsList">
      <h2>Notifications</h2>
      {renderedNotifications}
    </section>
  )
}
また、<Navbar> を更新して「通知」タブと通知を取得する新しいボタンを追加する必要があります:
// omit several imports

import { logout } from '@/features/auth/authSlice'
import { fetchNotifications } from '@/features/notifications/notificationsSlice'
import { selectCurrentUser } from '@/features/users/usersSlice'

export const Navbar = () => {
  const dispatch = useAppDispatch()
  const user = useAppSelector(selectCurrentUser)

  const isLoggedIn = !!user

  let navContent: React.ReactNode = null

  if (isLoggedIn) {
    const onLogoutClicked = () => {
      dispatch(logout())
    }

    const fetchNewNotifications = () => {
      dispatch(fetchNotifications())
    }

    navContent = (
      <div className="navContent">
        <div className="navLinks">
          <Link to="/posts">Posts</Link>
          <Link to="/users">Users</Link>
          <Link to="/notifications">Notifications</Link>
          <button className="button small" onClick={fetchNewNotifications}>
            Refresh Notifications
          </button>
        </div>
        {/* omit user details */}
      </div>
    )
  }

  // omit other rendering
}
最後に、App.tsxを「通知」ルートで更新し、そこにナビゲートできるようにする必要があります:
// omit imports
import { NotificationsList } from './features/notifications/NotificationsList'

function App() {
  return (
    // omit all the outer router setup
    <Routes>
      <Route path="/posts" element={<PostsMainPage />} />
      <Route path="/posts/:postId" element={<SinglePostPage />} />
      <Route path="/editPost/:postId" element={<EditPostForm />} />
      <Route path="/users" element={<UsersList />} />
      <Route path="/users/:userId" element={<UserPage />} />
      <Route path="/notifications" element={<NotificationsList />} />
    </Routes>
  )
}
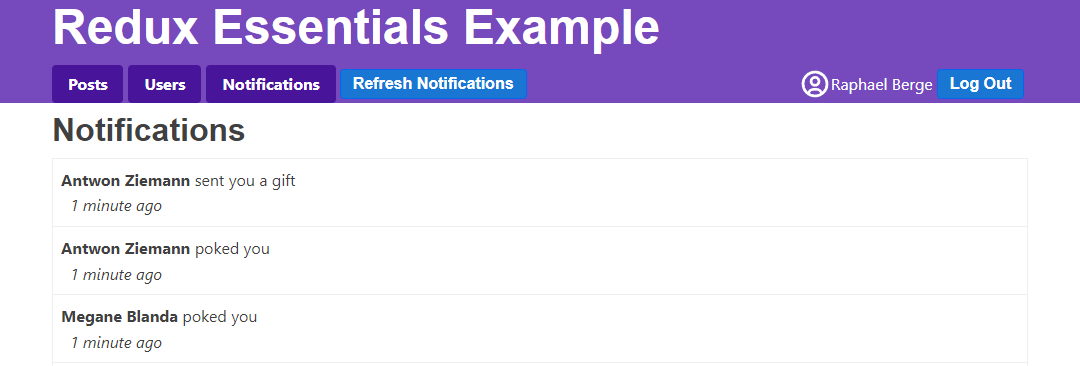
これが現在の「通知」タブの見た目です:
新しい通知の表示
「通知を更新」をクリックするたびに、通知エントリがリストに追加されます。実際のアプリでは、UI の他の部分を見ている間にサーバーから通知が届く可能性があります。<PostsList> や <UserPage> を見ている間に「通知を更新」をクリックすることで、同様のことができます。
しかし現時点では、新しく到着した通知の数がわからず、ボタンをクリックし続けると、まだ読んでいない通知が多く存在する可能性があります。どの通知が既読で、どの通知が「新しい」かを追跡するロジックを追加しましょう。これにより、ナビゲーションバーの「通知」タブに「未読」通知の数をバッジとして表示し、新しい通知を別の色で表示できるようになります。
通知ステータスの追跡
フェイク API が返す Notification オブジェクトは {id, date, message, user} のようになります。「新規」や「未読」の概念はクライアント側でのみ存在します。それに基づいて、notificationsSlice を再構築してサポートできるようにしましょう。
まず、ServerNotification を拡張してこれら2つのフィールドを追加した新しい ClientNotification 型を作成します。次に、サーバーから新しい通知のバッチを受け取ったら、常にこれらのフィールドをデフォルト値で追加します。
次に、すべての通知を既読としてマークするリデューサと、既存の通知を「新規ではない」としてマークする処理ロジックを追加します。
最後に、ストア内の未読通知の数をカウントするセレクタも追加できます:
// omit imports

export interface ServerNotification {
  id: string
  date: string
  message: string
  user: string
}

export interface ClientNotification extends ServerNotification {
  read: boolean
  isNew: boolean
}

// omit thunk

const initialState: ClientNotification[] = []

const notificationsSlice = createSlice({
  name: 'notifications',
  initialState,
  reducers: {
    allNotificationsRead(state) {
      state.forEach(notification => {
        notification.read = true
      })
    }
  },
  extraReducers(builder) {
    builder.addCase(fetchNotifications.fulfilled, (state, action) => {
      // Add client-side metadata for tracking new notifications
      const notificationsWithMetadata: ClientNotification[] =
        action.payload.map(notification => ({
          ...notification,
          read: false,
          isNew: true
        }))

      state.forEach(notification => {
        // Any notifications we've read are no longer new
        notification.isNew = !notification.read
      })

      state.push(...notificationsWithMetadata)
      // Sort with newest first
      state.sort((a, b) => b.date.localeCompare(a.date))
    })
  }
})

export const { allNotificationsRead } = notificationsSlice.actions

export default notificationsSlice.reducer

export const selectUnreadNotificationsCount = (state: RootState) => {
  const allNotifications = selectAllNotifications(state)
  const unreadNotifications = allNotifications.filter(
    notification => !notification.read
  )
  return unreadNotifications.length
}
通知を既読としてマークする
<NotificationsList>コンポーネントがレンダリングされるたびに、通知タブをクリックしたときや通知リストが開いた状態で新規通知を受信した場合などに、これらの通知を既読にしたいと考えています。このコンポーネントが再レンダリングされる度にallNotificationsReadをディスパッチすることで実現できます。更新時に古いデータがちらつくのを防ぐため、useLayoutEffectフック内でアクションをディスパッチします。また、ページ内の通知リストエントリに追加のクラス名を付与してハイライト表示します:
import { useLayoutEffect } from 'react'
import classnames from 'classnames'
import { useAppSelector, useAppDispatch } from '@/app/hooks'

import { TimeAgo } from '@/components/TimeAgo'

import { PostAuthor } from '@/features/posts/PostAuthor'

import {
  allNotificationsRead,
  selectAllNotifications
} from './notificationsSlice'

export const NotificationsList = () => {
  const dispatch = useAppDispatch()
  const notifications = useAppSelector(selectAllNotifications)

  useLayoutEffect(() => {
    dispatch(allNotificationsRead())
  })

  const renderedNotifications = notifications.map(notification => {
    const notificationClassname = classnames('notification', {
      new: notification.isNew
    })

    return (
      <div key={notification.id} className={notificationClassname}>
        <div>
          <b>
            <PostAuthor userId={notification.user} showPrefix={false} />
          </b>{' '}
          {notification.message}
        </div>
        <TimeAgo timestamp={notification.date} />
      </div>
    )
  })

  return (
    <section className="notificationsList">
      <h2>Notifications</h2>
      {renderedNotifications}
    </section>
  )
}
この方法は機能しますが、少し驚くべき挙動があります。新規通知がある場合(通知タブに切り替えたときやAPIから新規通知を取得したとき)、実際には"notifications/allNotificationsRead"アクションが2回ディスパッチされます。なぜでしょうか?
例えば<PostsList>を表示中に通知を取得し、その後「通知」タブをクリックした場合を考えます。<NotificationsList>コンポーネントがマウントされ、初回レンダリング後にuseLayoutEffectコールバックが実行されてallNotificationsReadがディスパッチされます。notificationsSliceはストア内の通知エントリを更新して処理し、不変更新されたエントリを含む新しいstate.notifications配列を生成します。これによりuseSelectorから返される配列が新しくなるため、コンポーネントが再レンダリングされます。
2回目のレンダリング時にuseLayoutEffectフックが再実行され、再度allNotificationsReadがディスパッチされます。リデューサーも再実行されますが、今回はデータ変更がないためスライス状態とルート状態は変化せず、コンポーネントは再レンダリングされません。
コンポーネントのマウント時に1度だけディスパッチし、通知配列のサイズが変化した場合のみ再度ディスパッチするなど、2回目のディスパッチを回避する方法はいくつかあります。ただし、この挙動は実害がないため、このままでも問題ありません。
これは実際に、アクションをディスパッチしても状態変更が全く発生しない可能性があることを示しています。覚えておいてください、状態を実際に更新する必要があるかどうかを判断するのは常にリデューサーの役割であり、「何もする必要がない」という判断もリデューサーにとって有効な選択肢です。
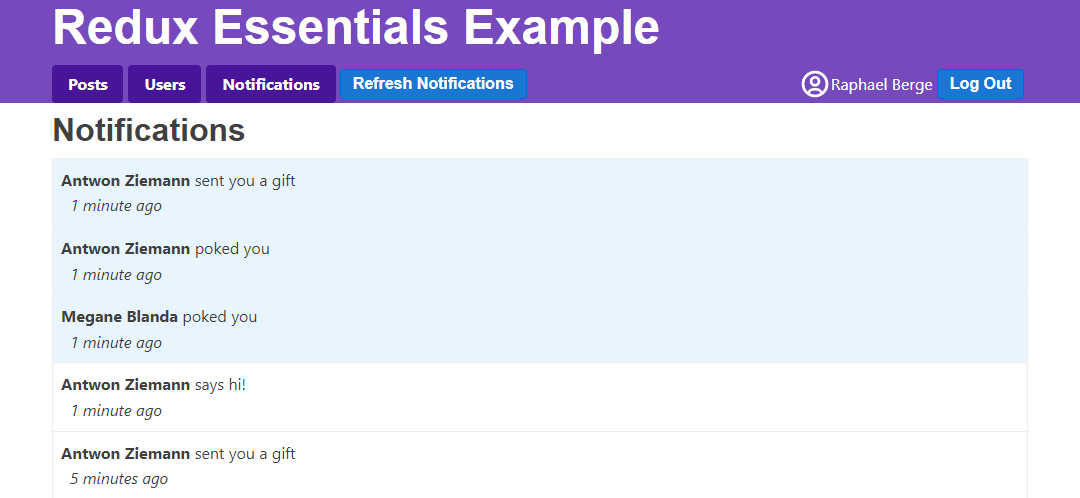
「新規/既読」の動作を実装した後の通知タブの表示は次のようになります:
未読通知の表示
次に進む前に最後に行うべきことは、ナビゲーションバーの「通知」タブにバッジを追加することです。他のタブを表示中に「未読」通知のカウントを表示します:
// omit other imports

import {
  fetchNotifications,
  selectUnreadNotificationsCount
} from '@/features/notifications/notificationsSlice'

export const Navbar = () => {
  const dispatch = useAppDispatch()
  const username = useAppSelector(selectCurrentUsername)
  const user = useAppSelector(selectCurrentUser)

  const numUnreadNotifications = useAppSelector(selectUnreadNotificationsCount)


  const isLoggedIn = !!user

  let navContent: React.ReactNode = null

  if (isLoggedIn) {
    const onLogoutClicked = () => {
      dispatch(logout())
    }

    const fetchNewNotifications = () => {
      dispatch(fetchNotifications())
    }

    let unreadNotificationsBadge: React.ReactNode | undefined

    if (numUnreadNotifications > 0) {
      unreadNotificationsBadge = (
        <span className="badge">{numUnreadNotifications}</span>
      )
    }

    navContent = (
      <div className="navContent">
        <div className="navLinks">
          <Link to="/posts">Posts</Link>
          <Link to="/users">Users</Link>
          <Link to="/notifications">
            Notifications {unreadNotificationsBadge}
          </Link>
          <button className="button small" onClick={fetchNewNotifications}>
            Refresh Notifications
          </button>
        </div>
        {/* omit button */}
      </div>
    )
  }

  // omit other rendering
}
レンダリングパフォーマンスの改善
アプリケーションは実用的に見えますが、コンポーネントの再レンダリングのタイミングと方法にいくつかの問題点があります。これらの問題を調査し、パフォーマンスを改善する方法について説明します。
レンダリング挙動の調査
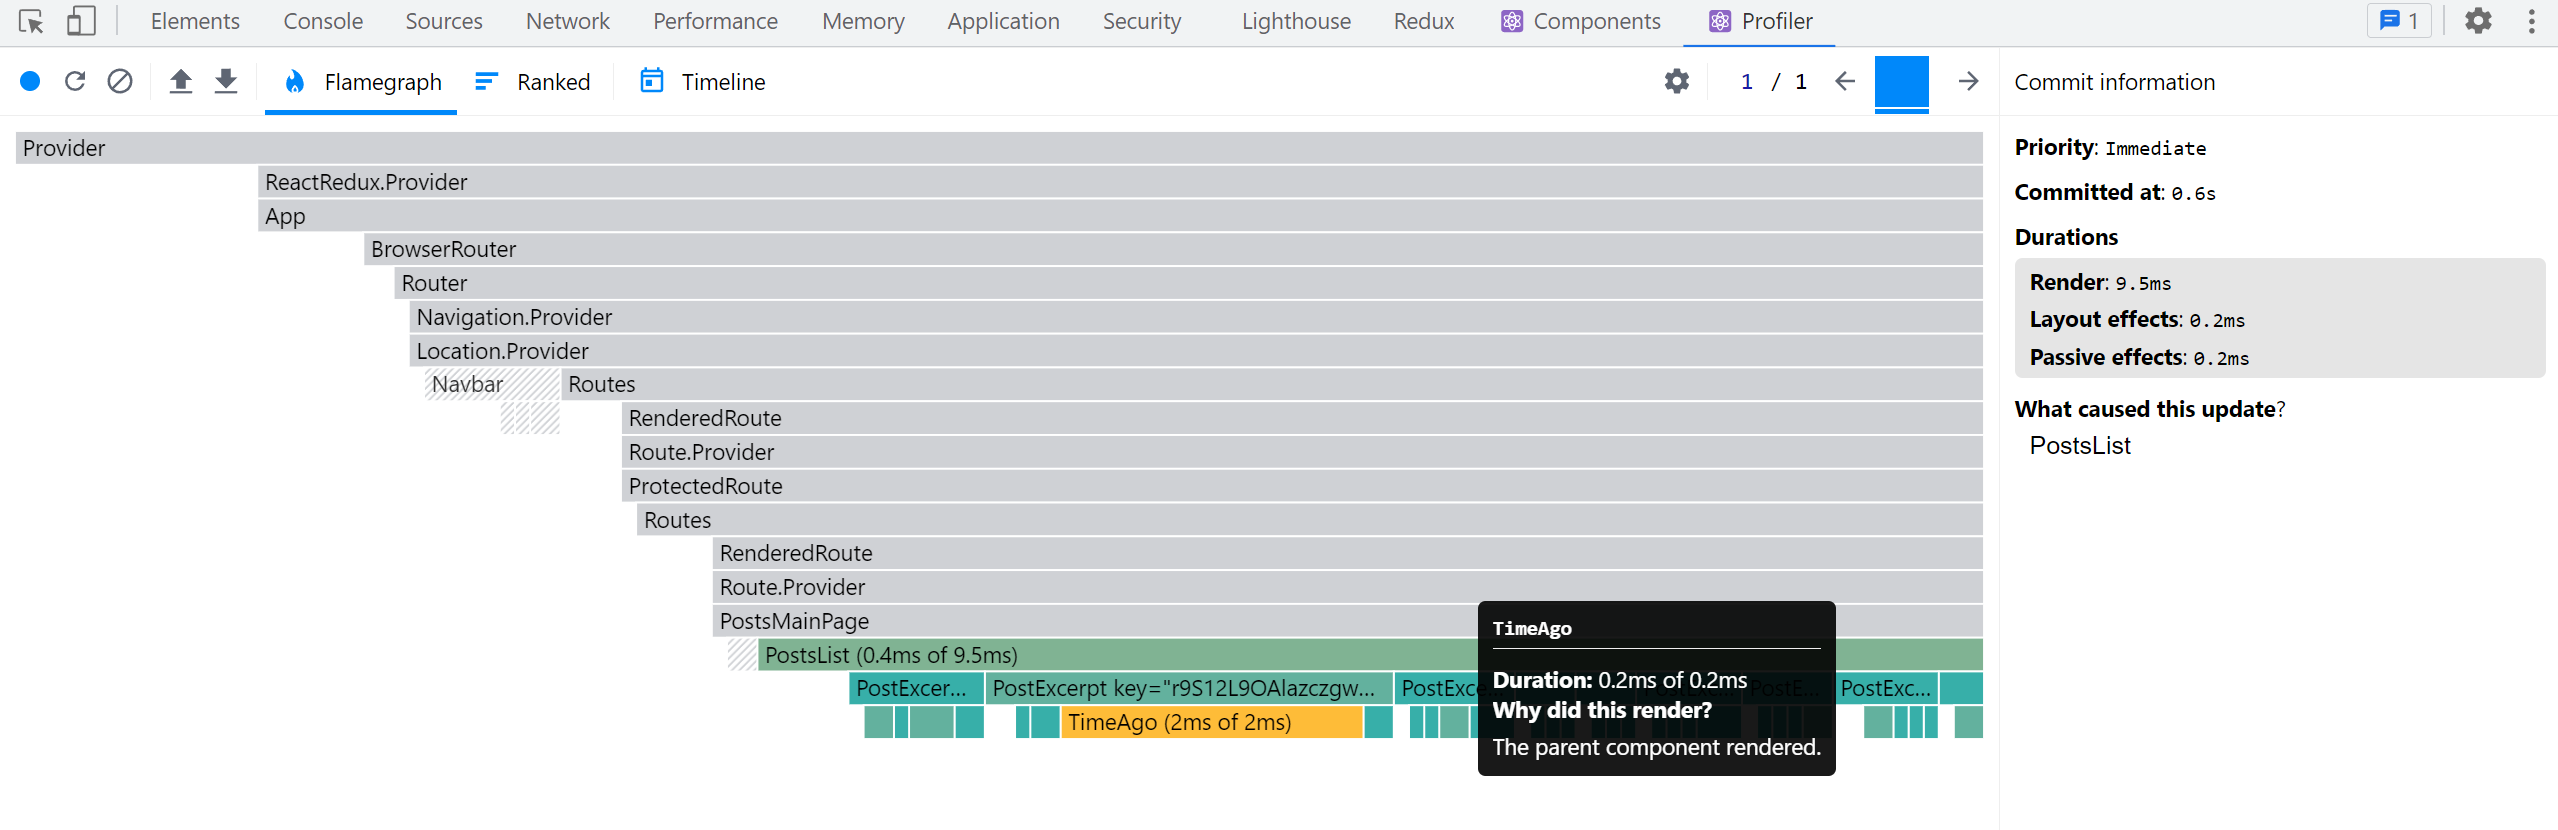
React DevToolsのProfilerを使用して、状態更新時にどのコンポーネントが再レンダリングされるかのグラフを確認できます。特定のユーザーの<UserPage>に移動してみてください。ブラウザのDevToolsを開き、Reactの「Profiler」タブで左上の丸い「記録」ボタンをクリックします。次にアプリ内の「通知を更新」ボタンをクリックし、React DevTools Profilerで記録を停止します。次のようなチャートが表示されるはずです:
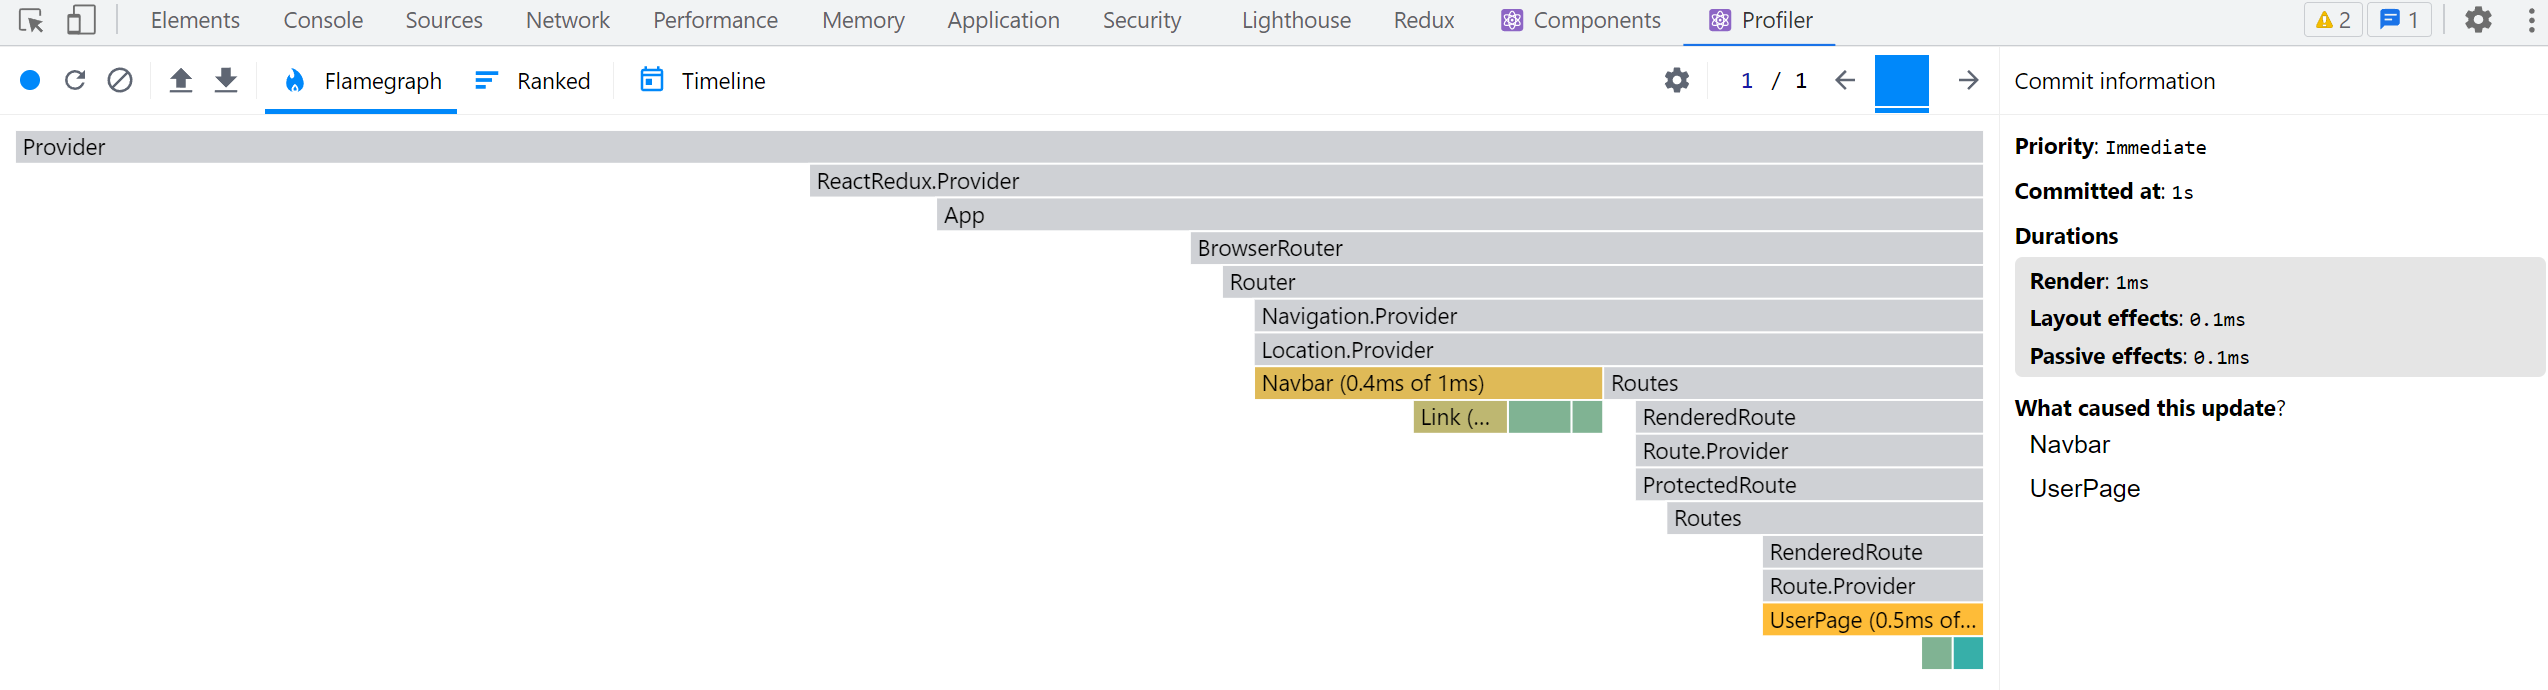
<Navbar>が再レンダリングされているのは、タブで更新された「未読通知」バッジを表示する必要があったため理解できます。しかし、なぜ<UserPage>が再レンダリングされたのでしょうか?
Redux DevToolsで最後にディスパッチされたアクションを確認すると、通知状態のみが更新されていることがわかります。<UserPage>は通知を読み取らないため、再レンダリングされるべきではありません。コンポーネントまたは使用しているセレクターのいずれかに問題がある可能性があります。
<UserPage> は selectPostsByUser を介してストアから投稿リストを読み取っていますが、この selectPostsByUser には特定の問題があります:
export const selectPostsByUser = (state: RootState, userId: string) => {
  const allPosts = selectAllPosts(state)
  // ❌ WRONG - this _always_ creates a new array reference!
  return allPosts.filter(post => post.user === userId)
}
useSelector はアクションがディスパッチされるたびに再実行され、新しい参照値を返すとコンポーネントの再レンダリングが強制されることを私たちは理解しています。
現在、セレクター関数内で filter() を呼び出しているため、該当ユーザーに属する投稿のみを含むリストを返しています。
残念ながら、これにより useSelector はこのセレクターに対して常に新しい配列参照を返すため、投稿データが変更されていなくてもアクションのたびにコンポーネントが再レンダリングされてしまいます!
これはReduxアプリケーションでよくある間違いです。そのため、React-Reduxは開発モードで誤って常に新しい参照を返すセレクターをチェックしています。ブラウザの開発者ツールを開きコンソールを見ると、次の警告が表示されるはずです:
Selector unknown returned a different result when called with the same parameters.
This can lead to unnecessary rerenders.
Selectors that return a new reference (such as an object or an array) should be memoized:
    at UserPage (http://localhost:5173/src/features/users/UserPage.tsx)
通常、エラーにはセレクターの実際の変数名が表示されます。今回の場合、useAppSelector 内で無名関数を使用しているため、エラーメッセージに特定のセレクター名は含まれません。ただし、<UserPage> 内の問題であることは特定できます。
現実的には、このサンプルアプリではパフォーマンス上の重大な問題とはなりません。<UserPage> コンポーネントは小さく、アプリ内でディスパッチされるアクションも多くありません。しかし、実際のアプリケーションではアプリ構造によっては重大なパフォーマンス問題となる可能性があります。不要なコンポーネントの再レンダリングは一般的なパフォーマンス問題であり、修正すべき点です。
メモ化セレクター関数
真に必要なのは、state.posts または userId のいずれかが変更された場合にのみ、新しいフィルタリング済み配列を計算する方法です。変更がない場合、前回と同じフィルタリング済み配列参照を返す必要があります。
この概念を 「メモ化(Memoization)」 と呼びます。前回の入力セットと計算結果を保存し、入力が同じ場合に再計算せずに前回の結果を返す手法です。
これまで、セレクターはプレーン関数として自作し、主にストアからのデータ読み取りコードをコピーせずに済むように使用してきました。セレクター関数をメモ化してパフォーマンスを向上させる方法があれば理想的です。
Reselect はメモ化セレクター関数を作成するためのライブラリで、Reduxでの使用を特に想定して設計されています。入力が変更された場合にのみ結果を再計算するメモ化セレクターを生成する createSelector 関数を提供します。Redux ToolkitはcreateSelector 関数をエクスポートしているため、既に利用可能です。
selectPostsByUser を createSelector を使用したメモ化関数に書き換えましょう:
import { createSlice, createAsyncThunk, createSelector } from '@reduxjs/toolkit'

// omit slice logic

export const selectAllPosts = (state: RootState) => state.posts.posts

export const selectPostById = (state: RootState, postId: string) =>
  state.posts.posts.find(post => post.id === postId)

export const selectPostsByUser = createSelector(
  // Pass in one or more "input selectors"
  [
    // we can pass in an existing selector function that
    // reads something from the root `state` and returns it
    selectAllPosts,
    // and another function that extracts one of the arguments
    // and passes that onward
    (state: RootState, userId: string) => userId
  ],
  // the output function gets those values as its arguments,
  // and will run when either input value changes
  (posts, userId) => posts.filter(post => post.user === userId)
)
createSelector を使用するには、まず1つ以上の「入力セレクター」関数(単一の配列内または個別の引数として)が必要です。さらに結果を計算する「出力関数」を渡す必要があります。
selectPostsByUser(state, userId) を呼び出すと、createSelector はすべての引数を各入力セレクターに渡します。入力セレクターが返す値は出力セレクターへの引数となります(selectCurrentUser で const currentUsername = selectCurrentUsername(state) を最初に呼び出すのと同様です)。
このケースでは、出力セレクターの引数としてすべての投稿の配列とユーザーIDの両方が必要です。投稿配列を抽出するために既存の selectAllPosts セレクターを再利用できます。ユーザーIDは selectPostsByUser に渡す2番目の引数なので、userId を返すだけの小さなセレクターを記述します。
出力関数は posts と userId を引数として受け取り、該当ユーザーの投稿のみを含むフィルタリング済み配列を返します。
selectPostsByUserを複数回呼び出す場合、postsかuserIdのいずれかが変更されたときだけ出力セレクターが再実行されます:
const state1 = getState()
// Output selector runs, because it's the first call
selectPostsByUser(state1, 'user1')
// Output selector does _not_ run, because the arguments haven't changed
selectPostsByUser(state1, 'user1')
// Output selector runs, because `userId` changed
selectPostsByUser(state1, 'user2')

dispatch(fetchUsers())
const state2 = getState()
// Output selector does not run, because `posts` and `userId` are the same
selectPostsByUser(state2, 'user2')

// Add some more posts
dispatch(addNewPost())
const state3 = getState()
// Output selector runs, because `posts` has changed
selectPostsByUser(state3, 'user2')
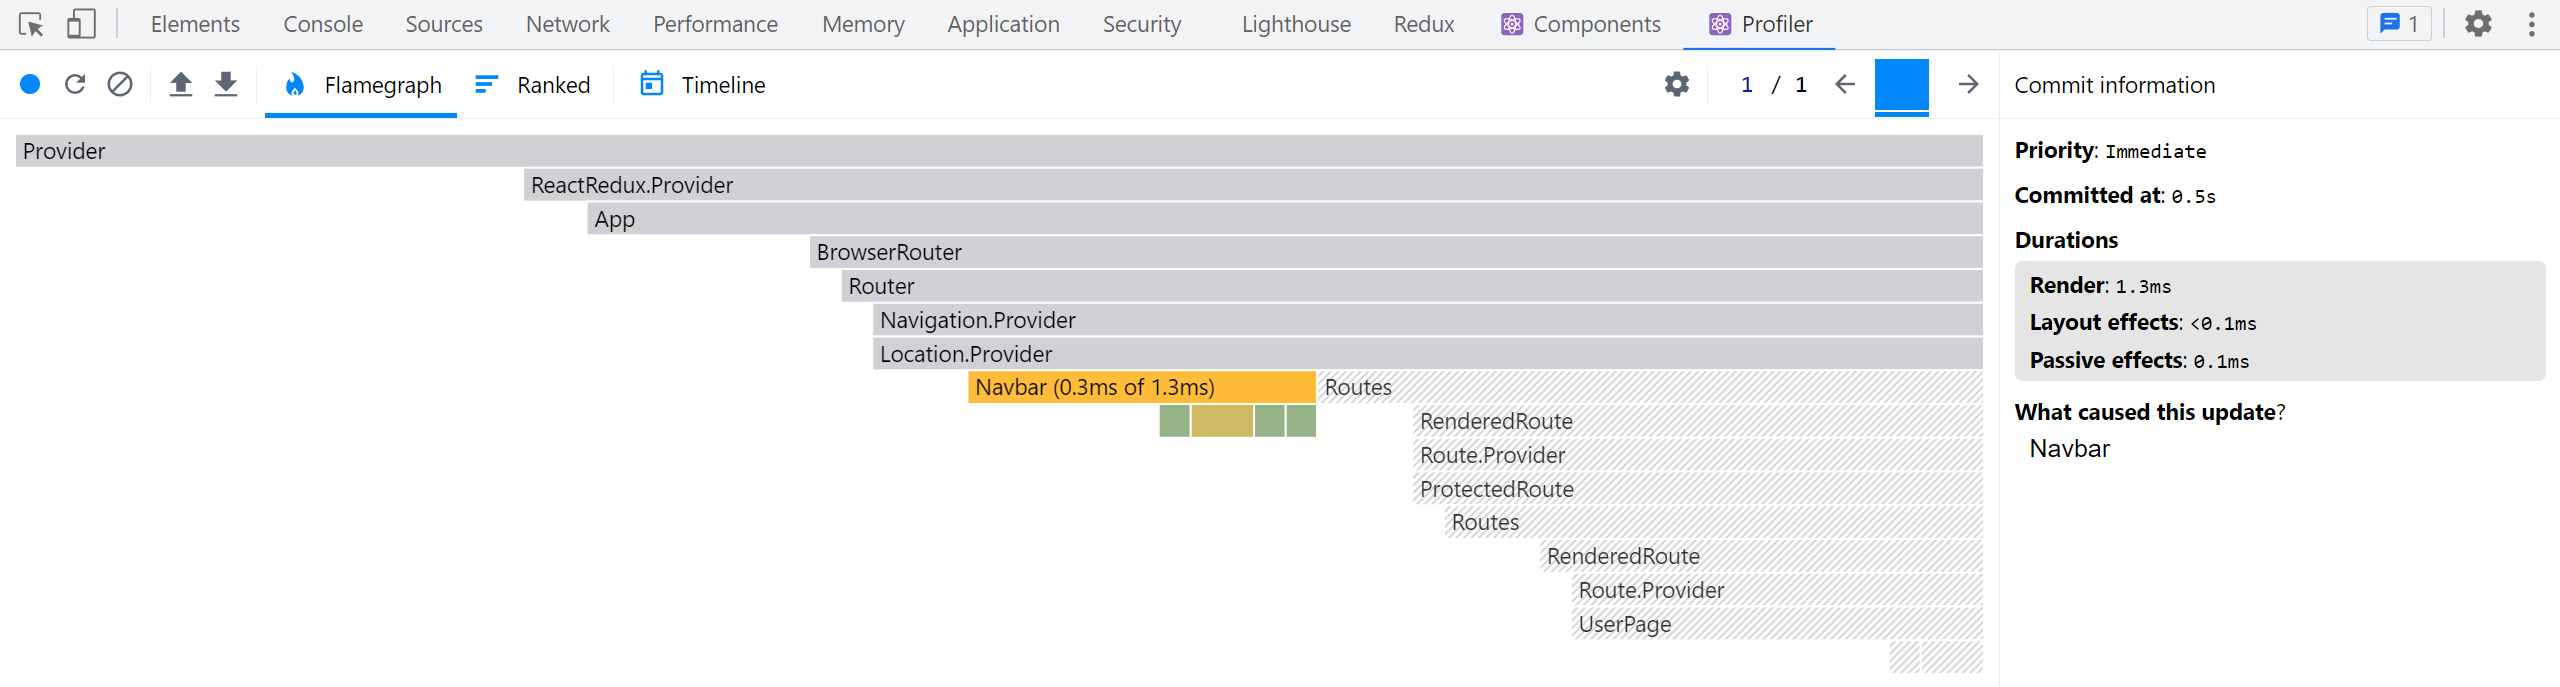
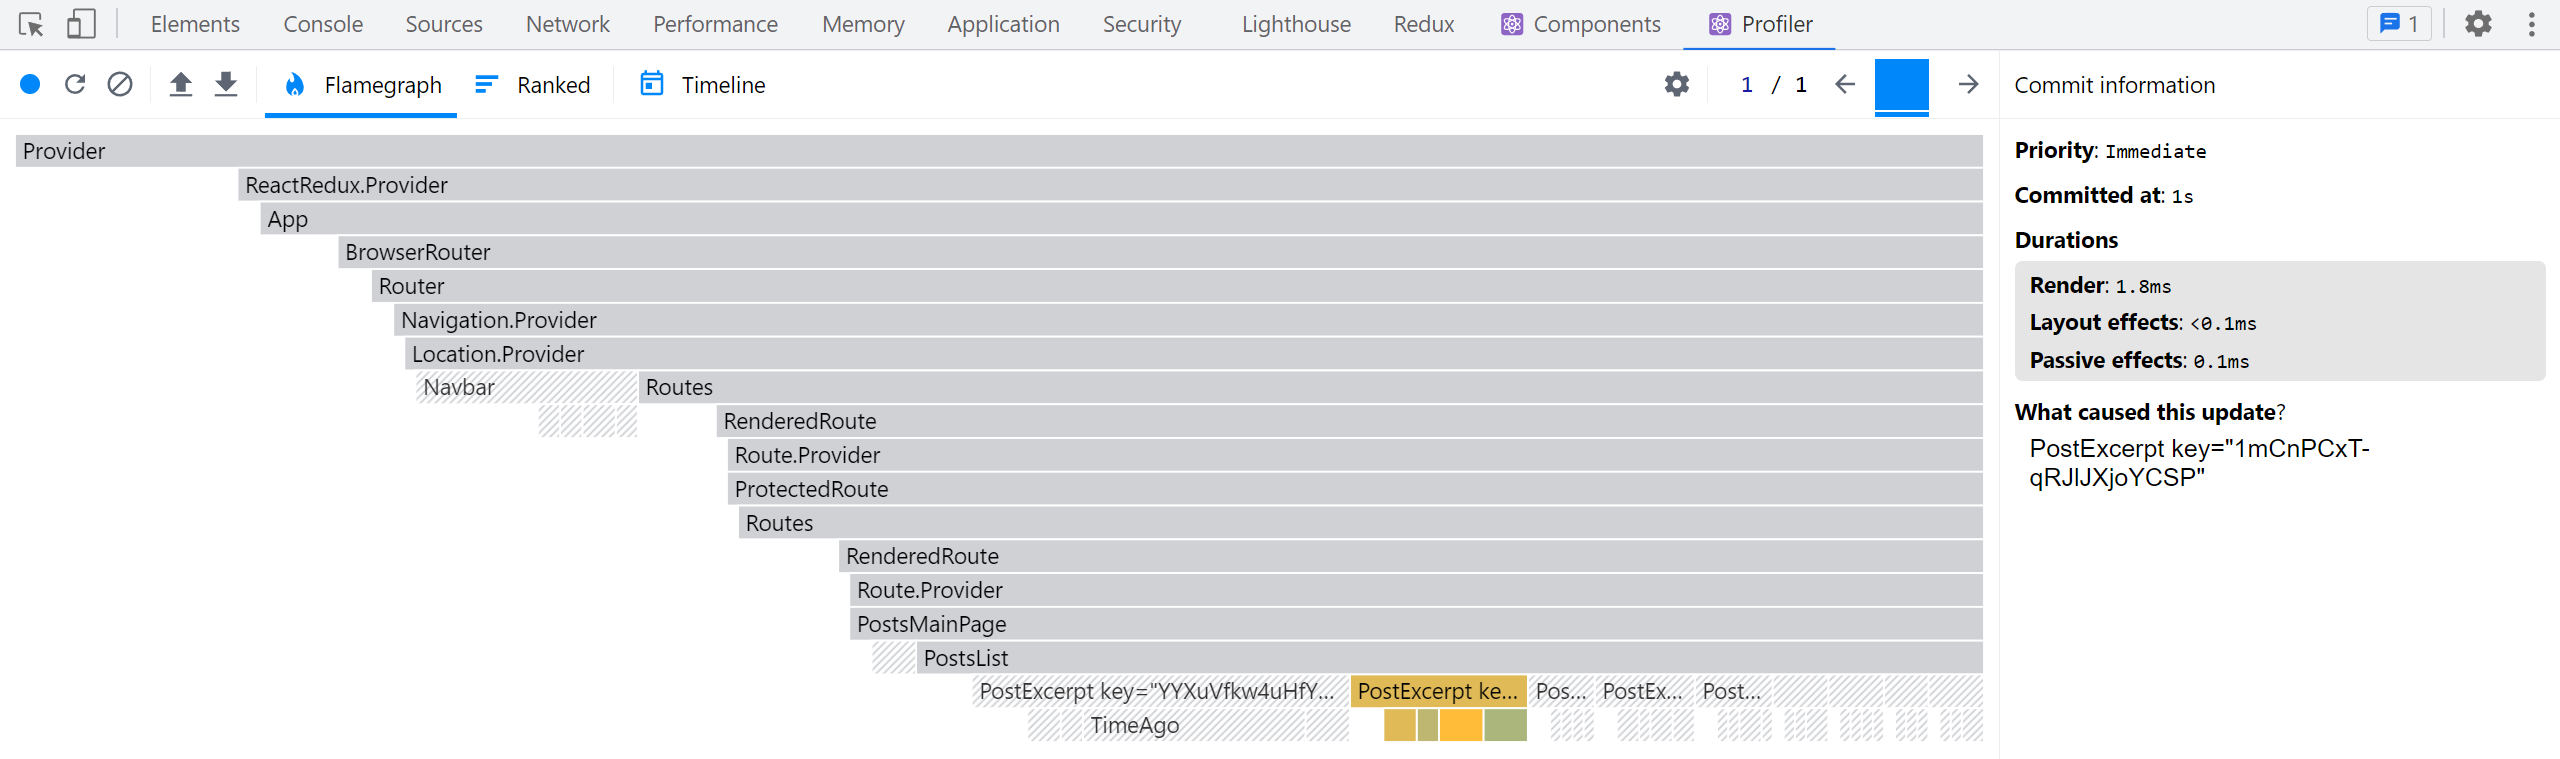
selectPostsByUserをメモ化したので、通知を取得しながら<UserPage>を開いた状態でReactプロファイラの計測を繰り返してみてください。今度は<UserPage>が再レンダリングされないはずです:
セレクター使用のバランス
メモ化セレクターはReact+Reduxアプリケーションのパフォーマンス改善に有効なツールです。不要な再レンダリングを回避できるほか、入力データが変更されていない場合に複雑で負荷の高い計算をスキップできます。
すべてのセレクターをメモ化する必要はないことに注意してください。これまで作成した他のセレクターは通常の関数のままで問題なく動作します。メモ化が必要なのは、新しいオブジェクトや配列の参照を生成・返却する場合や、計算ロジックが「高コスト」なセレクターだけです。
例としてselectUnreadNotificationsCountを見てみましょう:
export const selectUnreadNotificationsCount = (state: RootState) => {
  const allNotifications = selectAllNotifications(state)
  const unreadNotifications = allNotifications.filter(
    notification => !notification.read
  )
  return unreadNotifications.length
}
このセレクターは内部で.filter()呼び出しを行う通常の関数です。ただし、新しい配列参照を返しているわけではなく、数値を返している点に注目してください。この方が安全です。通知配列を更新しても、実際の戻り値が頻繁に変化することはありません。
とはいえ、このセレクターが実行されるたびに通知配列を再フィルタリングするのは多少無駄です。メモ化セレクターに変換すればCPUサイクルを節約できるでしょう。ただし、セレクターが毎回新しい参照を返す場合ほどの必要性はありません。
セレクター関数を使用する理由やReselectを使ったメモ化セレクターの書き方の詳細については以下を参照してください:
投稿リストの調査
<PostsList>に戻り、Reactプロファイラのトレースを取得しながら投稿のリアクションボタンをクリックすると、<PostsList>と更新された<PostExcerpt>インスタンスだけでなく、すべての<PostExcerpt>コンポーネントがレンダリングされていることがわかります:
なぜこうなるのでしょうか?他の投稿は変更されていないのに、なぜ再レンダリングが必要なのでしょう?
Reactのデフォルト動作では、親コンポーネントがレンダリングされると、内部のすべての子コンポーネントが再帰的にレンダリングされます!。ある投稿オブジェクトの不変更新は新しいposts配列も生成します。<PostsList>はposts配列が新しい参照となったため再レンダリングが必要でした。そしてレンダリング後、Reactはツリーを下方向に進み、すべての<PostExcerpt>コンポーネントも再レンダリングしたのです。
この小さなサンプルアプリでは深刻な問題ではありませんが、より大規模な実アプリケーションでは非常に長いリストや巨大なコンポーネントツリーがあるかもしれません。それらすべての余分なコンポーネントが再レンダリングされるとパフォーマンスが低下する可能性があります。
リストレンダリングの最適化オプション
<PostsList>のこの動作を最適化する方法はいくつかあります。
まず、React.memo()で<PostExcerpt>コンポーネントをラップできます。これにより、内部のコンポーネントはpropsが実際に変更された場合のみ再レンダリングされます。これは実際に非常に効果的です。試してみてください:
let PostExcerpt = ({ post }: PostExcerptProps) => {
  // omit logic
}

PostExcerpt = React.memo(PostExcerpt)
別の方法として、<PostsList>を書き換えてストアからposts配列全体ではなく投稿IDのリストのみを選択し、<PostExcerpt>を書き換えてpostIdプロップを受け取りuseSelectorで必要な投稿オブジェクトを読み込むようにできます。<PostsList>が以前と同じIDリストを取得すれば再レンダリング不要になり、変更された<PostExcerpt>コンポーネントのみがレンダリングされます。
残念ながら、すべての投稿を日付順にソートして正しい順序でレンダリングする必要があるため、これは複雑になります。postsSliceを更新して配列を常にソート済みに保ち、コンポーネント内でのソートを不要にし、メモ化されたセレクターで投稿IDリストのみ抽出できます。また、useSelectorが結果をチェックする比較関数をカスタマイズして(例: useSelector(selectPostIds, shallowEqual))、ID配列の内容が変更されていない場合に再レンダリングをスキップさせることも可能です。
最後の選択肢は、レデューサーがすべての投稿のIDを別途配列で保持し、投稿の追加/削除時のみその配列を変更し、<PostsList>と<PostExcerpt>を同様に書き換える方法です。これにより、<PostsList>はID配列が変更された時のみ再レンダリングが必要になります。
幸い、Redux Toolkitにはこの処理を実現するcreateEntityAdapter関数が用意されています。
データの正規化
これまでのロジックでは、IDフィールドでアイテムを検索するケースが多くありました。データを配列で保存しているため、目的のIDを持つアイテムが見つかるまでarray.find()で配列全体をループ処理する必要があります。
現実的には時間はかかりませんが、数百/数千のアイテムを含む配列の場合、1つのアイテムを探すために配列全体を検索するのは無駄な作業です。必要なのは、他のすべてのアイテムをチェックせずにIDに基づいて直接アイテムを検索する方法であり、このプロセスは**「正規化(normalization)」**として知られています。
正規化された状態の構造
**「正規化された状態」**とは以下を意味します:
-
各データのコピーを状態内に1つだけ保持する(重複なし)
-
正規化されたデータはルックアップテーブルで管理され、アイテムIDがキー、アイテム自体が値になります(通常はプレーンなJSオブジェクト)
-
特定のアイテムタイプの全IDを配列で保持することも可能
JavaScriptオブジェクトは、他の言語の「マップ」や「辞書」と同様にルックアップテーブルとして使用できます。以下はuserオブジェクト群の正規化された状態の例です:
{
  users: {
    ids: ["user1", "user2", "user3"],
    entities: {
      "user1": {id: "user1", firstName, lastName},
      "user2": {id: "user2", firstName, lastName},
      "user3": {id: "user3", firstName, lastName},
    }
  }
}
これにより、配列内の他のユーザーオブジェクトをループ処理せずに、IDで特定のuserオブジェクトを簡単に検索できます:
const userId = 'user2'
const userObject = state.users.entities[userId]
createEntityAdapterによる正規化状態の管理
Redux ToolkitのcreateEntityAdapter APIは、アイテムのコレクションを受け取り{ ids: [], entities: {} }の形に変換してスライスに保存する標準化された方法を提供します。この定義済み状態構造に加え、このデータを操作するレデューサー関数とセレクターのセットを生成します。
これには以下の利点があります:
-
正規化を管理するコードを自前で書く必要がない
-
createEntityAdapterの組み込みリデューサー関数は、「全アイテムを追加」「1アイテムを更新」「複数アイテムを削除」といった一般的なケースを処理します -
createEntityAdapterはオプションで、アイテムの内容に基づいてID配列をソート順で保持でき、アイテムの追加/削除やソート順変更時にのみ配列を更新します
createEntityAdapterはオプションオブジェクトを受け取り、sortComparer関数を含めることが可能です。この関数は2つのアイテムを比較してアイテムID配列をソート順で保持します(Array.sort()と同様の動作)。
戻り値はエンティティ状態オブジェクトへのアイテム追加・更新・削除のための生成済みリデューサー関数セットを含むオブジェクトです。これらの関数は特定アクションタイプのケースリデューサーとして、またはcreateSlice内の他リデューサーで「変更」ユーティリティ関数として使用可能です。
アダプターオブジェクトにはgetSelectors関数も含まれます。Reduxルート状態から特定スライスを返すセレクターを渡すと、selectAllやselectByIdといったセレクターを生成します。
最後に、アダプターオブジェクトには空の{ids: [], entities: {}}オブジェクトを生成するgetInitialState関数があります。追加フィールドをgetInitialStateに渡すとマージされます。
Postsスライスの正規化
これを踏まえ、createEntityAdapterを使用するようpostsSliceを更新しましょう。いくつかの変更が必要です。
PostsState構造が変更されます。配列形式のposts: Post[]ではなく、{ids: string[], entities: Record<string, Post>}形式になります。Redux Toolkitには{ids, entities}構造を記述するEntityState型が既にあるため、これをインポートしてPostsStateの基本型として使用します。statusとerrorフィールドも必要なのでこれらを含めます。
createEntityAdapterをインポートし、適切なPost型が適用され、投稿を正しい順序でソートする方法を知るインスタンスを作成します。
import {
  createEntityAdapter,
  EntityState
  // omit other imports
} from '@reduxjs/toolkit'

// omit thunks

interface PostsState extends EntityState<Post, string> {
  status: 'idle' | 'pending' | 'succeeded' | 'rejected'
  error: string | null
}

const postsAdapter = createEntityAdapter<Post>({
  // Sort in descending date order
  sortComparer: (a, b) => b.date.localeCompare(a.date)
})

const initialState: PostsState = postsAdapter.getInitialState({
  status: 'idle',
  error: null
})


// omit thunks

const postsSlice = createSlice({
  name: 'posts',
  initialState,
  reducers: {
    postUpdated(state, action: PayloadAction<PostUpdate>) {
      const { id, title, content } = action.payload

      const existingPost = state.entities[id]

      if (existingPost) {
        existingPost.title = title
        existingPost.content = content
      }
    },
    reactionAdded(
      state,
      action: PayloadAction<{ postId: string; reaction: ReactionName }>
    ) {
      const { postId, reaction } = action.payload
      const existingPost = state.entities[postId]
      if (existingPost) {
        existingPost.reactions[reaction]++
      }
    }
  },
  extraReducers(builder) {
    builder
      // omit other cases
      .addCase(fetchPosts.fulfilled, (state, action) => {
        state.status = 'succeeded'
        // Save the fetched posts into state
        postsAdapter.setAll(state, action.payload)
      })
      .addCase(addNewPost.fulfilled, postsAdapter.addOne)
  }
})

export const { postAdded, postUpdated, reactionAdded } = postsSlice.actions

export default postsSlice.reducer

// Export the customized selectors for this adapter using `getSelectors`
export const {
  selectAll: selectAllPosts,
  selectById: selectPostById,
  selectIds: selectPostIds
  // Pass in a selector that returns the posts slice of state
} = postsAdapter.getSelectors((state: RootState) => state.posts)

export const selectPostsByUser = createSelector(
  [selectAllPosts, (state: RootState, userId: string) => userId],
  (posts, userId) => posts.filter(post => post.user === userId)
)
多くの変更があります! 順を追って説明します。
まずcreateEntityAdapterをインポートし、呼び出してpostsAdapterオブジェクトを作成します。最新の投稿を先頭にしたソート済み投稿ID配列を保持したいため、post.dateフィールドに基づいて新しいアイテムを前にソートするsortComparer関数を渡します。
getInitialState()は空の{ids: [], entities: {}}正規化状態オブジェクトを返します。postsSliceではローディング状態用にstatusとerrorフィールドも保持する必要があるため、これらをgetInitialState()に渡します。
投稿がstate.entities内のルックアップテーブルとして保持されるようになったため、reactionAddedとpostUpdatedリデューサーを、古いposts配列をループする代わりにstate.entities[postId]でID経由で直接投稿を参照するよう変更します。
fetchPosts.fulfilledアクション受信時には、postsAdapter.setAll関数を使用して、ドラフトのstateとaction.payload内の投稿配列を渡すことで、受信した全投稿を状態に追加できます。これはcreateSliceリデューサー内でアダプターメソッドを「変更」ヘルパー関数として使用する例です。
addNewPost.fulfilledアクション受信時には、1つの新規投稿オブジェクトを状態に追加する必要があります。アダプター関数をリデューサーとして直接使用できるため、postsAdapter.addOneをこのアクションを処理するリデューサー関数として渡します。ここではアダプターメソッドを実際のリデューサーとして使用しています。
最後に、手書きの selectAllPosts および selectPostById セレクター関数を、postsAdapter.getSelectors で生成されたものに置き換えることができます。セレクターはルートの Redux ステートオブジェクトで呼び出されるため、Redux ステート内の投稿データの場所を知る必要があります。そのため、state.posts を返す小さなセレクターを渡します。生成されたセレクター関数は常に selectAll および selectById という名前なので、エクスポート時に分割代入構文を使用して名前を変更し、古いセレクター名と一致させます。また <PostsList> コンポーネントでソートされた投稿IDのリストを読み取る必要があるため、同様に selectPostIds もエクスポートします。
さらに数行削減するために、postUpdated を postsAdapter.updateOne メソッドを使用するように変更できます。これは {id, changes} 形式のオブジェクトを受け取り、changes は上書きするフィールドを持つオブジェクトです:
const postsSlice = createSlice({
  name: 'posts',
  initialState,
  reducers: {
    postUpdated(state, action: PayloadAction<PostUpdate>) {
      const { id, title, content } = action.payload
      postsAdapter.updateOne(state, { id, changes: { title, content } })
    },
    reactionAdded(
      state,
      action: PayloadAction<{ postId: string; reaction: ReactionName }>
    ) {
      const { postId, reaction } = action.payload
      const existingPost = state.entities[postId]
      if (existingPost) {
        existingPost.reactions[reaction]++
      }
    }
  }
  // omit `extraReducers`
})
postsAdapter.updateOne を reactionAdded リデューサーで使用することはほぼ不可能なことに注意してください。なぜなら、これは少し複雑だからです。投稿オブジェクトのフィールドを単に置き換えるのではなく、フィールド内にネストされたカウンターをインクリメントする必要があります。そのような場合、今まで通りオブジェクトを検索して「変更的な」更新を行うのが適切です。
投稿リストの最適化
投稿スライスが createEntityAdapter を使用するようになったので、<PostsList> を更新してレンダリング動作を最適化できます。
<PostsList> を更新してソートされた投稿IDの配列のみを読み取り、各 <PostExcerpt> に postId を渡します:
// omit other imports

import {
  fetchPosts,
  selectPostById,
  selectPostIds,
  selectPostsStatus,
  selectPostsError
} from './postsSlice'

interface PostExcerptProps {
  postId: string
}

function PostExcerpt({ postId }: PostExcerptProps) {
  const post = useAppSelector(state => selectPostById(state, postId))
  // omit rendering logic
}

export const PostsList = () => {
  const dispatch = useAppDispatch()
  const orderedPostIds = useAppSelector(selectPostIds)

  // omit other selections and effects

  if (postStatus === 'pending') {
    content = <Spinner text="Loading..." />
  } else if (postStatus === 'succeeded') {
    content = orderedPostIds.map(postId => (
      <PostExcerpt key={postId} postId={postId} />
    ))
  } else if (postStatus === 'rejected') {
    content = <div>{postsError}</div>
  }

  // omit other rendering
}
これで、React コンポーネントのパフォーマンスプロファイルを取得しながら投稿のリアクションボタンをクリックすると、そのコンポーネントのみが再レンダリングされるはずです:
ユーザースライスの正規化
他のスライスも createEntityAdapter を使用するように変換できます。
usersSlice はかなり小さいので、変更点はわずかです:
import {
  createSlice,
  createEntityAdapter
} from '@reduxjs/toolkit'

import { client } from '@/api/client'
import { createAppAsyncThunk } from '@/app/withTypes'

const usersAdapter = createEntityAdapter<User>()

const initialState = usersAdapter.getInitialState()

export const fetchUsers = createAppAsyncThunk('users/fetchUsers', async () => {
  const response = await client.get('/fakeApi/users')
  return response.users
})

const usersSlice = createSlice({
  name: 'users',
  initialState,
  reducers: {},
  extraReducers(builder) {
    builder.addCase(fetchUsers.fulfilled, usersAdapter.setAll)
  }
})

export default usersSlice.reducer

export const { selectAll: selectAllUsers, selectById: selectUserById } =
  usersAdapter.getSelectors((state: RootState) => state.users)

export const selectCurrentUser = (state: RootState) => {
  const currentUsername = selectCurrentUsername(state)
  if (!currentUsername) {
    return
  }
  return selectUserById(state, currentUsername)
}
ここで処理している唯一のアクションは、常にユーザーのリスト全体をサーバーから取得した配列で置き換えるものです。これを実装するために usersAdapter.setAll を使用できます。
手書きで作成した selectAllUsers および selectUserById セレクターはすでにエクスポートしていました。これらを usersAdapter.getSelectors() で生成されたバージョンに置き換えられます。
selectUserById に関して若干の型の不一致が生じています - 型上では currentUsername が null になり得ますが、生成された selectUserById はその値を受け付けません。簡単な修正方法は、値が存在するか確認し、存在しない場合は早期リターンすることです。
通知スライスの正規化
最後に notificationsSlice も更新します:
import { createEntityAdapter, createSlice } from '@reduxjs/toolkit'

import { client } from '@/api/client'

// omit types and fetchNotifications thunk

const notificationsAdapter = createEntityAdapter<ClientNotification>({
  // Sort with newest first
  sortComparer: (a, b) => b.date.localeCompare(a.date)
})

const initialState = notificationsAdapter.getInitialState()

const notificationsSlice = createSlice({
  name: 'notifications',
  initialState,
  reducers: {
    allNotificationsRead(state) {
      Object.values(state.entities).forEach(notification => {
        notification.read = true
      })
    }
  },
  extraReducers(builder) {
    builder.addCase(fetchNotifications.fulfilled, (state, action) => {
      // Add client-side metadata for tracking new notifications
      const notificationsWithMetadata: ClientNotification[] =
        action.payload.map(notification => ({
          ...notification,
          read: false,
          isNew: true
        }))

      Object.values(state.entities).forEach(notification => {
        // Any notifications we've read are no longer new
        notification.isNew = !notification.read
      })

      notificationsAdapter.upsertMany(state, notificationsWithMetadata)
    })
  }
})

export const { allNotificationsRead } = notificationsSlice.actions

export default notificationsSlice.reducer

export const { selectAll: selectAllNotifications } =
  notificationsAdapter.getSelectors((state: RootState) => state.notifications)

export const selectUnreadNotificationsCount = (state: RootState) => {
  const allNotifications = selectAllNotifications(state)
  const unreadNotifications = allNotifications.filter(
    notification => !notification.read
  )
  return unreadNotifications.length
}
再び createEntityAdapter をインポートして呼び出し、スライスの設定を支援するために notificationsAdapter.getInitialState() を呼び出します。
皮肉なことに、ここには通知オブジェクトをすべてループして更新する必要がある箇所がいくつかあります。これらはもはや配列に保持されていないため、Object.values(state.entities) を使用して通知の配列を取得し、それをループする必要があります。一方で、以前のフェッチ更新ロジックを notificationsAdapter.upsertMany に置き換えられます。
リアクティブロジックの記述
これまで、アプリケーションの動作はすべて命令型でした。ユーザーが何か(投稿の追加や通知の取得など)を行うと、クリックハンドラーまたはコンポーネントの useEffect フック内でアクションをディスパッチします。これには fetchPosts や login などのデータフェッチングサンクも含まれます。
しかし、アプリ内で発生した事象(特定のアクションがディスパッチされるなど)に応じて実行されるロジックを記述する必要が生じる場合があります。
投稿の取得などでローディングインジケーターを表示してきましたが、新規投稿時にトースト通知のような視覚的なフィードバックがあるとユーザー体験が向上します。
複数のスライスが同じアクションに応答することは既に見てきました。これは「状態の複数部分を更新する」ロジックには最適ですが、非同期処理や副作用を含むロジックが必要な場合はどうでしょうか? これはレデューサーに配置できません。レデューサーは「純粋」で副作用を持ってはならないからです。
では、副作用を含むこのロジックはどこに配置すればよいのでしょうか?
答えはReduxミドルウェア内です。ミドルウェアは副作用を可能にするように設計されているからです。
createListenerMiddlewareによるリアクティブロジック
非同期ロジックには「即時実行」が必要な場合、サンクミドルウェアを使用してきました。しかしサンクは単なる関数です。「特定のアクションがディスパッチされた時に追加ロジックを実行する」別種のミドルウェアが必要です。
Redux ToolkitにはcreateListenerMiddleware APIが含まれており、特定のアクションがディスパッチされた時に実行するロジックを記述できます。このAPIでは、監視対象のアクションを定義し、マッチした時に実行するeffectコールバックを持つ「リスナー」エントリを追加できます。
概念的には、createListenerMiddlewareをReactのuseEffectフックに例えることができます。ただし、Reduxロジックの一部として定義され、Reactコンポーネント内ではなく、Reactのレンダリングライフサイクルの一部ではなく、ディスパッチされたアクションやRedux状態の更新に応答して実行されます。
リスナーミドルウェアの設定
サンクミドルウェアの明示的な設定は不要でした。Redux ToolkitのconfigureStoreがストア設定に自動的に追加するからです。リスナーミドルウェアでは、作成してストアに追加する作業が必要です。
新規ファイルapp/listenerMiddleware.tsを作成し、リスナーミドルウェアのインスタンスを生成します。createAsyncThunkと同様に、正しいdispatchとstateの型を渡し、状態フィールドへの安全なアクセスとアクションのディスパッチを可能にします。
import { createListenerMiddleware, addListener } from '@reduxjs/toolkit'
import type { RootState, AppDispatch } from './store'

export const listenerMiddleware = createListenerMiddleware()

export const startAppListening = listenerMiddleware.startListening.withTypes<
  RootState,
  AppDispatch
>()
export type AppStartListening = typeof startAppListening

export const addAppListener = addListener.withTypes<RootState, AppDispatch>()
export type AppAddListener = typeof addAppListener
createSliceと同様に、createListenerMiddlewareは複数のフィールドを含むオブジェクトを返します:
-
listenerMiddleware.middleware: ストアに追加すべき実際のReduxミドルウェアインスタンス -
listenerMiddleware.startListening: ミドルウェアに直接新しいリスナーエントリを追加 -
listenerMiddleware.addListener:dispatchにアクセスできる場所ならどこからでも(listenerMiddlewareオブジェクトをインポートしなくても)リスナーエントリを追加できるアクションクリエーター
非同期サンクやフックと同様に、.withTypes()メソッドを使用して、適切な型が組み込まれたstartAppListeningとaddAppListener関数を事前型付けできます。
次に、これをストアに追加する必要があります:
import { configureStore } from '@reduxjs/toolkit'

import authReducer from '@/features/auth/authSlice'
import postsReducer from '@/features/posts/postsSlice'
import usersReducer from '@/features/users/usersSlice'
import notificationsReducer from '@/features/notifications/notificationsSlice'

import { listenerMiddleware } from './listenerMiddleware'

export const store = configureStore({
  reducer: {
    auth: authReducer,
    posts: postsReducer,
    users: usersReducer,
    notifications: notificationsReducer
  },
  middleware: getDefaultMiddleware =>
    getDefaultMiddleware().prepend(listenerMiddleware.middleware)
})
configureStoreはデフォルトでredux-thunkミドルウェアをストア設定に追加し、開発時には安全性チェックを追加するミドルウェアも含まれます。これらを維持しつつ、リスナーミドルウェアも追加します。
ミドルウェアの設定順序は重要です。パイプラインを形成するためです:m1 -> m2 -> m3 -> store.dispatch()。この場合、リスナーミドルウェアはパイプラインの先頭にある必要があります。そうすることで、特定のアクションを最初にインターセプトして処理できるからです。
getDefaultMiddleware() は設定済みミドルウェアの配列を返します。配列であるため、新しい項目を配列の末尾に追加したコピーを返す .concat() メソッドが既に存在しますが、configureStore は同等の .prepend() メソッドも追加しており、これを使うと新しい項目を配列の先頭に追加したコピーを作成できます。
したがって、getDefaultMiddleware().prepend(listenerMiddleware.middleware) を呼び出して、これをリストの先頭に追加します。
新しい投稿に対するトーストの表示
リスナーミドルウェアの設定が完了したので、新しい投稿が正常に追加されるたびにトーストメッセージを表示する新しいリスナーエントリを追加できます。
適切な見た目でトーストを表示するために、react-tiny-toast ライブラリを使用します。このライブラリはプロジェクトリポジトリに既に含まれているため、インストールは不要です。
<App> 内で <ToastContainer> コンポーネントをインポートしてレンダリングする必要があります。
import React from 'react'
import {
  BrowserRouter as Router,
  Route,
  Routes,
  Navigate
} from 'react-router-dom'
import { ToastContainer } from 'react-tiny-toast'

// omit other imports and ProtectedRoute definition

function App() {
  return (
    <Router>
      <Navbar />
      <div className="App">
        <Routes>{/* omit routes content */}</Routes>
        <ToastContainer />
      </div>
    </Router>
  )
}
これで、addNewPost.fulfilled アクションを監視し、「投稿が追加されました」というトーストを表示し、一定時間後にそれを削除するリスナーを追加できます。
コードベースでリスナーを定義するには複数のアプローチがあります。とはいえ、追加したいロジックに最も関連していると思われるスライスファイルでリスナーを定義するのが通常は良いプラクティスです。この場合、投稿が追加されたときにトーストを表示したいので、このリスナーを postsSlice ファイルに追加しましょう。
import {
  createEntityAdapter,
  createSelector,
  createSlice,
  EntityState,
  PayloadAction
} from '@reduxjs/toolkit'
import { client } from '@/api/client'

import type { RootState } from '@/app/store'
import { AppStartListening } from '@/app/listenerMiddleware'
import { createAppAsyncThunk } from '@/app/withTypes'

// omit types, initial state, slice definition, and selectors

export const selectPostsStatus = (state: RootState) => state.posts.status
export const selectPostsError = (state: RootState) => state.posts.error

export const addPostsListeners = (startAppListening: AppStartListening) => {
  startAppListening({
    actionCreator: addNewPost.fulfilled,
    effect: async (action, listenerApi) => {
      const { toast } = await import('react-tiny-toast')

      const toastId = toast.show('New post added!', {
        variant: 'success',
        position: 'bottom-right',
        pause: true
      })

      await listenerApi.delay(5000)
      toast.remove(toastId)
    }
  })
}
リスナーを追加するには、app/listenerMiddleware.ts で定義された startAppListening 関数を呼び出す必要があります。ただし、インポートの連鎖をより一貫性のあるものにするために、スライスファイルに直接 startAppListening をインポートしない方が良いでしょう。代わりに、startAppListening を引数として受け取る関数をエクスポートできます。そうすることで、app/listenerMiddleware.ts ファイルがこの関数をインポートできるようになり、app/store.ts が各スライスファイルからスライスリデューサーをインポートする方法と同様になります。
リスナーエントリを追加するには、startAppListening を呼び出し、effect コールバック関数を持つオブジェクトと、effect コールバックがいつ実行されるかを定義する以下のいずれかのオプションを渡します。
-
actionCreator: ActionCreator:reactionAddedやaddNewPost.fulfilledのような任意のRTKアクションクリエーター関数。このオプションを指定すると、その特定のアクションがディスパッチされたときにエフェクトが実行されます。 -
matcher: (action: UnknownAction) => boolean:isAnyOf(reactionAdded, addNewPost.fulfilled)のような任意のRTKの「matcher」関数。このオプションを指定すると、matcherがtrueを返すときはいつでもエフェクトが実行されます。 -
predicate: (action: UnknownAction, currState: RootState, prevState: RootState) => boolean:currStateとprevStateにアクセスできる、より一般的なマッチング関数。このオプションを使用すると、アクションや状態の値に対して任意のチェックを行うことができ、状態の一部が変更されたかどうか(例:currState.counter.value !== prevState.counter.value)の確認などが含まれます。
この場合、addNewPost サンクが成功するたびにトーストを表示したいので、actionCreator: addNewPost.fulfilled を指定してエフェクトを実行するようにします。
effect コールバック自体は非同期サンクとよく似ています。一致した action を最初の引数として受け取り、listenerApi オブジェクトを2番目の引数として受け取ります。
listenerApi には、通常の dispatch や getState メソッドに加えて、複雑な非同期ロジックやワークフローを実装するために使用できる他のいくつかの関数も含まれています。これには、他のアクションがディスパッチされるか状態の値が変更されるまで一時停止する condition()、このリスナーエントリがアクティブかどうかを変更する unsubscribe()/subscribe()、子タスクを開始する fork() などのメソッドが含まれます。
このケースでは、実際の react-tiny-toast ライブラリを動的にインポートし、成功トーストを表示し、数秒待ってからトーストを削除する必要があります。
最後に、addPostsListeners を実際にインポートして呼び出す場所が必要です。ここでは app/listenerMiddleware.ts にインポートします:
import { createListenerMiddleware, addListener } from '@reduxjs/toolkit'
import type { RootState, AppDispatch } from './store'

import { addPostsListeners } from '@/features/posts/postsSlice'

export const listenerMiddleware = createListenerMiddleware()

export const startAppListening = listenerMiddleware.startListening.withTypes<
  RootState,
  AppDispatch
>()
export type AppStartListening = typeof startAppListening

export const addAppListener = addListener.withTypes<RootState, AppDispatch>()
export type AppAddListener = typeof addAppListener

// Call this and pass in `startAppListening` to let the
// posts slice set up its listeners
addPostsListeners(startAppListening)
新しい投稿を追加すると、ページの右下隅に小さな緑色のトーストが表示され、5秒後に消えるはずです。これは、Reduxストアのリスナーミドルウェアがアクションがディスパッチされた後にチェックしてエフェクトコールバックを実行するため機能しており、Reactコンポーネント自体に追加のロジックを特に実装していなくても動作します。
学んだこと
このセクションでは多くの新しい機能を構築しました。これらの変更をすべて加えたアプリの表示を確認しましょう:
このセクションでカバーした内容は以下の通りです:
- メモ化されたセレクター関数でパフォーマンスを最適化できる
- Redux ToolkitはReselectの
createSelector関数を再エクスポートし、メモ化されたセレクターを生成する - メモ化されたセレクターは入力セレクターが新しい値を返した場合にのみ結果を再計算する
- メモ化により高コストな計算をスキップし、同じ結果参照を返すことが保証される
- Redux ToolkitはReselectの
- ReduxとReactコンポーネントのレンダリングを最適化する複数のパターンが存在する
useSelector内で新しいオブジェクト/配列参照を作成しない - これらは不要な再レンダリングを引き起こす- メモ化されたセレクター関数を
useSelectorに渡してレンダリングを最適化できる useSelectorは参照等価の代わりにshallowEqualのような代替比較関数を受け入れられる- コンポーネントを
React.memo()でラップしてpropsが変更された場合のみ再レンダリングできる - リストレンダリングは、親コンポーネントでアイテムIDの配列だけを読み取り、IDを子リストアイテムに渡し、子コンポーネントでIDごとにアイテムを取得することで最適化できる
- 正規化された状態構造はアイテム保存に推奨されるアプローチである
- 「正規化」とはデータの重複をなくし、アイテムIDごとのルックアップテーブルでアイテムを保持すること
- 正規化された状態の形状は通常
{ids: [], entities: {}}のようになる
- Redux Toolkitの
createEntityAdapterAPIはスライス内の正規化データ管理を支援するsortComparerオプションを渡すことでアイテムIDをソート順に保持できる- アダプターオブジェクトには以下が含まれる:
- ローディング状態のような追加状態フィールドを受け入れられる
adapter.getInitialState setAll、addMany、upsertOne、removeManyなど一般的なケース向けのビルトインリデューサーselectAllやselectByIdのようなセレクターを生成するadapter.getSelectors
- ローディング状態のような追加状態フィールドを受け入れられる
- Redux Toolkitの
createListenerMiddlewareAPIはディスパッチされたアクションに反応してリアクティブロジックを実行する- リスナーミドルウェアは適切なストアタイプを添付してストア設定に追加する必要がある
- リスナーは通常スライスファイルで定義されるが、他の構造でも可能
- リスナーは個々のアクション、複数アクションにマッチングできるほか、カスタム比較も使用可能
- リスナーエフェクトコールバックには同期/非同期ロジックを含められる
listenerApiオブジェクトは非同期ワークフローと動作を管理する多くのメソッドを提供する
次のステップ
Redux Toolkitには"RTK Query"と呼ばれる強力なデータ取得・キャッシュAPIも含まれています。RTK Queryはオプションのアドオンで、データ取得ロジックを自ら書く必要性を完全になくすことができます。パート7: RTK Query基礎では、RTK Queryとは何か、解決する課題、そしてアプリケーションでキャッシュデータを取得・使用する方法を学びます。