Reduxエッセンシャルズ Part 5: 非同期処理とデータ取得
このページは PageTurner AI で翻訳されました(ベータ版)。プロジェクト公式の承認はありません。 エラーを見つけましたか? 問題を報告 →
- Reduxの「thunk」ミドルウェアを使用して非同期処理を行う方法
- 非同期リクエストの状態を扱うパターン
- Redux Toolkitの
createAsyncThunkAPIを使用して非同期呼び出しを管理する方法
- サーバーのREST APIからデータを取得および更新するためのHTTPリクエストの使用に慣れていること
はじめに
Part 4: Reduxデータの使用では、Reactコンポーネント内でReduxストアから複数のデータを使用する方法、アクションオブジェクトの内容をディスパッチ前にカスタマイズする方法、そしてより複雑な更新ロジックをリデューサーで処理する方法を見てきました。
これまでに扱ってきたデータは、すべてReactクライアントアプリケーション内に直接存在していました。しかし、実際のアプリケーションのほとんどは、サーバーからのデータを扱う必要があり、HTTP API呼び出しを行ってアイテムを取得および保存します。
このセクションでは、ソーシャルメディアアプリを改造して、投稿とユーザーのデータをAPIから取得し、新しい投稿をAPIに保存して追加します。
Redux ToolkitにはRTK Queryデータ取得およびキャッシュAPIが含まれています。RTK QueryはReduxアプリ向けに特別に構築されたデータ取得およびキャッシュソリューションであり、データ取得を管理するためのthunkやリデューサーなどの追加のReduxロジックを書く必要をなくすことができます。データ取得のデフォルトのアプローチとして、RTK Queryを特に教えます。
RTK Queryはこのページで示すパターンと同じ基盤で構築されているため、このセクションはReduxでのデータ取得がどのように機能するか、その基礎となるメカニズムを理解するのに役立ちます。
RTK Queryの使用方法はPart 7: RTK Queryの基礎から始めます。
REST APIとクライアントの例
サンプルプロジェクトを隔離された状態で現実的に保つため、初期プロジェクト設定には、データ用の偽のインメモリREST APIがすでに含まれています(Mock Service WorkerモックAPIツールを使用して設定)。このAPIはエンドポイントのベースURLとして/fakeApiを使用し、/fakeApi/posts、/fakeApi/users、fakeApi/notificationsに対して典型的なGET/POST/PUT/DELETE HTTPメソッドをサポートします。これはsrc/api/server.tsで定義されています。
また、プロジェクトには小さなHTTP APIクライアントオブジェクトが含まれており、axiosのような人気のあるHTTPライブラリと同様にclient.get()メソッドとclient.post()メソッドを公開しています。これはsrc/api/client.tsで定義されています。
このセクションでは、インメモリの偽のREST APIに対してHTTP呼び出しを行うためにclientオブジェクトを使用します。
また、モックサーバーはページが読み込まれるたびに同じランダムシードを再利用するように設定されているため、毎回同じ偽のユーザーと偽の投稿のリストが生成されます。これをリセットしたい場合は、ブラウザのLocal Storageにある'randomTimestampSeed'の値を削除してページを再読み込みするか、src/api/server.tsを編集してuseSeededRNGをfalseに設定することで無効にできます。
補足として、コード例は各セクションの主要概念と変更点に焦点を当てています。アプリケーションの完全な変更内容については、CodeSandboxプロジェクトとプロジェクトリポジトリのtutorial-steps-tsブランチを参照してください。
非同期処理を可能にするミドルウェアの使用
Reduxストア自体は非同期ロジックについて何も知りません。同期的にアクションをディスパッチし、ルートリデューサー関数を呼び出して状態を更新し、何かが変更されたことをUIに通知することしかできません。非同期処理はストアの外部で行われる必要があります。
しかし、非同期ロジックでアクションをディスパッチしたり、現在のストア状態を確認したり、何らかの副作用を実行したりする必要がある場合はどうでしょうか? そこで活躍するのがReduxミドルウェアです。ミドルウェアはストアの機能を拡張し、次の操作を可能にします:
-
アクションがディスパッチされるたびに追加ロジックを実行(アクションと状態のログ記録など)
-
ディスパッチされたアクションを一時停止、変更、遅延、置換、停止
-
dispatchやgetStateにアクセスできる追加コードの記述 -
dispatchがプレーンなアクションオブジェクト以外の値(関数やプロミスなど)を受け入れる方法を教育し、それらをインターセプトして代わりに実際のアクションオブジェクトをディスパッチ -
非同期ロジックやその他の副作用を使用するコードの記述
ミドルウェアを使用する最も一般的な理由は、さまざまな種類の非同期ロジックがストアと対話できるようにするためです。これにより、UIから独立したロジックとして、アクションをディスパッチしストア状態を確認するコードを記述できます。
ミドルウェアによるReduxストアのカスタマイズ方法の詳細は以下を参照:
ミドルウェアとReduxデータフロー
以前、Reduxの同期データフローの様子を確認しました。
ミドルウェアはdispatchの開始時に追加ステップを設けることでReduxデータフローを更新します。これにより、ミドルウェアはHTTPリクエストなどのロジックを実行した後でアクションをディスパッチできます。非同期データフローは次のようになります:
サンクと非同期ロジック
Redux向けにはさまざまな非同期ミドルウェアが存在し、それぞれ異なる構文でロジックを記述できます。最も一般的な非同期ミドルウェアはredux-thunkで、非同期ロジックを直接含むプレーンな関数を記述できます。Redux ToolkitのconfigureStore関数はデフォルトでサンクミドルウェアを自動設定し、Reduxでの非同期ロジック記述の標準アプローチとしてサンクの使用を推奨しています。
サンク関数
サンクミドルウェアがReduxストアに追加されると、_サンク関数_を直接store.dispatchに渡せるようになります。サンク関数は常に(dispatch, getState)を引数として呼び出され、内部で必要に応じてこれらを使用できます。
サンク関数には_あらゆる_ロジック(同期/非同期問わず)を含められます。
サンクは通常、dispatch(increment())のようにアクションクリエーターを使用してプレーンアクションをディスパッチします:
const store = configureStore({ reducer: counterReducer })

const exampleThunkFunction = (
  dispatch: AppDispatch,
  getState: () => RootState
) => {
  const stateBefore = getState()
  console.log(`Counter before: ${stateBefore.counter}`)
  dispatch(increment())
  const stateAfter = getState()
  console.log(`Counter after: ${stateAfter.counter}`)
}

store.dispatch(exampleThunkFunction)
通常のアクションオブジェクトのディスパッチとの一貫性を保つため、通常は_サンクアクションクリエーター_として記述します。これはサンク関数を返し、サンク内部で使用できる引数を取ることができます。
const logAndAdd = (amount: number) => {
  return (dispatch: AppDispatch, getState: () => RootState) => {
    const stateBefore = getState()
    console.log(`Counter before: ${stateBefore.counter}`)
    dispatch(incrementByAmount(amount))
    const stateAfter = getState()
    console.log(`Counter after: ${stateAfter.counter}`)
  }
}

store.dispatch(logAndAdd(5))
Thunk は通常「スライス」ファイル内に記述されます。これは、thunk によるデータ取得が特定のスライスの更新ロジックと概念的に関連しているためです。本セクションでは、thunk を定義するいくつかの異なる方法を見ていきます。
非同期 Thunk の記述
Thunk 内部には setTimeout、Promise、async/await などの非同期ロジックを含めることができます。この特性により、サーバーAPIへのHTTP呼び出しを配置するのに適した場所となります。
Redux におけるデータ取得ロジックは通常、次の予測可能なパターンに従います:
-
リクエスト前に「開始」アクションをディスパッチし、処理中であることを示します。これにより重複リクエストのスキップやUIのローディング表示が可能になります。
-
fetchまたはラッパーライブラリを使用した非同期リクエストを実行し、結果のPromiseを取得します -
リクエストのPromiseが解決すると、非同期ロジックは結果データを含む「成功」アクション、またはエラー詳細を含む「失敗」アクションのいずれかをディスパッチします。Reducerロジックは両ケースでローディング状態を解除し、成功時は結果データを処理し、失敗時は表示用にエラー値を保存します。
これらのステップは_必須ではありません_が、一般的に使用されます(成功結果のみが重要な場合、「開始」と「失敗」アクションをスキップし、リクエスト完了時に単一の「成功」アクションをディスパッチすることも可能です)。
Redux Toolkit は非同期リクエストを記述するアクションの作成とディスパッチを実装するための createAsyncThunk API を提供します。
基本的な createAsyncThunk の使用法は次のようになります:
import { createAsyncThunk } from '@reduxjs/toolkit'

export const fetchItemById = createAsyncThunk(
  'items/fetchItemById',
  async (itemId: string) => {
    const item = await someHttpRequest(itemId)
    return item
  }
)
非同期リクエストのアクションをディスパッチするコードを createAsyncThunk がどのように簡略化するかについての詳細は、この詳細セクションを参照してください。実際の使用例はすぐ後で見ていきます。
Detailed Explanation: Dispatching Request Status Actions in Thunks
If we were to write out the code for a typical async thunk by hand, it might look like this:
const getRepoDetailsStarted = () => ({
  type: 'repoDetails/fetchStarted'
})
const getRepoDetailsSuccess = (repoDetails: RepoDetails) => ({
  type: 'repoDetails/fetchSucceeded',
  payload: repoDetails
})
const getRepoDetailsFailed = (error: any) => ({
  type: 'repoDetails/fetchFailed',
  error
})

const fetchIssuesCount = (org: string, repo: string) => {
  return async (dispatch: AppDispatch) => {
    dispatch(getRepoDetailsStarted())
    try {
      const repoDetails = await getRepoDetails(org, repo)
      dispatch(getRepoDetailsSuccess(repoDetails))
    } catch (err) {
      dispatch(getRepoDetailsFailed(err.toString()))
    }
  }
}
However, writing code using this approach is tedious. Each separate type of request needs repeated similar implementation:
- Unique action types need to be defined for the three different cases
- Each of those action types usually has a corresponding action creator function
- A thunk has to be written that dispatches the correct actions in the right sequence
createAsyncThunk abstracts this pattern by generating the action types and action creators, and generating a thunk that dispatches those actions automatically. You provide a callback function that makes the async call and returns a Promise with the result.
It's also easy to make mistakes with error handling when writing thunk logic yourself. In this case, the try block will actually catch errors from both a failed request, and any errors while dispatching. Handling this correctly would require restructuring the logic to separate those. createAsyncThunk already handles errors correctly for you internally.
Redux Thunks の型付け
Redux Thunk の型付け
手動でthunkを書く場合、thunkの引数を(dispatch: AppDispatch, getState: () => RootState)のように明示的に型付けすることができます。これはよくあるパターンなので、再利用可能なAppThunk型を定義してそれを使用することもできます:
import { Action, ThunkAction, configureStore } from '@reduxjs/toolkit'

// omit actual store setup

// Infer the type of `store`
export type AppStore = typeof store
// Infer the `AppDispatch` type from the store itself
export type AppDispatch = typeof store.dispatch
// Same for the `RootState` type
export type RootState = ReturnType<typeof store.getState>
// Export a reusable type for handwritten thunks
export type AppThunk = ThunkAction<void, RootState, unknown, Action>
その後、それを利用して記述中の thunk 関数を説明できます:
// Use `AppThunk` as the return type, since we return a thunk function
const logAndAdd = (amount: number): AppThunk => {
  return (dispatch, getState) => {
    const stateBefore = getState()
    console.log(`Counter before: ${stateBefore.counter}`)
    dispatch(incrementByAmount(amount))
    const stateAfter = getState()
    console.log(`Counter after: ${stateAfter.counter}`)
  }
}
createAsyncThunkの型定義
具体的に createAsyncThunk の場合:ペイロード関数が引数を受け取る場合は、その引数に型を指定してください(例: async (userId: string))。デフォルトでは戻り値の型を指定する必要はありません。TS が自動的に戻り値の型を推論します。
もし createAsyncThunk 内で dispatch や getState にアクセスする必要がある場合、RTK は createAsyncThunk.withTypes() を呼び出すことで、正しい dispatch と getState の型が組み込まれた「事前型付けされた」バージョンを定義する方法を提供します。これは事前型付けされた useSelector と useDispatch を定義した方法と同様です。新しい src/app/withTypes ファイルを作成し、そこからエクスポートします。
import { createAsyncThunk } from '@reduxjs/toolkit'

import type { RootState, AppDispatch } from './store'

export const createAppAsyncThunk = createAsyncThunk.withTypes<{
  state: RootState
  dispatch: AppDispatch
}>()
TypeScript で thunk を定義する詳細については、次を参照してください:
投稿の読み込み
これまで、私たちの postsSlice は、初期状態としてハードコードされたサンプルデータを使用していました。これを、代わりに空の投稿配列で始まるように変更し、サーバーから投稿のリストを取得します。
これまで postsSlice は初期状態としてハードコードされたサンプルデータを使用していました。これを空の投稿配列で開始するように変更し、サーバーから投稿リストを取得します。
リクエストの読み込み状態
API呼び出しを行う際、その進捗状況は次の4つの状態のいずれかを取る小さなステートマシンとして捉えることができます:
-
リクエストがまだ開始されていない
-
リクエストが進行中である
-
リクエストが成功し、必要なデータを取得した
-
リクエストが失敗し、おそらくエラーメッセージがある
この情報をisLoading: trueのようなブール値で追跡することも可能ですが、これらの状態を単一の共用体型(union type)の値として管理する方が優れた方法です。推奨パターンとしては、次のような状態構造を採用します(TypeScriptの文字列共用体型表記を使用):
{
  // Multiple possible status string union values
  status: 'idle' | 'pending' | 'succeeded' | 'failed',
  error: string | null
}
これらのフィールドは、実際に保存されるデータと併せて存在します。これらの具体的な状態名は必須ではありません - 必要に応じて'pending'の代わりに'loading'を、'succeeded'の代わりに'completed'を使用するなど自由に変更可能です。
この情報を活用して、リクエストの進行状況に応じてUIに表示する内容を決定できます。また、リデューサーにロジックを追加してデータの二重読み込みを防止することも可能です。
投稿取得リクエストのローディング状態を管理するため、postsSliceを更新しましょう。状態を単なる投稿配列から{posts, status, error}形式に変更します。初期状態から古いサンプル投稿を削除し、ローディング状態とエラー状態を取得する新しいセレクターを追加します:
import { createSlice, nanoid } from '@reduxjs/toolkit'

// omit reactions and other types

interface PostsState {
  posts: Post[]
  status: 'idle' | 'pending' | 'succeeded' | 'failed'
  error: string | null
}

const initialState: PostsState = {
  posts: [],
  status: 'idle',
  error: null
}

const postsSlice = createSlice({
  name: 'posts',
  initialState,
  reducers: {
    postAdded: {
      reducer(state, action: PayloadAction<Post>) {
        state.posts.push(action.payload)
      },
      prepare(title: string, content: string, userId: string) {
        // omit prepare logic
      }
    },
    postUpdated(state, action: PayloadAction<PostUpdate>) {
      const { id, title, content } = action.payload
      const existingPost = state.posts.find(post => post.id === id)
      if (existingPost) {
        existingPost.title = title
        existingPost.content = content
      }
    },
    reactionAdded(
      state,
      action: PayloadAction<{ postId: string; reaction: ReactionName }>
    ) {
      const { postId, reaction } = action.payload
      const existingPost = state.posts.find(post => post.id === postId)
      if (existingPost) {
        existingPost.reactions[reaction]++
      }
    }
  },
  extraReducers: builder => {
    builder.addCase(userLoggedOut, state => {
      // Clear out the list of posts whenever the user logs out
      return initialState
    })
  }
})

export const { postAdded, postUpdated, reactionAdded } = postsSlice.actions

export default postsSlice.reducer


export const selectAllPosts = (state: RootState) => state.posts.posts

export const selectPostById = (state: RootState, postId: string) =>
  state.posts.posts.find(post => post.id === postId)

export const selectPostsStatus = (state: RootState) => state.posts.status
export const selectPostsError = (state: RootState) => state.posts.error
この変更に伴い、配列として扱っていたstateの参照箇所はすべてstate.postsに変更する必要があります(配列が一段階深くなったため)。
これによりstate.posts.postsのような若干冗長で奇妙なネスト構造が生じますが、現時点ではこのままにしておきます。ネストされた配列名をitemsやdataなどに変更することも可能ですが、今回はそのまま維持します。
createAsyncThunkを使ったデータ取得
Redux ToolkitのcreateAsyncThunk APIは、「開始/成功/失敗」アクションを自動的にディスパッチするサンクを生成します。
まず、投稿リストを取得するHTTPリクエストを行うサンクを追加します。src/apiフォルダからclientユーティリティをインポートし、'/fakeApi/posts'へのリクエストに使用します。
import { createSlice, nanoid, PayloadAction } from '@reduxjs/toolkit'
import { client } from '@/api/client'

import type { RootState } from '@/app/store'
import { createAppAsyncThunk } from '@/app/withTypes'

// omit other imports and types

export const fetchPosts = createAppAsyncThunk('posts/fetchPosts', async () => {
  const response = await client.get<Post[]>('/fakeApi/posts')
  return response.data
})

const initialState: PostsState = {
  posts: [],
  status: 'idle',
  error: null
}
createAsyncThunkは2つの引数を受け取ります:
-
生成されるアクションタイプのプレフィックスとして使用される文字列
-
何らかのデータを含むPromise、またはエラーを含む拒否されたPromiseを返す「ペイロードクリエーター」コールバック関数
ペイロードクリエーターは通常HTTPリクエストを行い、HTTPリクエストから直接Promiseを返すか、APIレスポンスからデータを抽出して返します。JSのasync/await構文を使用して記述するのが一般的で、これによりsomePromise.then()チェーンではなく標準的なtry/catchロジックを使ったPromise処理が可能になります。
今回の場合、アクションタイプのプレフィックスとして'posts/fetchPosts'を渡します。
fetchPostsのペイロード作成コールバックは引数を必要とせず、API呼び出しがレスポンスを返すのを待つだけです。レスポンスオブジェクトは{data: []}形式で、ディスパッチされるReduxアクションのペイロードは投稿配列そのものにしたいため、response.dataを抽出してコールバックから返します。
dispatch(fetchPosts())を呼び出すと、fetchPostsサンクは最初に'posts/fetchPosts/pending'タイプのアクションをディスパッチします:
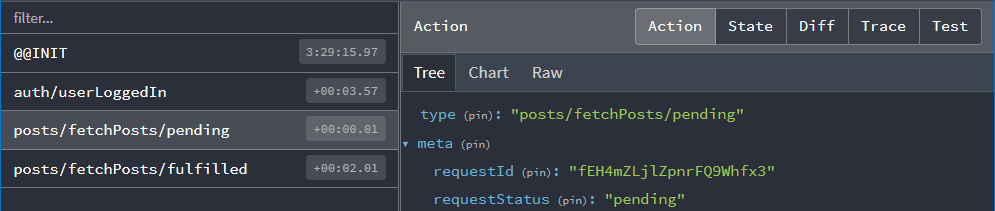
リデューサーでこのアクションをリッスンし、リクエスト状態を'pending'に設定できます。
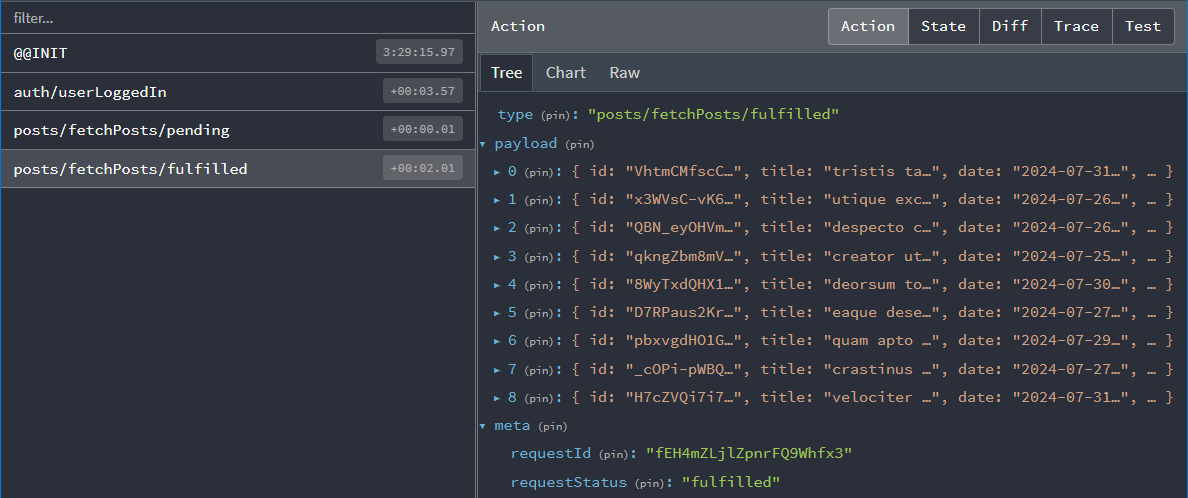
Promiseが解決すると、fetchPostsサンクはコールバックから返されたresponse.data配列を受け取り、投稿配列をaction.payloadに含んだ'posts/fetchPosts/fulfilled'アクションをディスパッチします:
リデューサーとロードアクション
次に、リデューサー内でこれらのアクションを両方処理する必要があります。これには、これまで使用してきたcreateSlice APIをさらに深く理解する必要があります。
createSliceがreducersフィールドで定義した各リデューサー関数に対してアクションクリエーターを生成することは既に見てきました。生成されるアクションタイプにはスライス名が含まれます。例:
console.log(
  postUpdated({ id: '123', title: 'First Post', content: 'Some text here' })
)
/*
{
  type: 'posts/postUpdated',
  payload: {
    id: '123',
    title: 'First Post',
    content: 'Some text here'
  }
}
*/
また、スライス外部で定義されたアクションに応答するためにcreateSliceのextraReducersフィールドを使用できることも既に確認しています。
この場合、fetchPosts thunkによってディスパッチされる「pending」および「fulfilled」アクションタイプを監視する必要があります。これらのアクションクリエーターは実際のfetchPosts関数にアタッチされており、extraReducersに渡すことでこれらのアクションをリッスンできます:
export const fetchPosts = createAsyncThunk('posts/fetchPosts', async () => {
  const response = await client.get<Post[]>('/fakeApi/posts')
  return response.data
})

const postsSlice = createSlice({
  name: 'posts',
  initialState,
  reducers: {
    // omit existing reducers here
  },

  extraReducers: builder => {
    builder
      .addCase(userLoggedOut, state => {
        // Clear out the list of posts whenever the user logs out
        return initialState
      })
      .addCase(fetchPosts.pending, (state, action) => {
        state.status = 'pending'
      })
      .addCase(fetchPosts.fulfilled, (state, action) => {
        state.status = 'succeeded'
        // Add any fetched posts to the array
        state.posts.push(...action.payload)
      })
      .addCase(fetchPosts.rejected, (state, action) => {
        state.status = 'failed'
        state.error = action.error.message ?? 'Unknown Error'
      })
  }
})
返したPromiseに基づき、サンクがディスパッチする可能性のある3つのアクションタイプをすべて処理します:
-
リクエスト開始時には
statusを'pending'に設定します -
リクエスト成功時、
statusを'succeeded'にマークし、取得した投稿をstate.postsに追加 -
リクエスト失敗時、
statusを'failed'にマークし、エラーメッセージを状態に保存して表示可能に
コンポーネントからのサンクディスパッチ
fetchPostsサンクを作成し、それらのアクションを処理するようにスライスを更新したので、実際にデータ取得を開始するために<PostsList>コンポーネントを更新しましょう。
コンポーネントにfetchPostsサンクをインポートします。他のアクションクリエーターと同様、ディスパッチする必要があるためuseAppDispatchフックも追加します。<PostsList>マウント時にデータを取得したいため、ReactのuseEffectフックをインポートし、アクションをディスパッチします。
投稿リストの取得は一度だけ行うことが重要です。<PostsList>コンポーネントがレンダリングされるたび、またはビュー切り替えでコンポーネントが再作成されるたびに取得を実行すると、複数回の取得が発生する可能性があります。この問題を回避するには、コンポーネント内でposts.statusの値を選択し、ステータスが'idle'(未開始状態)の場合のみ実際の取得を開始するようにします。
import React, { useEffect } from 'react'
import { Link } from 'react-router-dom'

import { useAppSelector, useAppDispatch } from '@/app/hooks'
import { TimeAgo } from '@/components/TimeAgo'

import { PostAuthor } from './PostAuthor'
import { ReactionButtons } from './ReactionButtons'
import { fetchPosts, selectAllPosts, selectPostsStatus } from './postsSlice'

export const PostsList = () => {
  const dispatch = useAppDispatch()
  const posts = useAppSelector(selectAllPosts)
  const postStatus = useAppSelector(selectPostsStatus)

  useEffect(() => {
    if (postStatus === 'idle') {
      dispatch(fetchPosts())
    }
  }, [postStatus, dispatch])

  // omit rendering logic
}
これで、アプリにログインした後に新しい投稿リストが表示されるはずです!
重複取得の防止
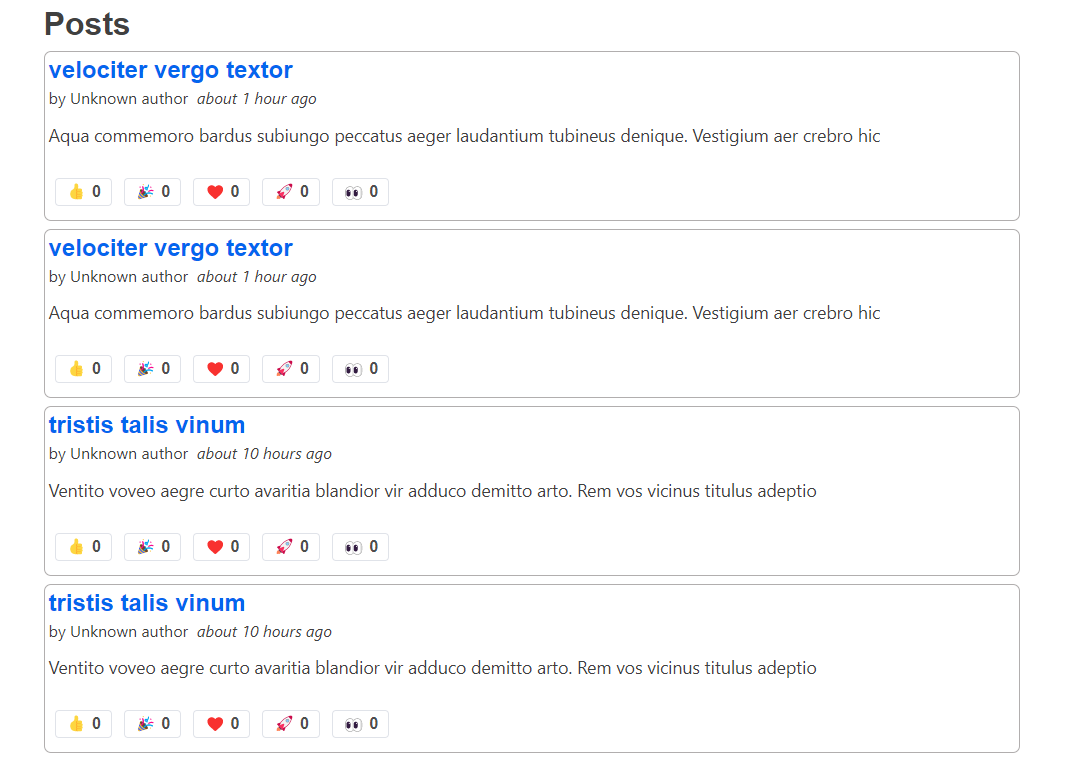
良いニュース:モックサーバーAPIから投稿オブジェクトを正常に取得できました。
残念ながら問題が発生しています。現在、投稿リストに各投稿の重複が表示されています:
実際、Redux DevToolsを見ると、'pending'と'fulfilled'アクションが2セットディスパッチされているのがわかります:
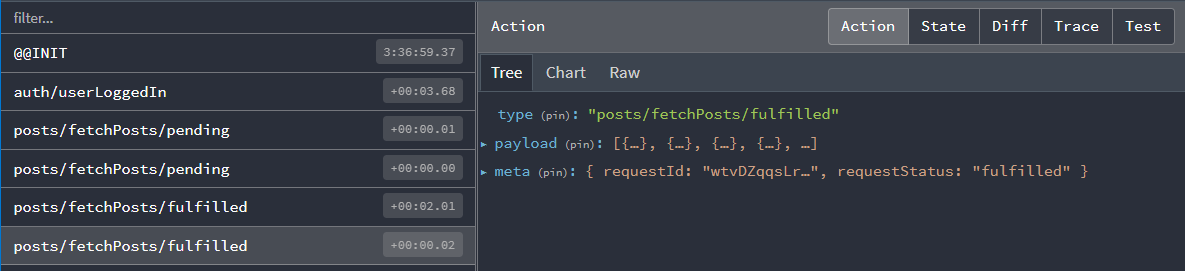
なぜでしょうか?postStatus === 'idle'のチェックを追加したばかりではありませんか?これでサンクを1回だけディスパッチできるはずでは?
そうですね... でもそうでもないのです :)
ここでの useEffect 内のロジック自体は正しいものです。問題は、現在開発ビルドのアプリケーションを見ていることであり、開発環境では React は <StrictMode> コンポーネント内でマウント時にすべての useEffect フックを2回実行します。これは特定の種類のバグを顕在化させるためです。
この場合、以下の流れが発生しました:
-
<PostsList>コンポーネントがマウントされた -
useEffectフックが初めて実行され、postStatusが'idle'だったためfetchPostsサンクがディスパッチされた -
fetchPostsが即座にfetchPosts.pendingアクションをディスパッチしたため、Redux ストアはステータスを'pending'に更新 -
しかし React がコンポーネントの再レンダリングなしに
useEffectを再実行したため、エフェクトはpostStatusがまだ'idle'だと判断しfetchPostsを再度ディスパッチ -
両方のthunkがデータの取得を完了し、
fetchPosts.fulfilledアクションをディスパッチします。その結果、fulfilledリデューサーが2回実行され、重複した投稿がstateに追加されます
では、どのように修正すればよいでしょうか?
選択肢の一つはアプリから <StrictMode> タグを削除することですが、React チームはこれを推奨しており他の問題検出に役立ちます。
useRef フックで初回レンダリングを追跡する複雑なロジックを書いて fetchPosts を一度だけディスパッチする方法もありますが、これは洗練されていません。
最後の選択肢は Redux ステートの state.posts.status 値を実際にチェックし、リクエスト進行中ならサンク自体に処理を中止させることです。幸い createAsyncThunk にはこれを実現する方法があります。
非同期サンクの条件チェック
createAsyncThunk はオプションの condition コールバックを受け付けます。指定するとサンク呼び出し開始時に実行され、condition が false. を返すとサンク全体がキャンセルされます。
このケースでは state.posts.status が 'idle' でない場合のサンク実行を避けたいわけです。既存の selectPostsStatus セレクターを利用できるので、condition オプションを追加して値をチェックします:
export const fetchPosts = createAppAsyncThunk(
  'posts/fetchPosts',
  async () => {
    const response = await client.get<Post[]>('/fakeApi/posts')
    return response.data
  },
  {
    condition(arg, thunkApi) {
      const postsStatus = selectPostsStatus(thunkApi.getState())
      if (postsStatus !== 'idle') {
        return false
      }
    }
  }
)
これでページをリロードして <PostsList> を見ると、重複のない投稿セットが1つだけ表示され、Redux DevTools でもディスパッチされたアクションが1セットのみ確認できるはずです。
すべてのサンクに condition を追加する必要はありませんが、同時に複数リクエストが発生しないようにする場合に有用です。
RTK Query がこれを自動管理します! すべてのコンポーネント間でリクエストを重複排除するため、各リクエストは一度だけ実行され、手動で対応する必要がなくなります。
ローディング状態の表示
<PostsList> コンポーネントは Redux に保存された投稿の更新をチェックし、リスト変更時に自身を再レンダリングします。ページを更新するとフェイク API からランダムな投稿セットが表示されますが、若干の遅延が発生します — <PostsList> は最初空で、数秒後に投稿が表示されます。
実際の API 呼び出しは応答に時間がかかるため、通常は UI に「読み込み中...」インジケーターを表示し、ユーザーにデータ待機中であることを伝えるのが良いプラクティスです。
<PostsList>コンポーネントを更新し、state.posts.statusの値に基づいて異なるUIを表示できます:読み込み中はスピナー、失敗時はエラーメッセージ、データ取得後は実際の投稿リストを表示します。
ついでに、リスト内の各アイテムのレンダリングをカプセル化するため <PostExcerpt> コンポーネントを抽出する良いタイミングでしょう。
結果は次のようになります:
import React, { useEffect } from 'react'
import { Link } from 'react-router-dom'

import { useAppSelector, useAppDispatch } from '@/app/hooks'

import { Spinner } from '@/components/Spinner'
import { TimeAgo } from '@/components/TimeAgo'

import { PostAuthor } from './PostAuthor'
import { ReactionButtons } from './ReactionButtons'
import {
  Post,
  selectAllPosts,
  selectPostsError,
  fetchPosts
} from './postsSlice'

interface PostExcerptProps {
  post: Post
}

function PostExcerpt({ post }: PostExcerptProps) {
  return (
    <article className="post-excerpt" key={post.id}>
      <h3>
        <Link to={`/posts/${post.id}`}>{post.title}</Link>
      </h3>
      <div>
        <PostAuthor userId={post.user} />
        <TimeAgo timestamp={post.date} />
      </div>
      <p className="post-content">{post.content.substring(0, 100)}</p>
      <ReactionButtons post={post} />
    </article>
  )
}

export const PostsList = () => {
  const dispatch = useAppDispatch()
  const posts = useAppSelector(selectAllPosts)
  const postStatus = useAppSelector(selectPostsStatus)
  const postsError = useAppSelector(selectPostsError)

  useEffect(() => {
    if (postStatus === 'idle') {
      dispatch(fetchPosts())
    }
  }, [postStatus, dispatch])

  let content: React.ReactNode

  if (postStatus === 'pending') {
    content = <Spinner text="Loading..." />
  } else if (postStatus === 'succeeded') {
    // Sort posts in reverse chronological order by datetime string
    const orderedPosts = posts
      .slice()
      .sort((a, b) => b.date.localeCompare(a.date))

    content = orderedPosts.map(post => (
      <PostExcerpt key={post.id} post={post} />
    ))
  } else if (postStatus === 'rejected') {
    content = <div>{postsError}</div>
  }

  return (
    <section className="posts-list">
      <h2>Posts</h2>
      {content}
    </section>
  )
}
API呼び出しに時間がかかり、ローディングスピナーが数秒間表示され続けることに気付くかもしれません。モックAPIサーバーはすべてのレスポンスに2秒の遅延を追加するよう設定されており、ローディングスピナーが表示される時間を可視化するため特別に設計されています。この動作を変更したい場合は、api/server.ts を開き、次の行を修正してください:
// Add an extra delay to all endpoints, so loading spinners show up.
const ARTIFICIAL_DELAY_MS = 2000
API呼び出しをより速く完了させたい場合は、必要に応じてこの設定をオン/オフしてください。
オプション: createSlice 内でのthunk定義
現在、fetchPosts thunkは postsSlice.ts ファイル内で定義されていますが、createSlice() 呼び出しの外側にあります。
thunkを createSlice 内で定義するオプションの方法もあり、これには reducers フィールドの定義方法を変更する必要があります。詳細は以下の説明を参照してください:
Defining Thunks in createSlice
We've seen that the standard way to write the createSlice.reducers field is as an object, where the keys become the action names, and the values are reducers. We also saw that the values can be an object with the {reducer, prepare} functions for creating an action object with the values we want.
Alternately, the reducers field can be a callback function that receives a create object. This is somewhat similar to what we saw with extraReducers, but with a different set of methods for creating reducers and actions:
create.reducer<PayloadType>(caseReducer): defines a case reducercreate.preparedReducer(prepare, caseReducer): defines a reducer with a prepare callback
Then, return an object like before with the reducer names as the fields, but call the create methods to make each reducer. Here's what the postsSlice would look like converted to this syntax:
const postsSlice = createSlice({
  name: 'posts',
  initialState,
  reducers: create => {
    return {
      postAdded: create.preparedReducer(
        (title: string, content: string, userId: string) => {
          return {
            payload: {
              id: nanoid(),
              date: new Date().toISOString(),
              title,
              content,
              user: userId,
              reactions: initialReactions
            }
          }
        },
        (state, action) => {
          state.posts.push(action.payload)
        }
      ),
      postUpdated: create.reducer<PostUpdate>((state, action) => {
        const { id, title, content } = action.payload
        const existingPost = state.posts.find(post => post.id === id)
        if (existingPost) {
          existingPost.title = title
          existingPost.content = content
        }
      }),
      reactionAdded: create.reducer<{ postId: string; reaction: ReactionName }>(
        (state, action) => {
          const { postId, reaction } = action.payload
          const existingPost = state.posts.find(post => post.id === postId)
          if (existingPost) {
            existingPost.reactions[reaction]++
          }
        }
      )
    }
  },
  extraReducers: builder => {
    // same as before
  }
})
Writing reducers as a callback opens the door for extending the capabilities of createSlice. In particular, it's possible to make a special version of createSlice that has the ability to use createAsyncThunk baked in.
First, import buildCreateSlice and asyncThunkCreator, then call buildCreateSlice like this:
import { buildCreateSlice, asyncThunkCreator } from '@reduxjs/toolkit'

export const createAppSlice = buildCreateSlice({
  creators: { asyncThunk: asyncThunkCreator }
})
That gives you a version of createSlice with the ability to write thunks inside.
Finally, we can use that createAppSlice method to define our postsSlice with the fetchPosts thunk inside. When we do that, a couple other things change:
- We can't pass in the
RootStategeneric directly, so we have to dogetState() as RootStateto cast it - We can pass in all of the reducers that handle the thunk actions as part of the options to
create.asyncThunk(), and remove those from theextraReducersfield:
const postsSlice = createAppSlice({
  name: 'posts',
  initialState,
  reducers: create => {
    return {
      // omit the other reducers
      fetchPosts: create.asyncThunk(
        // Payload creator function to fetch the data
        async () => {
          const response = await client.get<Post[]>('/fakeApi/posts')
          return response.data
        },
        {
          // Options for `createAsyncThunk`
          options: {
            condition(arg, thunkApi) {
              const { posts } = thunkApi.getState() as RootState
              if (posts.status !== 'idle') {
                return false
              }
            }
          },
          // The case reducers to handle the dispatched actions.
          // Each of these is optional, but must use these names.
          pending: (state, action) => {
            state.status = 'pending'
          },
          fulfilled: (state, action) => {
            state.status = 'succeeded'
            // Add any fetched posts to the array
            state.posts.push(...action.payload)
          },
          rejected: (state, action) => {
            state.status = 'rejected'
            state.error = action.error.message ?? 'Unknown Error'
          }
        }
      )
    }
  },
  extraReducers: builder => {
    builder.addCase(userLoggedOut, state => {
      // Clear out the list of posts whenever the user logs out
      return initialState
    })
    // The thunk handlers have been removed here
  }
})
Remember, the create callback syntax is optional! The only time you have to use it is if you really want to write thunks inside of createSlice. That said, it does remove the need to use the PayloadAction type, and cuts down on extraReducers as well.
ユーザーの読み込み
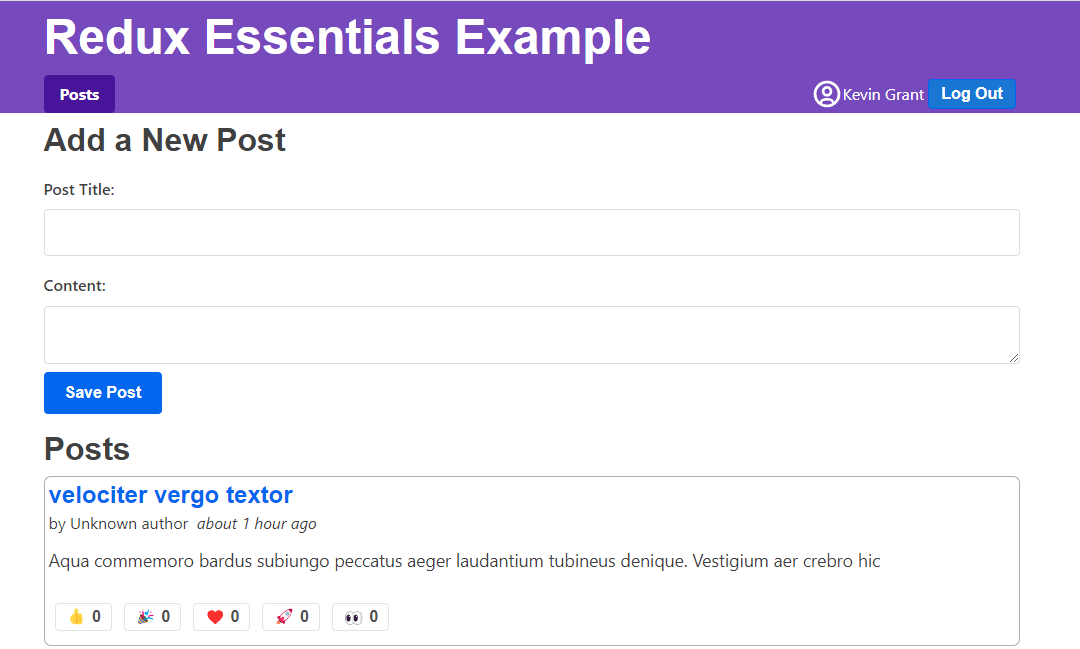
これで投稿リストの取得と表示が可能になりました。しかし、投稿を見ると問題があります:すべての投稿の著者が「Unknown author」と表示されています:

これは、投稿エントリが偽のAPIサーバーによってランダム生成され、ページをリロードするたびに偽のユーザーセットもランダム生成されるためです。アプリケーション起動時にこれらのユーザーを取得するため、ユーザースライスを更新する必要があります。
前回と同様に、APIからユーザーを取得して返す非同期thunkを作成し、extraReducers スライスフィールドで fulfilled アクションを処理します。今回はローディング状態の処理は省略します:
import { createSlice, PayloadAction } from '@reduxjs/toolkit'

import { client } from '@/api/client'

import type { RootState } from '@/app/store'
import { createAppAsyncThunk } from '@/app/withTypes'

interface User {
  id: string
  name: string
}

export const fetchUsers = createAppAsyncThunk('users/fetchUsers', async () => {
  const response = await client.get<User[]>('/fakeApi/users')
  return response.data
})

const initialState: User[] = []

const usersSlice = createSlice({
  name: 'users',
  initialState,
  reducers: {},
  extraReducers(builder) {
    builder.addCase(fetchUsers.fulfilled, (state, action) => {
      return action.payload
    })
  }
})

export default usersSlice.reducer

// omit selectors
今回のケースリデューサーが state 変数を全く使用していないことに気付くかもしれません。代わりに、直接 action.payload を返しています。Immerでは、既存のstate値を変更(mutate)する方法と、新しい結果を返す(return)方法の2つでstateを更新できます。新しい値を返す場合、返した値で既存のstateを完全に置き換えます(なお、手動で新しい値を返す場合、必要な不変性更新ロジックを自分で記述する必要があります)。
初期状態は空の配列でしたが、state.push(...action.payload) で変更することもできました。しかし今回は、サーバーから返された内容でユーザーリストを完全に置き換えたいため、この方法を採用しています。これにより、state内でユーザーリストが重複する可能性を回避できます。
Immerを使ったstate更新の詳細については、RTKドキュメントの「Immerを使ったreducerの作成」ガイドを参照してください。
ユーザーリストの取得は一度だけ必要であり、アプリケーション起動直後に実行したいものです。これは main.tsx ファイルで実装でき、store が直接利用可能なため fetchUsers thunkを直接ディスパッチします:
// omit other imports

import store from './app/store'
import { fetchUsers } from './features/users/usersSlice'

import { worker } from './api/server'

async function start() {
  // Start our mock API server
  await worker.start({ onUnhandledRequest: 'bypass' })

  store.dispatch(fetchUsers())

  const root = createRoot(document.getElementById('root')!)

  root.render(
    <React.StrictMode>
      <Provider store={store}>
        <App />
      </Provider>
    </React.StrictMode>
  )
}

start()
これは起動時のデータ取得方法として有効です。この方法ではReactコンポーネントのレンダリング前に取得プロセスが開始されるため、データをより早く利用可能にできます(この原則はReact Routerのデータローダーを使用しても適用できます)。
これで、各投稿に再度ユーザー名が表示されるようになり、<AddPostForm> の「Author」ドロップダウンにも同じユーザーリストが表示されるはずです。
新しい投稿の追加
このセクションにはあと1ステップあります。<AddPostForm>から新しい投稿を追加すると、現在はアプリ内のReduxストアにのみ追加されています。実際にフェイクAPIサーバーで新しい投稿エントリを作成するAPI呼び出しを行う必要があり、これによってデータが「保存」されます(これはフェイクAPIのため、ページをリロードしても新しい投稿は持続しませんが、実際のバックエンドサーバーがあれば次回リロード時に利用可能になります)。
データの送信とThunk
createAsyncThunkはデータ取得だけでなく送信にも使用できます。<AddPostForm>からの値を受け取るthunkを作成し、データを保存するためにフェイクAPIへHTTP POSTリクエストを送信します。
この過程で、レデューサー内の新しい投稿オブジェクトの扱い方を変更します。現在、postsSliceはpostAddedのprepareコールバックで新しい投稿オブジェクトを作成し、一意のIDを生成しています。データをサーバーに保存するほとんどのアプリでは、サーバーが一意のID生成と追加フィールドの埋め込みを行い、通常はレスポンスで完成したデータを返します。そのため、{ title, content, user: userId }のようなリクエストボディをサーバーに送信し、返ってきた完成した投稿オブジェクトをpostsSliceの状態に追加できます。また、thunkに渡されるオブジェクトを表すNewPost型を抽出します。
type PostUpdate = Pick<Post, 'id' | 'title' | 'content'>
type NewPost = Pick<Post, 'title' | 'content' | 'user'>

export const addNewPost = createAppAsyncThunk(
  'posts/addNewPost',
  // The payload creator receives the partial `{title, content, user}` object
  async (initialPost: NewPost) => {
    // We send the initial data to the fake API server
    const response = await client.post<Post>('/fakeApi/posts', initialPost)
    // The response includes the complete post object, including unique ID
    return response.data
  }
)

const postsSlice = createSlice({
  name: 'posts',
  initialState,
  reducers: {
    // The existing `postAdded` reducer and prepare callback were deleted
    reactionAdded(state, action) {}, // omit logic
    postUpdated(state, action) {} // omit logic
  },
  extraReducers(builder) {
    builder
      // omit the cases for `fetchPosts` and `userLoggedOut`
      .addCase(addNewPost.fulfilled, (state, action) => {
        // We can directly add the new post object to our posts array
        state.posts.push(action.payload)
      })
  }
})

// Remove `postAdded`
export const { postUpdated, reactionAdded } = postsSlice.actions
コンポーネントでのThunk結果の確認
最後に、<AddPostForm>を更新して古いpostAddedアクションの代わりにaddNewPost thunkをディスパッチします。これもサーバーへのAPI呼び出しであるため、時間がかかり失敗する可能性があります。addNewPost() thunkは自動的にpending/fulfilled/rejectedアクションをReduxストアにディスパッチし、これは既に処理済みです。
必要に応じて、postsSlice内で2つ目のローディング状態共用体型を使用してリクエストステータスを追跡することも可能です。ただしこの例では、他の実装方法の可能性を示すため、ローディング状態の追跡をコンポーネントに限定します。
少なくともリクエスト待機中に「投稿を保存」ボタンを無効化し、ユーザーが誤って二重投稿するのを防ぐのが良いでしょう。リクエストが失敗した場合は、フォームにエラーメッセージを表示するか、コンソールに記録することも考えられます。
コンポーネントロジックで非同期thunkの完了を待機し、終了時に結果を確認できます:
import React, { useState } from 'react'

import { useAppDispatch, useAppSelector } from '@/app/hooks'

import { selectCurrentUsername } from '@/features/auth/authSlice'

import { addNewPost } from './postsSlice'

// omit field types

export const AddPostForm = () => {
  const [addRequestStatus, setAddRequestStatus] = useState<'idle' | 'pending'>(
    'idle'
  )

  const dispatch = useAppDispatch()
  const userId = useAppSelector(selectCurrentUsername)!

  const handleSubmit = async (e: React.FormEvent<AddPostFormElements>) => {
    // Prevent server submission
    e.preventDefault()

    const { elements } = e.currentTarget
    const title = elements.postTitle.value
    const content = elements.postContent.value

    const form = e.currentTarget

    try {
      setAddRequestStatus('pending')
      await dispatch(addNewPost({ title, content, user: userId })).unwrap()

      form.reset()
    } catch (err) {
      console.error('Failed to save the post: ', err)
    } finally {
      setAddRequestStatus('idle')
    }
  }

  // omit rendering logic
}
ReactのuseStateフックを使用してローディングステータスを追加できます。これは投稿取得時にpostsSliceでローディング状態を追跡する方法と類似しており、このケースではリクエストが進行中かどうかのみを追跡します。
dispatch(addNewPost())を呼び出すと、非同期thunkはdispatchからPromiseを返します。このPromiseをawaitすることでthunkのリクエスト完了を検知できます。ただし、リクエストが成功したか失敗したかはまだわかりません。
createAsyncThunkは内部でエラーを処理するため、ログに「rejected Promise」メッセージは表示されません。そして最終的にディスパッチされたアクション(成功時はfulfilled、失敗時はrejected)を返します。つまり**await dispatch(someAsyncThunk())は常に「成功」し、結果はアクションオブジェクト自体となります**。
しかし、実際に行われたリクエストの成功/失敗を確認するロジックを書きたい場合が一般的です。Redux Toolkitは返されたPromiseに.unwrap()関数を追加しており、これはfulfilledアクションの実際のaction.payload値を持つ新しいPromiseを返すか、rejectedアクションの場合はエラーをスローします。これにより、コンポーネント内で通常のtry/catchロジックを使用して成功と失敗を処理できます。投稿が正常に作成された場合は入力フィールドをクリアしてフォームをリセットし、失敗した場合はエラーをコンソールに記録します。
addNewPost API呼び出しが失敗した場合の挙動を確認したい場合は、「Content」フィールドに「error」という単語のみ(引用符なし)を入力して新しい投稿を作成してみてください。サーバーがこれを検知して失敗レスポンスを返すため、コンソールにメッセージが記録されます。
学んだこと
非同期処理とデータ取得は常に複雑なトピックです。Redux Toolkitには、典型的なReduxデータ取得パターンを自動化するツールが含まれています。
偽装APIからデータを取得した現在のアプリケーションの外観は次の通りです:
本セクションで学んだ内容を改めてまとめます:
- Reduxは非同期処理を可能にする「ミドルウェア」プラグインを使用
- 標準的な非同期ミドルウェアは
redux-thunkと呼ばれ、Redux Toolkitに含まれる - Thunk関数は引数として
dispatchとgetStateを受け取り、非同期処理の一部として使用可能
- 標準的な非同期ミドルウェアは
- API呼び出しのローディング状態を追跡するために追加アクションをディスパッチ可能
- 典型的なパターン:呼び出し前に「pending」アクションをディスパッチし、データを含む「success」またはエラーを含む「failure」アクションを後続
- ローディング状態は通常、
'idle' | 'pending' | 'succeeded' | 'rejected'のような文字列リテラルのユニオン型で保持
- Redux Toolkitはこれらのアクションを自動ディスパッチする
createAsyncThunkAPIを提供createAsyncThunkはPromiseを返す「ペイロードクリエーター」コールバックを受け入れ、pending/fulfilled/rejectedアクションタイプを自動生成fetchPostsのような生成されたアクションクリエーターは、返されたPromiseに基づいてこれらのアクションをディスパッチcreateSliceのextraReducersフィールドでこれらのアクションタイプをリッスンし、対応するリデューサーで状態を更新可能createAsyncThunkのconditionオプションでRedux状態に基づくリクエストキャンセルが可能- ThunkはPromiseを返却可能。特に
createAsyncThunkでは、await dispatch(someThunk()).unwrap()でコンポーネントレベルでのリクエスト成功/失敗処理が可能
次のステップ
Redux ToolkitのコアAPIと使用パターンに関する最後のトピックがあります。パート6:パフォーマンスとデータ正規化では、Reduxの使用がReactパフォーマンスに与える影響と、アプリケーションのパフォーマンスを最適化する方法について解説します。